Craft Vanilla Candles
- Craft Vanilla Candles: Create a Cozy Haven at Home
- Your Go-To Essential Ingredients Guide for Candle Crafting
- Exploring Professional Cooking Techniques Made Simple
- Pro Tips & Secrets: Crafting Your Perfect Vanilla Candles
- Perfect Presentation: Make Your Candles Eye-Catching
- Storage & Make-Ahead: Keeping the Goodness
- Creative Variations: Get Wild with Your Candle-Crafting
- Complete Nutrition Guide: Scents for the Soul
- Expert FAQ Solutions: What You Need to Know
- Conclusion: Confidence in Your Candle-Crafting Journey
- 📝 Recipe Card
Craft Vanilla Candles: Create a Cozy Haven at Home
Have you ever walked into a room and felt instantly relaxed just by the delicious smell in the air? i remember the first time i lit a homemade candle filled with rich vanilla.
It was like wrapping myself in a warm blanket on a chilly day. you can easily craft vanilla candles | delightful aroma , and trust me, it’s one of the simplest joys that can transform your home into a cozy sanctuary.
So, why not whip up a batch?
Crafting Candles: A Quick look into into the World of Wax
Candle making has been an art form for centuries. historically, people used tallow and beeswax, but nowadays, you’ll find that diy candle making leans heavily on eco-friendly materials like soy wax.
This modern twist makes it easier for all of us to enjoy crafting our little works of scented art. fast forward to now, and these scented candles are making a huge comeback, blending tradition with a touch of contemporary flair.
Plus, who doesn’t love saying they made it themselves?
Worried about the time? relax! this project is super quick only about 45 minutes total with minimal fuss, and you'll whip up four 8-ounce candles .
Easy peasy, right? the best part? it won’t put a dent in your wallet. grab some candle making supplies , and you'll be set!
Why You Should Make Your Own Candles
Okay, let's talk benefits. you might be wondering, "why should i make my own candles?" well, besides the sheer crafting joy, there are some serious perks.
For starters, homemade candles can provide therapeutic benefits. think about it: the warm, comforting scent of vanilla can uplift your mood and create a relaxing ambiance in any space.
They make great gifts, too! a handmade gift shows you care, and who wouldn’t want a beautifully crafted candle? lay it beside a cute tag or a note, and you've got a perfect present.
Or, how about a cozy night in with friends? home baked treats and your custom scented candles will easily sweeten up any gathering.
Plus, let’s not forget the health aspects! using natural candle ingredients like soy wax and vanilla essential oils means you’re avoiding harmful additives that some store-bought candles have.
It’s pretty cool to know that you can create something beautiful that's better for you and the environment. these eco-friendly candles add character to your home while keeping the environment in mind.
Why You’ll Love These Vanilla Candles
Making these candles isn’t just about the final product; it’s also about the journey. picture this: you’re sipping your coffee, melted wax bubbling away, and there’s a gorgeous vanilla fragrance filling the air.
Talk about a mood booster! plus, the experience of candle crafting can be a great stress reliever. it’s all about taking time for yourself, you know?
If you’re throwing a gathering, these cozy candles make for perfect centerpieces. pair them with flower infused candles for a visually appealing setup that’s sure to impress.
And don’t sweat it if you’re a beginner we all start somewhere! the candle cooling process is forgiving, and i promise you’ll learn valuable candle making tips along the way.
Feeling inspired? Let's gather the ingredients and get this candle party started!
Next up, i'll guide you through the list of ingredients you'll need to craft your very own craft vanilla candles | delightful aroma ! remember, it’s all about enjoying the experience just as much as the end result.
Your Go-To Essential Ingredients Guide for Candle Crafting
When it comes to diy projects, you can't go wrong with making your own candles. seriously, crafting your own vanilla candles isn’t just fun; it fills your home with that sweet, warm aroma that immediately makes your space feel cozy.
And let’s not forget all those gorgeous scented candles you can customize to your heart’s content! let’s dive into the essentials you need to consider before you start whipping up those delightful homemade candles.
Premium Core Components
First things first, quality matters . When you're picking your ingredients, aim for the good stuff!
Measurements : If you're using soy wax , you'll need 2 cups (roughly 475 ml). And don’t skimp on that vanilla essential oil —grab about 1 ounce (30 ml).
Quality Indicators : Look for natural candle ingredients . If it smells incredible in the bottle, it’ll smell incredible in your candles. Avoid anything synthetic unless that’s your jam.
Storage Guidelines : Keep your wax cool and dry. Heat can ruin it, and nobody wants a slushy candle mix.
Freshness Tips : Check the expiration dates. Essential oils lose their potency over time. The fresher, the better!
Signature Seasoning Blend
Alright, let’s spice things up figuratively and literally!
Essential Spice Combinations : Ever think about mixing vanilla with a hint of cinnamon? Trust me, it’s divine.
Herb Selections : Dried flowers like lavender or rose petals can elevate your candle game. Plus, they look stunning in the container!
Regional Variations : If you're feeling adventurous, try using a pinch of citrus zest or even some eucalyptus for a fresh twist.
Flavor Enhancers : Those fragrant decorative candles really pop with some aromatic herbs. Get creative; it’s your candle!
Smart Substitutions
Sometimes, the recipe won’t go as planned (we’ve all been there, right?).
Common Alternatives : If you can’t find soy wax, use beeswax! Just note, it might burn differently.
Dietary Modifications : For beeswax ensoiasts, it can be a bit pricier, but boy, those eco-friendly candles are worth every penny!
Emergency Replacements : Don’t have essential oils? You can use fragrance oils, but just be wary some might not offer the best throw.
Seasonal Options : Right now, I’m digging scents like pumpkin spice and cedarwood in the fall. It’s like a warm hug!
Kitchen Equipment Essentials
Before you start melting wax, let’s talk tools:
Must Have Tools : A double boiler is gold for this. If you don’t have one, a microwave safe bowl works too.
Alternative Equipment Options : A good ol’ glass jar can double as your melting vessel.
Preparation Tips : Always make sure your containers are clean and dried. Nobody wants funky candle remnants!
Storage Solutions : Once you’ve made your beautiful handmade gifts , store them in a cool place this keeps them fresh and fragrant.
Making candles is a journey, not a race. there’s a learning curve with those melting wax techniques and wick trimming but that’s all part of the fun adventure! so, gather your candle making supplies , pick a cozy spot, and get ready to indulge in some relaxation.
Stay tuned for the section where i break down the steps of actually creating your very own craft vanilla candles | delightful aroma .
Trust me once you light one, you’ll never want to go back to store-bought! get ready to transform your space into a fragrant oasis.
Exploring Professional Cooking Techniques Made Simple
Alright, friends! today, we’re diving into some professional cooking methods but don’t worry, i promise to keep it casual and easy to digest.
Professional cooking can seem intense, but with some solid techniques and tips, you’ll be whipping up meals like you’re in a fancy restaurant in no time.
Let’s get cooking!
Essential Preparation Steps
First up is a concept every pro chef lives by: mise en place. fancy french term for “everything in its place.
” before you start cooking, gather all your ingredients and tools. it’s about setting yourself up for success. trust me, nothing’s worse than realizing you’ve run out of garlic halfway through making your famous lasagna!
Now, let’s chat about time management. set a timer for each step (like cutting veggies or stirring sauces) to keep you on track.
It’s sooo easy to lose track of time when you’re in the kitchen, right?
Organization strategies are essential too. keep your workspace neat. use small bowls to hold chopped items before tossing them into the frying pan.
It makes cooking feel less chaotic and can even speed up your process. also, don’t overlook safety considerations. always keep a clean area and handle knives with care.
It’s about cooking with confidence!
step-by-step Process
For the best results, let’s break it down into clear, numbered instructions:
- Preparation: Gather all your ingredients and tools.
- Temperature Control: Keep an eye on your stove temp. A general rule? Keep sautéing on medium high heat; this usually means somewhere around 375° F ( 190° C) .
- Timing Precision: For perfect veggies, you typically want to sauté them for about 5- 7 minutes until tender but still crisp.
- Visual Cues for Doneness: Learn to recognize the signs! Chicken should be golden brown (no one likes rubbery fowl), while pasta should be al dente (you know, firm to the bite).
Expert Techniques
Now, let’s get into some pro tricks that’ll elevate your cooking game. First up, always taste as you go! Add seasonings in small amounts. A pinch of salt goes a long way!
Next, let’s talk about critical steps. For a great sear on your meat, make sure your pan is hot before adding it in. Think of the sound! You should hear a sizzle.
Quality checkpoints are vital too. Invest in a good quality thermometer for meats aim for about 165° F ( 74° C) for poultry.
Got an issue? Don’t sweat it! Troubleshooting tips can save the day. If your sauce is too thick, just add a splash of broth to loosen it up. Voila!
Success Strategies
Hey, we all make mistakes; it’s part of cooking! Here are a few common missteps to avoid:
- Forgetting to prep before you start cooking. Set those ingredients out first!
- Overcrowding the pan. It leads to steaming instead of browning. Don’t rush the process.
For quality assurance tips, always double check your seasoning. You can always add more, but you can't take it away!
And if you're planning ahead? Try those make-ahead options . Soups and stews actually get better with time. Make a big batch on Sunday, and you’ll be set for the week.
Wrap-Up & Transition
Whew! that’s a lot to digest, but mastering these professional cooking methods makes a world of difference in the kitchen.
Plus, once you get comfortable with these tips, you might even find yourself inspired to try other creative projects, like craft vanilla candles | delightful aroma !
So, if you ever think about tapping into your crafting side, making homemade candles can be a cozy activity to pair with your cooking adventures.
They can fill your space with mood boosting scents and make for fantastic gifts, trust me! candle crafting can turn your home into a fragrant sanctuary.
Stay tuned for my next post, where i’ll share some delightful candle recipes and tips to enhance your home fragrance experience.
Who knew cooking and crafting could go hand-in-hand? let’s keep this creative kitchen journey going together!
Pro Tips & Secrets: Crafting Your Perfect Vanilla Candles
First things first , let’s talk about the beauty of crafting your own candles right at home. oh my gosh! the sense of accomplishment is off the charts! when you dive into this diy candle making world, the first tip i gotta share is about time saving techniques .
Now, no one wants to be stuck melting wax forever, right? so, invest in a double boiler or just pop those soy wax flakes in the microwave in short bursts.
This approach speeds things up, and you’re less likely to burn your wax. we don’t want crispy candles!
Chef’s secret insight? use a thermometer ! checking that wax is around 185° f ( 85° c) before adding your delicious vanilla essential oil ensures you lock in those fragrant notes.
The last thing you want is to lose that cozy aroma by overheating.
And for those looking to enhance flavors let me tell you, blending in other essential oils like cinnamon or lavender can take your candle game to another level. Get creative, my friend!
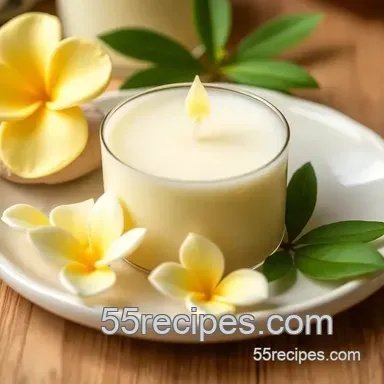
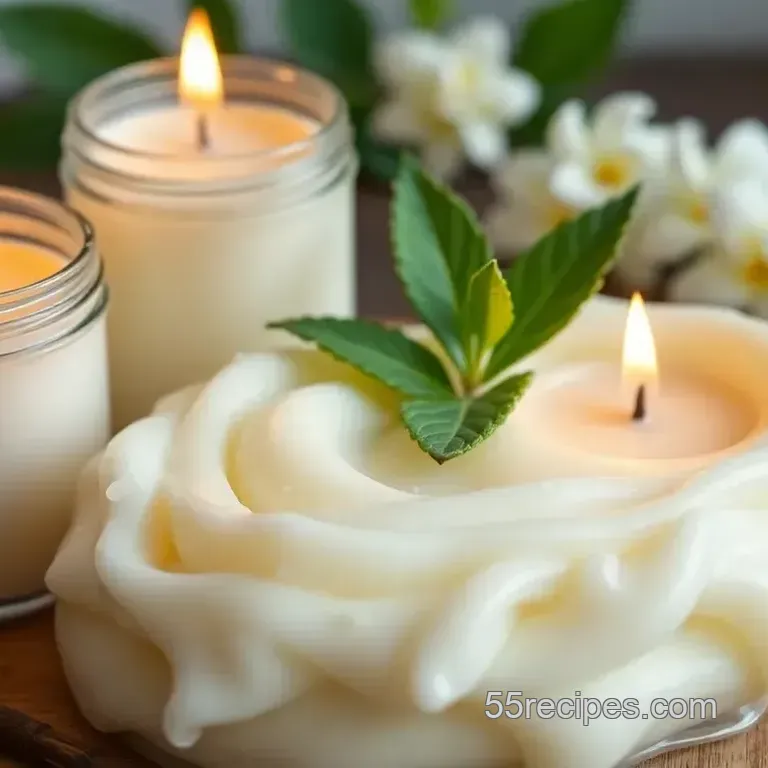
Perfect Presentation: Make Your Candles Eye-Catching
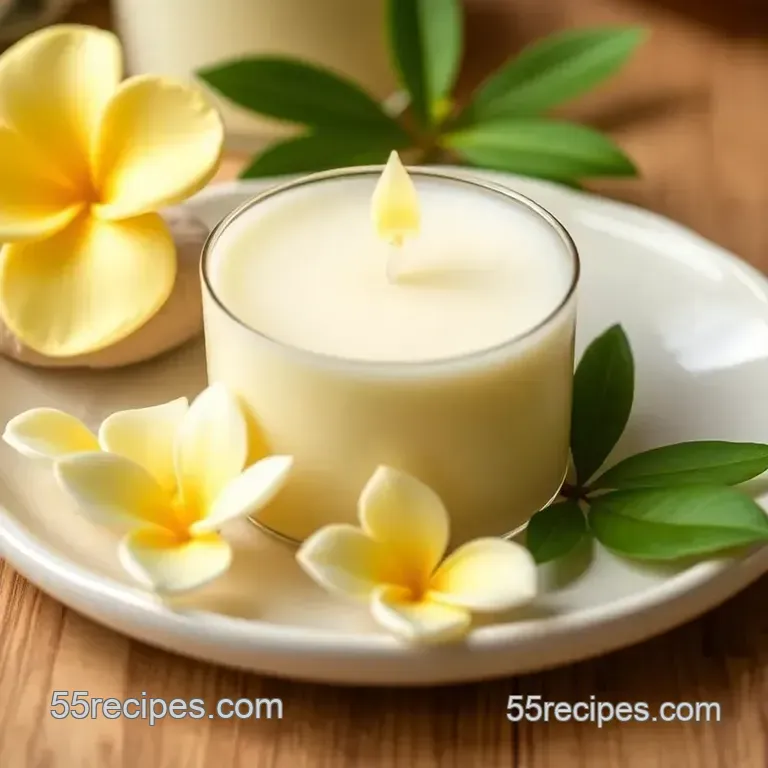
Alright, let's move on to presentation. i mean, who doesn’t want candles that look as good as they smell? here’s where some plating techniques come into play.
When pouring your wax, leave about half an inch at the top this gives you space for a delightful touch of dried flowers or herbs .
Picture that: your candles glowing, topped with tiny blossoms. such a cozy home décor moment!
Color combinations matter too! try contrasting colors for your glass jars. if the jar is see-through, a light colored wax peeking through can look fab.
Remember, visual appeal goes a long way, especially if you plan to give them away as handmade gifts or for your next dinner party.
Storage & make-ahead: Keeping the Goodness
So, you’ve crafted these fabulous candles, but now what? let’s chat about storage guidelines . keep your candles in a cool, dry place, away from direct sunlight, to avoid them melting or losing scent.
Honestly , if they’re stored well, they can last for months. they won't spoil but will maintain their delicious aroma!
If you’re the kind who loves making things ahead, try letting your candles cure for a few days before lighting them.
This gives those scents time to mingle and deepen. for reheating , just pop them back on a double boiler to bring them back to life, but always keep an eye on 'em!
Creative Variations: Get Wild with Your Candle Crafting
Now, let’s talk creative variations ! want to change it up? try different scents! you can absolutely adapt your candle recipe with seasonal twists.
Think pumpkin spice in the fall or peppermint during the holidays yum!
And don’t shy away from dietary modifications - if you’re someone who prefers eco-friendly candles, you’re already on the right track using soy wax ! but if you want something a bit different, try beeswax.
I mean, bees are just doing their thing, right?
Save some money and experiment with your candle making supplies ! use whatever container you’ve got lying around, and get crafty with decoration ideas.
I once used old teacups for a vintage vibe, and it was such a hit!
Complete Nutrition Guide: Scents for the Soul
Alright, so candles don’t have nudging nutritional information like food, but hear me out! the health benefits of these scents can’t be overstated.
Vanilla is known to have mood boosting properties, creating a relaxing ambiance when lit. embrace that calming factor!
And since we’re talking about portion guidance, if you’re breaking it down for friends, consider how many candles you’re gifting. Always a good idea to have extra, right?
Expert FAQ Solutions: What You Need to Know
Let’s wrap things up with an expert faq section . a burning question (pun intended): what if my wick isn’t staying centered? try using a pencil or chopstick to hold it in place while the wax cools.
Struggling with scent throw? if your candles aren’t fragrant enough, it's likely that you either didn’t add enough essential oils or didn’t mix well.
Remember those scent blending techniques we talked about earlier? keep experimenting until you find that sweet spot.
Conclusion: Confidence in Your Candle Crafting Journey
So here we are, ready to light those Craft Vanilla Candles | Delightful Aroma ! You’ve navigated through pro tips, perfect presentation, storage secrets, and all those creative variations.
Honestly, i can’t wait for you to start crafting your own vanilla scented magic! whether it’s for yourself or thoughtful gifts for loved ones, you’re going to spread that cozy vibe everywhere.
So, light 'em up and let the warm aroma fill your space! happy crafting!
Craft Vanilla Candles Delightful Aroma