Bbq Ribs: the Ultimate Fork-Tender Oven Method
- Achieving the Perfect 'Fork-Tender' Rib Experience
- The Science Behind Succulent Texture and Deep Flavor
- Essential Components for Your BBQ Ribs
- Step-by-Step Guide to Mastering Your Ribs
- Troubleshooting and Expert Secrets for Perfect Ribs
- Managing Leftovers: Storage and Reheating Guide
- Perfect Side Dish Pairings
- Recipe FAQs
- 📝 Recipe Card
Achieving the Perfect 'Fork Tender' Rib Experience
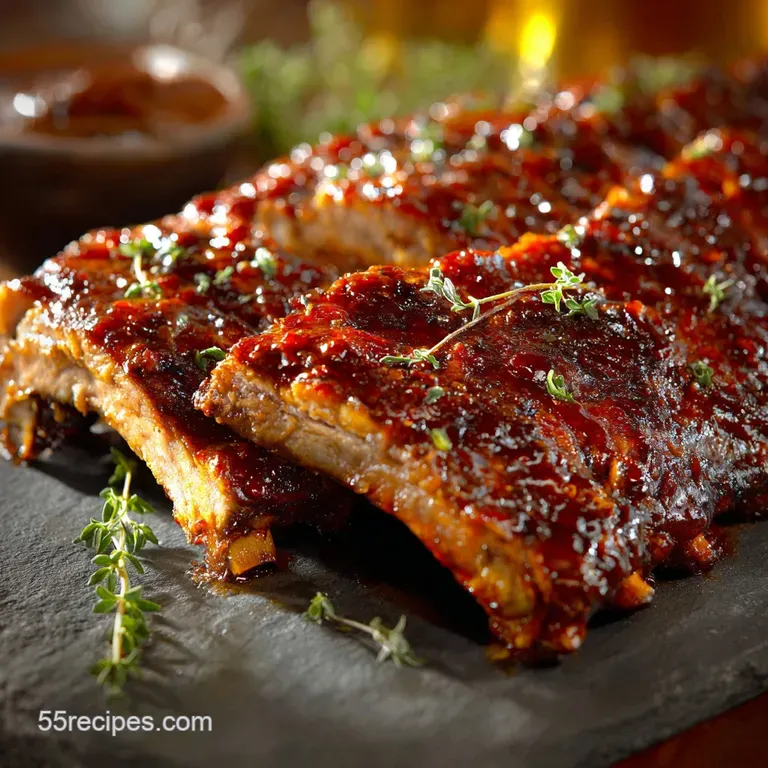
The moment that smoky, sweet, and deeply savory aroma starts wafting through your house, you know you’re winning. That’s the smell of truly phenomenal BBQ ribs coming to life, right in your everyday oven.
I swear, the texture we are aiming for here that glorious, sticky bark followed by meat so tender it pulls cleanly from the bone is pure magic.
You don't need a thousand dollar smoker or twelve hours in the backyard to achieve this level of flavor. This low and slow oven method is a total lifesaver, delivering competition level results with minimal fuss. It’s perfect for feeding a crowd and infinitely cheaper than buying them at a smokehouse.
Trust me, once you nail this process, you’ll be making your own BBQ ribs every weekend.
We’re ditching the grill today and embracing the consistent heat of the oven, coupled with a tight foil wrap that steams the meat into absolute submission. We’ll finish with a over high heat blast to achieve that perfect, caramelized glaze.
Let's dive in and learn how to make the best BBQ ribs recipe you’ve ever tasted.
The Science Behind Succulent Texture and Deep Flavor
The Myth of Falling Off-The-Bone
Okay, let’s get something straight right off the bat: "Falling off-the-bone" means they are technically overcooked . That texture means the collagen has been entirely melted away, turning the muscle fibers mushy.
If your goal is true competition style BBQ ribs , you want them "fork tender." This means the meat should cling lightly to the bone, offering just a tiny, gentle resistance before releasing completely. It’s a clean bite.
That’s the sweet spot we are aiming for with this BBQ ribs recipe.
Why the Low and Slow Method Reigns Supreme
Ribs are packed with connective tissue, known as collagen. If you cook them quickly, that collagen shrinks, squeezes out all the moisture, and leaves you with tough, chewy meat. Nobody wants that. Cooking low (250°F or less) and slow (3+ hours) gives the collagen enough time to slowly dissolve and melt.
It transforms into gelatin, lubricating the muscle fibers from the inside out. This makes the meat incredibly moist and tender.
Understanding the St. Louis Cut Advantage
We specifically use St. Louis style ribs here. They are essentially spareribs, trimmed neatly into a rectangular shape by removing the cartilage and uneven ends. Why St. Louis? They have a great meat-to-fat ratio and cook much more evenly than uneven racks.
They are slightly fattier than baby backs, which means they stay far moister during the lengthy cooking process required for perfect BBQ ribs .
The Role of Moisture: Steaming for Tenderness
The most crucial step in the oven method is the "foil wrap," also known as the braise or steam bath. After the initial dry cooking phase sets the rub, we seal the ribs tightly with a splash of liquid, like apple cider vinegar. This trapped moisture cooks the ribs gently from the outside in.
This ensures every molecule of tough collagen breaks down. This steaming stage is critical for truly fork tender bbq ribs when cooking indoors.
The Maillard Reaction and Dry Rub Penetration
The dry rub needs time to penetrate the meat, and the initial, unwrapped cooking phase allows the rub’s sugars and spices to mingle with the rendered fat. This creates what we call the bark . That dark, crunchy exterior is the Maillard reaction doing its magic.
We need this crust to be stable before we introduce the moisture.
The 3 2-1 Ratio Simplified for the Home Oven
The traditional smoking method uses a 3 2-1 ratio ( 3 hours dry smoke, 2 hours wrapped, 1 hour sauced). For the oven, we adjust slightly because the heat is less intense and more stable.
We use a 2 hour 15 minute dry cook (to set the bark), followed by a 1 hour 30 minute wrap (the steaming phase). Finally, we finish with 15 minutes unwrapped for glazing.
This adjusted ratio creates amazing bbq ribs in oven .
Essential Components for Your BBQ Ribs
Selecting the Ideal Rack: St. Louis vs. Baby Back
Choosing the right cut is half the battle when making homemade bbq ribs . I highly recommend the St. Louis cut (Spareribs). Look for racks that have good, even fat marbling and thick, uniform meat along the bones.
Avoid "shiners" ribs where the bone is exposed as they tend to dry out quickly. If you prefer Baby Backs, know that they are leaner and will cook faster. You’ll need to adjust the middle cooking phase downward, perhaps by 30 to 45 minutes.
The Ultimate Spice Rub Components
The rub is the soul of these BBQ ribs . It needs a balance of sweet, salty, and savory, with a hint of heat. We rely heavily on dark brown sugar because it contributes fantastic moisture and caramelization.
Smoked paprika is non-negotiable; it provides the deep, smoky flavor we lose by cooking indoors.
| Ingredient | Role | Substitution Tip |
|---|---|---|
| Dark Brown Sugar | Sweetener, promotes sticky bark | Use half white sugar + 1 Tbsp molasses. |
| Smoked Paprika | Provides "smoke" flavor and color | Use regular paprika + a dash of liquid smoke in the braising liquid. |
| Kosher Salt | Essential for seasoning and retaining moisture | Use fine sea salt, but reduce quantity by 20%. |
| Mustard (Binder) | Helps rub adhere, flavor cooks off | Use olive oil, but the adherence isn't quite as strong. |
| Apple Cider Vinegar | Crucial braising liquid for moisture | Beer (lager or pale ale) works well, imparting a malty flavor. |
A Note on Homemade vs. store-bought Sauce
Look, I am all for homemade sauces, but sometimes life is too short. For these easy bbq ribs , a high-quality store-bought sauce is perfectly acceptable, even preferred, if it’s a good one.
You want something thick, slightly sweet (Kansas City style is ideal), and robust enough to stand up to the heavily seasoned meat. Pro Tip: If your favorite sauce is too thin, simmer it gently for 15 minutes to reduce and thicken it before glazing.
Must Have Equipment Check
You really don't need much. Heavy duty foil is a must; the cheap stuff will rip, causing the precious steam to escape. A simple wire rack is excellent because it allows air to circulate around the ribs during the initial dry cook, preventing a soggy bottom. For those of you who want to finish these outside for maximum char, you can transfer the unwrapped racks to the grill after the oven steam stage. If you're tackling BBQ ribs on the grill from the start, check out my full guide on FallOffTheBone Grilled Ribs on a Gas Grill .
step-by-step Guide to Mastering Your Ribs
Before we crack on, remember this process relies heavily on temperature control and patience. Don't rush these BBQ ribs .
Preparation Phase: Trimming and Membrane Removal
- Prep the Meat: Pat the ribs thoroughly dry with paper towels. Seriously, moisture is the enemy of a good crust.
- Remove the Membrane (Non-Negotiable): This is the single most important step for tender ribs! Flip the rack meat side down. Locate the thin, silvery membrane (silverskin) on the bone side. Use a small knife to gently lift it up near the end bone. Grab it with a paper towel or kitchen cloth (it’s slippery!) and pull it off in one go. If you leave it, your finished BBQ ribs will be tough and chewy.
- Apply Binder: Spread a thin layer of yellow mustard evenly across the meat side and bone side. Don’t worry; you won't taste it.
- Rub It Down: Mix your dry rub components thoroughly. Apply the rub aggressively and press it firmly into all surfaces. We are building a fortress of flavor here.
- Rest: If you have time, let the rubbed ribs sit uncovered in the fridge for 30 minutes. This allows the salt to start drawing moisture out, which then mixes with the rub, forming a thick paste called a pellicle .
Stage 1: The Flavor Foundation (Rub Application and Rest)
Preheat your oven to 250°F (120°C). Place the rubbed ribs meat side up on a wire rack set over a baking sheet. Cook for 2 hours and 15 minutes undisturbed.
This is the "smoke" phase, setting the bark and developing deep color on your BBQ ribs .
Stage 2: The Oven Steam Bath
- Prepare the Wrap: Lay out two huge sheets of heavy duty foil per rack. Stack them to prevent tearing.
- Seal and Moisten: Place the ribs meat side up on the foil. Pour half of the ACV/water mixture (1/4 cup ACV, 1/4 cup water) around the base of the rack. This is crucial for keeping them moist.
- Tight Seal: Crimp the foil edges tightly, creating an airtight pouch. You are essentially turning your oven into a massive, low-temperature pressure cooker. Return the wrapped bbq ribs in oven and reduce the temperature to 225°F (107°C). Cook for 1 hour 30 minutes.
Chef’s Note: Do NOT open the foil during this phase. That trapped steam is what creates the gelatin and the fork tender texture we crave. Patience, friend!
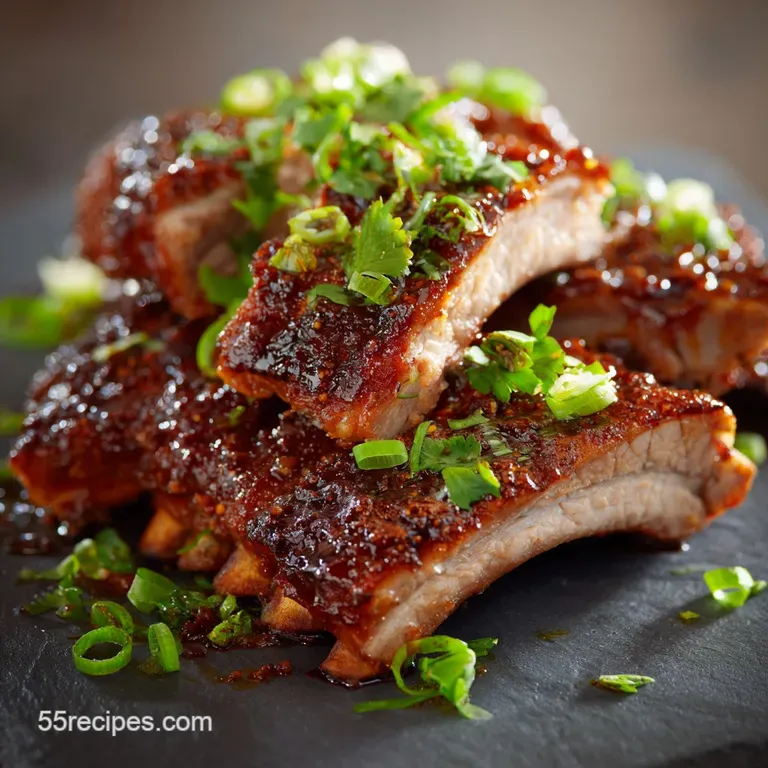
Stage 3: Glazing and Finishing Under High Heat
- Unwrap and Test: Carefully remove the foil packets (watch out for superheated steam!). Gently lift the ribs out and place them back on the wire rack/baking sheet.
- First Glaze: Brush the entire top surface heavily with your favorite BBQ sauce.
- Finish: Increase the oven temperature to 400°F (200°C). Return the sauced BBQ ribs to the oven for 10– 15 minutes. The high heat caramelizes the sugars in the sauce, creating that beautiful, sticky, tacky bark. If you want maximum stickiness, apply a second, lighter coat of sauce halfway through the finishing time.
Troubleshooting and Expert Secrets for Perfect Ribs
Making best bbq ribs recipe is easy, but there are two main failure points I see home cooks make constantly.
The Danger Zone: Why Your Ribs Are Dry
If your BBQ ribs came out tough and dry, you likely committed one of two cardinal sins. First, you might have skipped the foil wrap it is the oven cook’s best friend for moisture retention. Second, you might have cooked them too hot during the unwrapped phase.
If the internal temperature gets above 210°F (99°C), the rendered fat and gelatin start squeezing out, leaving the meat dry and stringy. Keep the oven temperature low and steady. I once rushed this and ended up with flavorless shoe leather. Never again!
Testing for Readiness: The Bend Test Technique
Forget checking the internal temperature for a moment, although 200°F 205°F (93°C 96°C) is the technical target. The real test is the bend test . Carefully lift one end of the rack with tongs.
If the ribs are ready, the rack should arc into a gentle U shape and the surface should crack right in the middle, revealing the moist meat below. If it’s stiff and doesn’t break, cook them for another 15– 30 minutes wrapped.
If it immediately disintegrates, they are slightly overdone, but still tasty!
Managing Leftovers: Storage and Reheating Guide
You might think that after all this work, you won't have leftovers, but trust me, knowing how to handle extra BBQ ribs is a great skill.
Safe Cooling and Refrigeration Methods
Cool your cooked BBQ ribs rapidly. If you leave a whole rack out, it can stay warm too long and become unsafe. Slice the ribs and store them immediately in an airtight container in the fridge. They will last safely for 3 to 4 days.
If the ribs were sauced, you'll notice the sauce firms up slightly when chilled.
How to Freeze Uncooked and Cooked Racks
You can absolutely freeze both raw and cooked racks. For cooked ribs, I recommend freezing them before applying the final glaze. Wrap the finished, un-sauced rack tightly in plastic wrap, followed by a layer of heavy duty foil. They will last beautifully for up to 3 months. When ready to eat, thaw overnight in the fridge and proceed with the over high heat glazing stage. If you're looking for different types of frozen ribs, you could even try my recipe for Crispy Fried Ribs My Chippy Tea Take on Cantonese Style which freeze well before frying!
Best Practices for Reheating Ribs
Reheating properly ensures your leftover BBQ ribs are just as good as the first night. The microwave is a terrible idea it steams them and makes them rubbery.
- Oven Method: Preheat the oven to 250°F (120°C). Wrap the ribs tightly in foil with a tablespoon of water or apple juice added to the bottom to create steam. Heat for 20– 25 minutes until warmed through (165°F/74°C internal).
- Finish: Open the foil, brush with fresh sauce, and crank the heat to 400°F (200°C) for 5 minutes to set the glaze again.
Perfect Side Dish Pairings
What do you serve alongside world class BBQ ribs ? You need sides that cut through the richness and complement the smoke, not compete with it.
Classic Southern Sides That Complement Smoke
Baked beans are the obvious choice, but elevate them! Add in a diced jalapeño and some bacon ends to your baked beans recipe for extra depth. Creamy potato salad is mandatory; skip the overly vinegary version and opt for one with plenty of mayo, egg, and mustard.
That cooling texture is the perfect contrast to the sticky BBQ ribs .
Salad and Slaw Choices to Cut the Richness
Every great BBQ meal needs something bright and acidic to balance the sweetness of the glaze. A sharp, vinegar based coleslaw is the answer. It provides crunch and a tangy bite that resets your palate between mouthfuls of the savory bbq ribs recipe oven creation.
You could also serve a simple cucumber and onion salad tossed in a light vinegar dressing.
Beverage Pairings: Beer, Wine, and Soft Drinks
For beer, stick to something crisp. A hoppy Pale Ale or a light Lager cuts through the fat beautifully. If wine is your preference, a low-tannin Zinfandel or a slightly chilled, fruity Beaujolais is robust enough to handle the strong flavors without being overwhelmed.
And if you’re keeping it classic, nothing beats an ice-cold, sweet iced tea served in a frosty glass! Now go forth and enjoy your spectacular BBQ ribs !

Recipe FAQs
Why are my ribs tough or dry after following the low-and-slow method?
If the ribs are tough, they simply needed more time; tenderness is achieved during the low-temperature wrapped cooking stage. Dryness often results from cooking slightly too hot or not ensuring enough moisture (like apple cider vinegar or broth) was added to the foil packet before sealing.
Always monitor your oven temperature with a separate thermometer to ensure accuracy.
Is it truly necessary to remove the silver skin (membrane) from the back of the ribs?
Yes, removing the membrane is a critical step for achieving optimal texture and flavor absorption. If left on, it cooks down into a tough, plastic like layer that prevents the seasoning rub from penetrating the meat.
To remove it easily, slide a dull knife under the membrane on one end and pull it off using a paper towel for grip.
Can I use Baby Back Ribs instead of St. Louis Style ribs for this recipe?
Absolutely, you can substitute Baby Back ribs, but be prepared to adjust the cooking time downward. Baby Backs are smaller, leaner, and cook faster, usually requiring 30 to 60 minutes less time during the wrapped stage. Focus on the internal "bend test" rather than strict time to determine when they are truly tender.
How do I know when the ribs are perfectly "fork tender" but not "falling off the bone"?
The best indicator is the "bend test": lift the rack of ribs in the center using tongs; if the rack bends significantly and the surface cracks (indicating the meat is pulling apart), they are done.
The meat should pull clean from the bone with a slight tug, signifying that essential "bite" is maintained without being tough.
When is the right time to apply the BBQ sauce, and how do I prevent it from burning?
Apply the BBQ sauce only during the final 30 to 45 minutes of cooking, after the ribs have been unwrapped from the foil. This timing allows the sauce to caramelize and become tacky without burning the sugars in the glaze.
If using a very sugary sauce, keep the oven temperature below 300°F during this final glazing step.
What is the best way to store leftover cooked ribs, and can I freeze them?
Store leftover ribs tightly wrapped in aluminum foil or in an airtight container in the refrigerator for up to four days. You can also freeze them: wrap the individual portions tightly in foil, place them inside a large freezer bag, and they will keep well for up to three months.
To reheat, thaw overnight and warm gently in a 300°F oven.
Should I rinse the ribs before applying the dry rub seasoning?
No, rinsing raw meat like ribs is generally discouraged as it promotes cross contamination by splashing bacteria onto your sink and surrounding kitchen surfaces. Instead, simply pat the ribs very thoroughly with paper towels to ensure the surface is dry.
This dryness is key for allowing the rub to form a robust crust (or bark) during cooking.
Fork Tender Oven Bbq Ribs
Ingredients:
Instructions:
Nutrition Facts:
| Calories | 421 kcal |
|---|---|
| Protein | 25.6 g |
| Fat | 18.0 g |
| Carbs | 45.2 g |
