Homemade Eskimo Pie Popsicles — Frozen Chocolate & Creamy Vanilla Delight
Ever since i was a kid, i’d get this rush of excitement the moment summer was near. no joke, i’d start dreaming about my favorite ice cream treats the classic ice cream bars, those chilled, chocolate coated goodies that just scream nostalgic summer treats.
But honestly, nothing beats making your own at home. that way, you get to customize, control the ingredients, and even get the kids involved.
It’s just fun, y’know? and trust me, if you’re craving that perfect combo of creamy vanilla ice cream dipped in glossy chocolate, the best homemade eskimo pie popsicle recipe is a total game changer.
These diy pops are more than just a sweet escape they’ve got history. the eskimo pie, born in the early 1920s, brought a chocolate coating to good old vanilla ice cream, making it an instant hit.
Over the years, it’s become a symbol of cool summer vibes and comfort food at its finest. today, they’re still incredibly popular, especially when the sun’s blazing and you want something sweet, chilled, and satisfying.
Best part? making them at home is super simple, and you don’t need fancy skills. it’s all about throwing together a few basic ingredients, patiently waiting for the freezer, and voilà your own ice cream on a stick, coated in luscious chocolate.
Now, let’s talk time and effort. honestly, you’re probably looking at around 15 minutes active prep, and then it’s just a matter of waiting for the magic to happen in the freezer.
In total, the whole process takes about two hours or so, but most of that is just waiting. the difficulty? it’s no sweat.
Even a beginner home cook can pull this off because it’s straightforward just a little melting, dipping, and freezing. and hey, if you’re watching your budget, making your own popsicles is way cheaper than buying those fancy shop bought ones.
Plus, the ingredients are simple: vanilla ice cream, chocolate chips, maybe some optional sprinkles or nuts. budget friendly and totally customizable what’s not to love?
One of the biggest wins here? the health perks. you control the ingredients, so you can opt for healthier options like dairy-free ice cream or vegan chocolate to make these treats suitable for various diets.
They’re also a good way to sneak in some natural ingredients and avoid preservatives found in store-bought options. plus, these homemade frozen desserts are a hit on any family friendly dessert table or summer party.
They’re perfect for kids’ ice cream snacks, but let’s be honest they’re equally delightful for grownups craving a quick, nostalgic sugar rush.
And honestly, they beat store-bought popsicles any day, thanks to that rich chocolate coating and creamy interior.
If you’re into experimenting, this recipe is super flexible. you can swap vanilla ice cream for chocolate, strawberry, or even swirl in some caramel or fudge.
Want dairy-free or vegan options? no worries! coconut milk or almond milk ice cream works like a charm, and there are plenty of dairy-free chocolates out there, too.
Think of it as a chance to make a truly customizable popsicle recipe a treat that’s not only refreshing and fun but also healthier and exactly what you want.
Ready to dive into the ingredient list? first, you need some good vanilla ice cream, then melt some chocolate chips with a little coconut oil or shortening for that shiny, perfect chocolate coating.
Popsicle molds and sticks are obvious must haves, and a tray lined with parchment makes cleanup a breeze. once you’ve got your ingredients ready, the real fun begins mixing, freezing, dipping, and enjoying.
Just wait till you taste that first bite smooth vanilla center with that crisp chocolate shell? honestly, it’s like a bite of childhood.
So, if you’re looking for a fun and totally doable recipe, this homemade eskimo pie popsicle recipe is it . it’s simple, adaptable, and most importantly, seriously yummy.
Perfect for summer, parties, or whenever you need a quick freeze-to-face treat. next up? let’s get into the ingredients so you can start creating your own frozen masterpiece!
Hey there, fellow dessert lovers! so, i recently tackled what i can officially call the best homemade eskimo pie popsicle trust me, it’s a total game changer for summer snack time.
Nothing beats biting into that crispy chocolate shell and having rich vanilla ice cream melt in your mouth. and honestly, putting my own spin on this classic was a blast.
You know how nostalgic it is, right? that cool, creamy, chocolate coated ice cream that just screams summer fun? yep, that’s what we’re making today!
Before diving into the actual recipe, i want to chat about some essential ingredients and tips that’ll make your popsicle game next level.
These little nuggets might seem basic, but trust me, choosing quality ingredients and understanding some kitchen secrets can seriously make a difference.
First off, let’s talk core components. you want vanilla ice cream . no skimping on quality here look for full fat vanilla ice cream because it’s creamier and gives a richer taste.
I usually go for store-bought or whip up my own batch, but honestly, good old vanilla ice cream in the freezer works just fine.
Make sure it’s cold and firm before you're ready to dip. a tip from my own trials: always let your ice cream sit out for a few minutes to soften just slightly makes the coating process smoother, and avoids cracking.
Now, onto the chocolate. i love a good, semi sweet chocolate chip bag easy to melt and melt smoothly. for that glossy finish , add a couple of tablespoons of coconut oil or vegetable shortening.
This trick makes your coating super shiny and helps it set crispy without looking dull or chalky. melt in short bursts in the microwave or use a double boiler i swear, patience here pays off because burned chocolate? no thanks.
Storage? oh yeah, this is key. keep your popsicles in an airtight container in the freezer. once coated, i always pop them back in for at least 30 mins to an hour until the shell is firm.
That way, when you bite in, everything stays intact no melty mess!
Now, what about that special signature seasoning blend ? honestly, i stick with simple. good quality cocoa and maybe a pinch of sea salt in the chocolate do wonders.
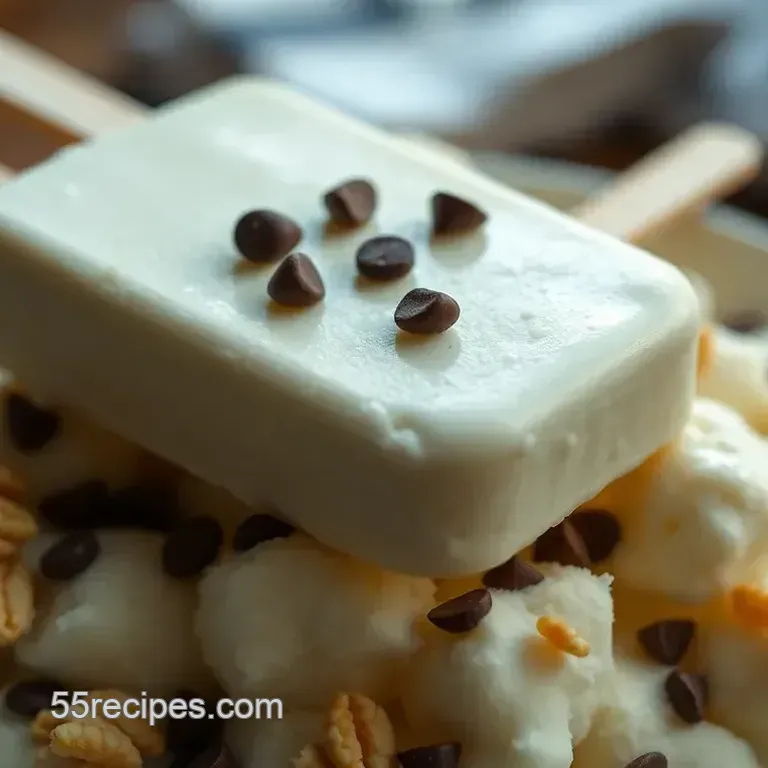
If you’re feeling fancy, sprinkle some crushed nuts or sprinkles while the chocolate is still tacky. it adds that fun texture and makes your popsicles look super pretty.
But regional variations? absolutely! some folks prefer a dash of cinnamon in the coating for a bit of spice, or even a sprinkle of chili powder for that sweet and spicy vibe.
Thinking about substitutions? no worries. if you’re dairy-free or vegan, totally substitute with vegan ice cream coconut milk based works beautifully, and dairy-free chocolates are easier to find than ever.
If you’re short on time, just make quick homemade ice cream lollipops with some frozen yogurt or plant based options. and, hey, if you don’t have a proper mold, a paper cup still works in a pinch just peel it away carefully when frozen!
Lastly, the kitchen gear i swear by silicone molds these days. they’re so easy to unmold and cleanup is a breeze.
If you’re using wooden skewers, make sure they’re sturdy and handle the cold without wobbling. melting the chocolate in a microwave safe bowl? keep a spatula handy to stir and avoid clumps.
When storing, lay your pops flat in a tray so the coating doesn’t crack or chip.
Getting this all dialed in might seem a bit much at first, but honestly, once you try it? you’ll be hooked.
It makes for an awesome summer treat, perfect for kids’ ice cream snacks, or even a cool party favor. plus, it’s pretty satisfying to say you made your own eskimo pie popsicles and they taste way better than store-bought because, well, you made them your way .
Alright, enough tech talk let’s get ready to whip up these chilled beauties. next stop: the step-by-step instructions that will walk you through making your very own homemade eskimo pie popsicle , guaranteed to wow everyone.
Trust me, it’s simple , fun, and totally customizable. let’s do this!
Alright, let’s dive into the magic of making the best homemade eskimo pie popsicle a nostalgic summer treat with a creamy vanilla center and that perfect glossy chocolate shell.
Honestly, i’ve made this a dozen times with my kids, and let me tell you, once you get the hang of it, it’s totally addictive.
Plus, it’s way more fun and way healthier (or at least customizable) than buying those classic ice cream bars at the store.
First thing, let’s talk professional cooking method making sure you get that smooth, shiny chocolate coat and perfectly frozen ice cream core every time.
I’ve learned a few tricks along the way, and i want to share my tips so your popsicles turn out gorgeous and delicious.
Essential Preparation Steps
Before you even pack that freezer full of ice cream, you’ve gotta mise en place like a pro. it’s just fancy french talk for everything in its place.
Chill your ice cream in the freezer, get your molds ready, and melt your chocolate. i keep my chocolate melt in a microwave safe bowl 30 seconds, stir, repeat until it’s super smooth.
Coconut oil or shortening helps it get that shiny finish. oh, and line your tray with parchment paper because sticky chocolate is a nightmare to clean up.
Time management is key here. freeze your ice cream at least 2 hours (or overnight if you want to be super prepared).
Have your melted chocolate ready before the pops are fully frozen so you can dip immediately. this prevents the ice cream from melting or getting uneven nobody wants chunky chocolate patches.
Organization is everything. have your molds, sticks, and toppings handy. i like to keep crushed nuts or sprinkles ready for a quick sprinkle right after coating adds a little pop of texture and color.
Also, if you’re making a bunch, work in batches. no one wants soggy or melted popsicles when you’re ready to serve.
And of course, safety considerations always use clean utensils, don’t leave dairy out too long (bacteria loves warm temps), and keep an eye on melting chocolate.
If it gets too hot, it will seize or turn dull. patience, my friend, is part of the process.
step-by-step Process
Here’s my fool proof way to get those perfect Eskimo Pie pops :
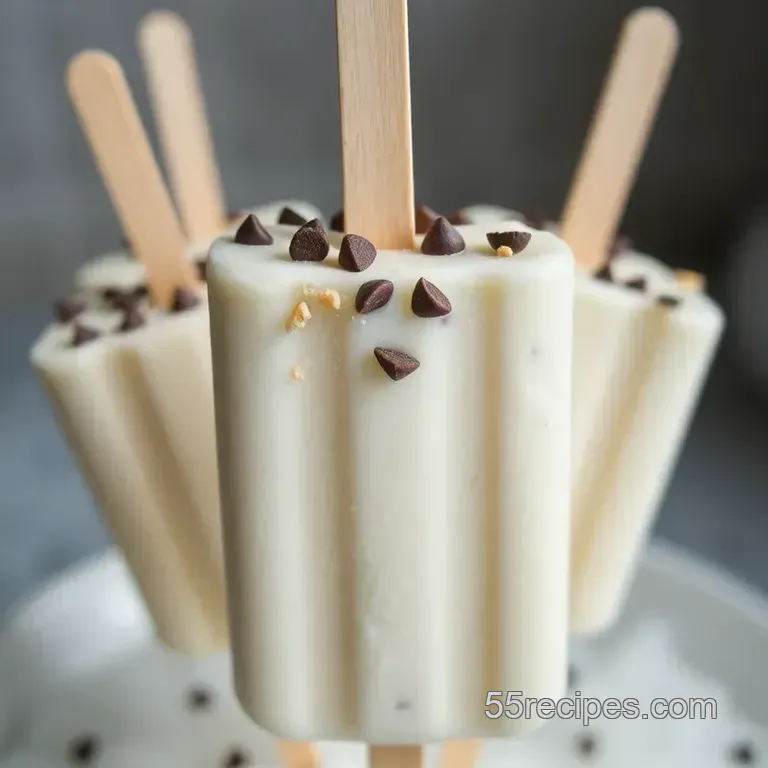
Fill your molds with vanilla ice cream. i like to leave about an inch at the top for easier dipping.
Insert the sticks don’t wiggle ‘em too much, or the ice cream might crack. freeze for at least 2 hours until hard.
Make your chocolate coating. melt your semi sweet chocolate chips with a tablespoon of coconut oil in short bursts. when it’s silky and shiny, it’s ready.
Cool it just enough so it’s still pourable but not runny.
Dip your frozen cores. gently dip each one into the melted chocolate, letting the excess drip off. tap the mold on the side of the bowl if needed.
Here’s where your visual cues come in: the chocolate should coat smoothly. if it cracks or looks streaky, your chocolate might be too hot or cold temper it by stirring in little bits of chocolate until it’s just right.
Decorate immediately. if you want sprinkles or crushed nuts, add them now before the chocolate hardens. it takes about 30- 60 minutes in the freezer for the shell to set firm.
Final freeze. Once coated and decorated, pop them back in the freezer for a bit longer. This ensures a solid, professional finish.
Expert Tips & Tricks
To raise your game, use quality chocolate it makes all the difference in that shiny finish. also, don’t rush the freezing steps.
Patience is key for that smooth, crack free shell. when dipping, work quickly but carefully, and try to dip straight down to avoid drips or uneven coating.
Critical steps include keeping your chocolate at the right temperature not too hot or it’ll burn, not too cold or it’ll be stiff.
Check by dipping a spoon and watching how smoothly it flows.
And here’s a troubleshooting tip : if your shell cracks when you bite in, likely your chocolate cooled too quickly or your ice cream wasn’t cold enough.
Warm the chocolate slightly or make sure the ice cream is rock solid before dipping.
Success Strategies for Perfect Pops
Avoid common mistakes like rushing the freezing process or using low-quality chocolate. the best homemade eskimo pie popsicle relies on simplicity and patience.
Want a dairy-free version? use coconut ice cream, which works beautifully with natural ingredients.
Another pro move: if you’re short on time, make a batch of regular vanilla ice cream and keep it in the freezer.
When you’re ready to dip, just scoop and go quick homemade ice cream lollipops at its finest. for healthier popsicle options , skip the sugar heavy ingredients and opt for fruit purees or naturally sweetened recipes.
And don’t forget about make-ahead options . These pops freeze well for days, so you can prep in advance for summer parties or snack cravings.
Anyway, once you get the hang of these steps, it’s almost too easy. my kids go crazy for these, and honestly, they taste so much better than store-bought classic ice cream bars .
Plus, you get to customize the flavors, add nuts or sprinkles, and even experiment with vegan ice cream recipes .
So, get your supplies and start experimenting I promise, once you nail the best homemade eskimo pie popsicle recipe , you’ll be all about those refreshing summer desserts.
Next, I’ll cover some extra additional info — from storage tips to fun variations so keep reading!
Looking for the ultimate diy popsicle ideas that beat store-bought any day? honestly, there's something magical about making your own eskimo pie popsicle it takes that nostalgic summer treat and turns it into your own homemade frozen dessert.
And trust me, once you get the hang of this best homemade eskimo pie popsicle recipe , you'll never want to go back to the freezer aisle.
It’s simple, customizable, and downright fun, especially when you add your own twists.
Let’s dive into some pro tips & secrets i’ve picked up along the way. when i first started experimenting, i found that high-quality chocolate think semi sweet chips makes all the difference.
A smooth, glossy coating = next level presentation. to get that picture perfect shine, melted chocolate with a little coconut oil (about 2 tablespoons per 1.
5 cups chips) works like a charm. oh, and don’t forget to melt in short bursts in the microwave, stirring between each no one likes burnt chocolate, and this way, you save time and mess.
Now, here’s a little secret to saving time: fully freeze your vanilla ice cream before dipping. i mean, let it become rock solid this stops melting during the quick coating process.
Once your ice cream cores are solid, dipping becomes way easier and less messy. trust me, dipping warm or soft ice cream just leads to drips and cracks.
I also like to keep my popsicle molds in the freezer as cold as possible, so creating a smooth, even coating feels effortless.
For presentation, the devil’s in the details. when you dip, tap off the excess so it lays flat and shiny.
Want to get fancy? before the chocolate sets, sprinkle crushed nuts, sprinkles, or even tiny shredded cookies on top. it adds both texture and visual appeal.
Bright, colorful sprinkles make it look super fun perfect for kids’ ice cream snacks or summer party treats. presentation wise, placing your finished pops on a parchment lined tray and returning them to the freezer for about an hour ensures the coating stays glossy and crack free.
Storing these frozen chocolate desserts is also easy. keep them flat in an airtight container, separated with parchment paper if stacking nobody wants messy, squished pops.
They’ll stay good for up to 2 weeks, but honestly, they’ve never lasted that long in my house. when it’s time to serve, warm the outside of the mold slightly or run it under warm water to slip out your homemade eskimo pie popsicle without breaking the chocolate coating.
Quick tip: always have some extra sticks on hand for last minute customizations or to fix snapped pops!
Thinking about variations? here’s the fun part! switch out vanilla ice cream for chocolate or strawberry for flavor twists. for the health conscious, make them dairy-free with coconut or almond milk ice cream.
I even experimented with vegan chocolate coating using dairy-free chips results were just as dreamy. want a seasonal touch? try adding crushed peppermint or pumpkin spice to the ice cream base for autumn vibes.
Now, let's talk nutrition these are more than just good looks. they’re a fun, controlled way to enjoy a sweet treat while using more natural ingredients.
You can tweak the sugar levels or substitute with healthier swaps like honey or maple syrup in your ice cream base.
Portion control? easy! stick with 8-10 pops for a family friendly dessert that satisfies everyone without going overboard.
In the end, this homemade eskimo pie popsicle isn’t just about flavor it’s about creating memories, sharing laughs, and enjoying summer in every bite.
I still remember the first time i mastered the perfect chocolate coating honestly, it felt like such an achievement.
So don’t be afraid to experiment. add your favorite toppings, try different ice cream flavors, or make it vegan it’s your own summer masterpiece.
You can do this! making frozen chocolate popsicles at home is satisfying and fun. plus, nothing beats snacking on a cool, creamy treat you whipped up yourself.
So grab your ingredients, get dipping, and enjoy every delicious, nostalgic moment. here’s to many more diy popsicle adventures you’ve got this!
Frequently Asked Questions
What makes this the best homemade eskimo pie popsicle recipe?
This recipe combines a rich vanilla ice cream core with a crisp, glossy chocolate coating, mimicking the classic Eskimo Pie flavor. It's easy to customize, uses simple ingredients, and results in a delicious, nostalgic treat perfect for any occasion.
Can I swap out the vanilla ice cream for other flavors?
Absolutely! Feel free to use chocolate, strawberry, or any flavored ice cream you love. Just make sure it's firm enough to hold its shape when dipped in chocolate for the best results.
How do I get that shiny, smooth chocolate coating without it cracking?
Use high-quality semi sweet chocolate chips melted with a bit of coconut oil or shortening for a glossy finish. Make sure the melted chocolate isn't too hot, and work swiftly when dipping the frozen ice cream cores to prevent cracks and ensure a smooth exterior.
What are some tips for storing these homemade eskimo pie popsicles?
Store the pops in an airtight container in the freezer, laying them flat to prevent the coating from cracking. For the best texture, serve directly from the freezer and avoid leaving them out for extended periods, as the chocolate can soften.
Are there healthy or diet friendly alternatives I can try?
Yes! Use dairy-free or reduced sugar ice cream options, or make your own healthier versions at home. You can also opt for dark chocolate with a higher cocoa content for added antioxidants and less sugar, making your treats a bit more nutritious.
Homemade Eskimo Pie Popsicles Frozen Chocolate C
Ingredients:
Instructions:
Nutrition Facts:
| Calories | 150-180 kcal |
|---|---|
| Protein | 3g |
| Fat | 8g |
| Carbs | 20g |
| Fiber | 1g |
| Sugar | 15g |
| Sodium | 40mg |
