Rustic Miche Bread: the Art of Sourdough Tradition
- Essential Ingredients Guide to Baking Rustic Miche Bread
- Professional Cooking Method: Mastering Rustic Miche Bread
- Pro Tips & Secrets for Baking Miche Bread
- Perfect Presentation That Wows
- Storage & Make-Ahead Magic
- Creative Variations to Explore
- Complete Nutrition Guide
- Encouraging Conclusion
- Frequently Asked Questions
- 📝 Recipe Card
Oh my gosh, let me tell you about the first time i made miche bread . i was feeling all fancy, scrolling through my social media feed, and i stumbled upon this impressive looking loaf that just screamed artisanal .
Honestly, it looked so good that i thought, "i can totally do that!" little did i know, it wasn’t just about the photo but also the journey of the sourdough fermentation process that would lead to this rustic masterpiece.
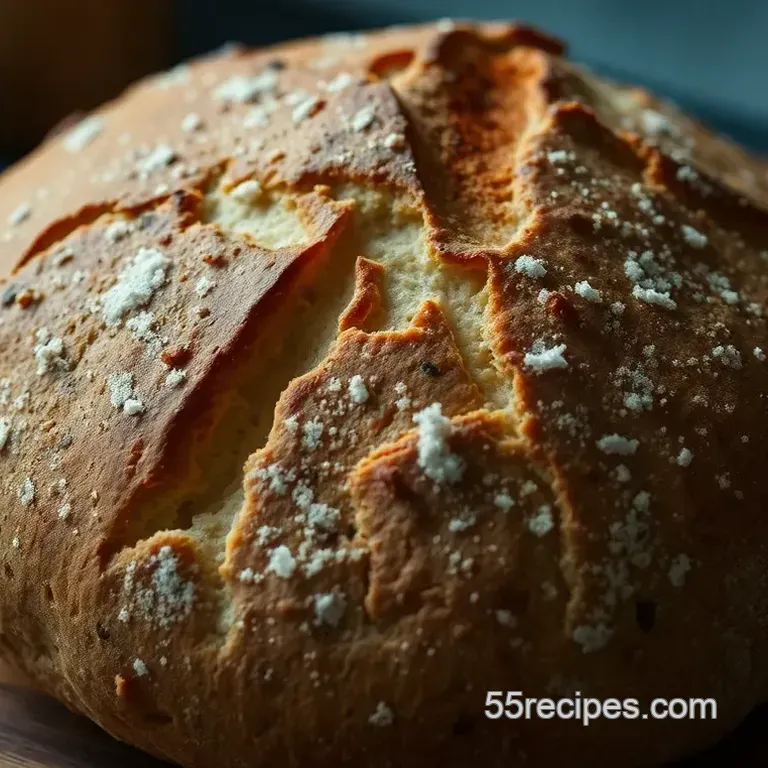
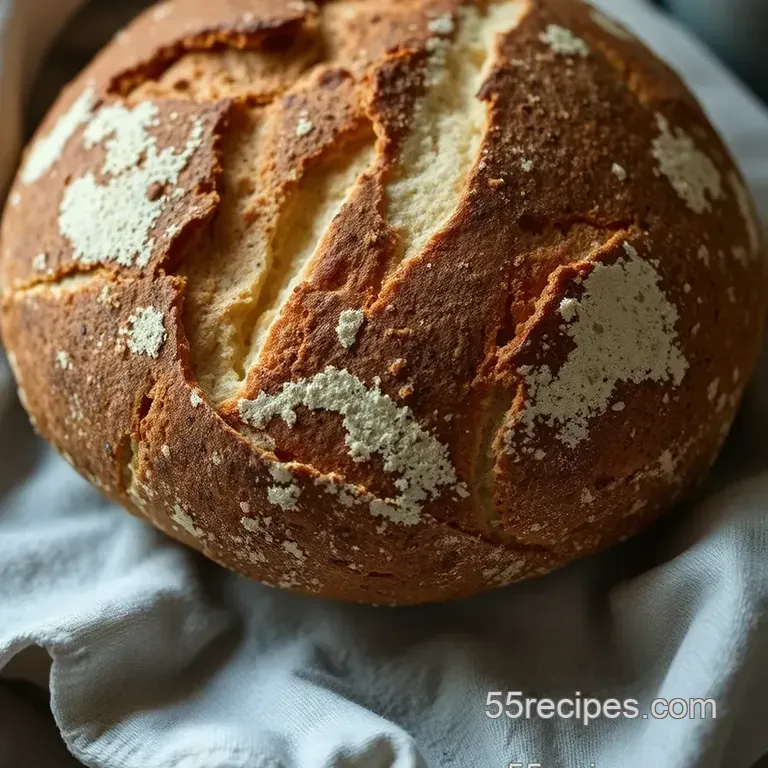
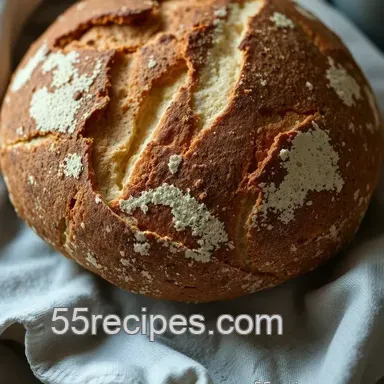
Now, let’s get real. miche bread is more than just any sourdough recipe; it’s a traditional french country loaf with some serious heritage.
Hailing from the nouvelle aquitaine region, it’s made with a blend of whole grain flours that gives it a thick, crusty bread exterior and that delicious, tender, chewy crumb we all crave.
Plus, who doesn’t love a loaf that pairs perfectly with cheese or spreads? it’s the ideal sidekick to any meal, really.
Recipe Overview
So, you might be wondering where this delicious loaf came from. miche bread has roots steeped in traditional bread making practices.
It’s been around for ages, probably before instagram was even a thing! this rustic loaf is getting modern love too, thanks to the rise of healthy bread recipes that focus on flavor and nutrition.
Now, let’s talk about time. you’re looking at about 30 minutes of active prep and then a cool 12 to 18 hours of fermentation.
Yeah, patience is key here, but trust me, it’s worth it. the dough needs care, but even if you’re a beginner, you’ll find that with a bit of attention and love, you can nail this!
Cost wise? You can whip up a large loaf that serves about 12 people for a fraction of what you'd pay for fancy artisan bread at the store! Seriously, who doesn’t love saving a few bucks?
Key Benefits
But why should you throw yourself into the world of miche bread? first off, nutritional benefits of whole grain flours are no joke! they bring fiber, protein, and some awesome nutty flavor that really elevates your meals.
Plus, when you go for homemade, you're aware of every ingredient no sneaky additives here.
Feeling fancy for a special occasion? miche bread is perfect for dinner parties or holiday meals! it’s a showstopper that will have your guests thinking you took a class at a french culinary school.
And let’s be honest: who doesn’t want to impress their friends with a beautiful, rustic loaf ?
Another perk? this recipe is adaptable! you can play with different miche recipe variations by adding herbs or even unique flours.
Also, the bread scoring techniques can add a signature look that’s all your own.
And if you want to flex your baking skills but are worried about the labor? Don’t fret! With some solid baking tips like keeping track of your dough hydration levels you’re already halfway to success!
Transitioning from the thought of baking to the actual ingredients, let’s break down what you’ll need for this delicious loaf!
Essential Ingredients Guide to Baking Rustic Miche Bread
Baking love isn’t born overnight. It starts with the basics. You want to become the Michelangelo of your kitchen? Grab my Essential Ingredients Guide for your miche bread adventure, and let’s get rolling pun intended!
Premium Core Components
Let’s kick things off with our Premium Core Components . You want to ensure you have the best stuff when whipping up your artisan bread .
Detailed measurements: for miche bread, i work with 500g (about 4 cups) of all-purpose flour and 300g (or 2 1/2 cups) of whole wheat flour.
This mix gives you that delicious chewy crumb we all dream of. add about 700g (2 3/4 cups) of room temp water and 150g (3/4 cup) of your trusty sourdough starter .
Oh, and don’t forget 10g (2 tsp) of sea salt for flavor magic.
Quality indicators: look for flours that feel soft and finely milled, no clumps allowed! trust me , fresh, high-quality flour makes a world of difference.
Check dates on the packages; old flour = sad bread.
Storage Guidelines: Keep your flours sealed in a cool, dark place. If they start smelling off, toss 'em. Like my uncle always said, "If it smells funky, it ain’t junky."
Freshness Tips: When choosing your ingredients, check for freshness. Look for whole grain options when available, trust me the nutty flavor bread is absolutely killer!
Signature Seasoning Blend
Now, let’s dive into the Signature Seasoning Blend . Your seasoning choices can really bump up those flavors.
Essential Spice Combinations: Salt is your friend! No, seriously. It builds flavor, balances, and enhances the artisan experience. If you’re feeling extra adventurous, add a hint of garlic powder.
Herb Selections and Pairings: Fresh rosemary or thyme? Yes, please! Aromatic herbs pair beautifully with rustic bread.
Regional Variations: Depending on where you hail from, spices might vary. Texan? A dash of cayenne will spice things up. New Yorker? Try some everything bagel seasoning for a unique twist.
Smart Substitutions
Let’s talk about Smart Substitutions . Sometimes life throws curveballs, and we need alternatives!
Common Alternatives: No whole wheat flour? Swap it with spelt or rye for your rustic loaf .
Dietary Modifications: Got gluten issues? Try a gluten-free flour blend; just make sure it's designed for bread.
Emergency Replacements: Out of sourdough starter? Mix equal parts of all-purpose flour and water, let it sit for a couple of hours, and boom - you’ve got a makeshift starter!
Seasonal Options: Catch berries or herbs in season? Toss those in! They can completely change up your miche recipe variations.
Kitchen Equipment Essentials
Let's not forget our Kitchen Equipment Essentials .
Must Have Tools: You’ll need a mixing bowl, kitchen scale for precise measurements, and a trusty Dutch oven. It’s a game changer for that crispy crust.
Alternative Equipment: If you don’t have a Dutch oven, try a baking stone and a roasting pan just be careful with the steam!
Preparation Tips: Always prep your work surface with a light dusting of flour to avoid sticky disasters.
Storage Solutions: Keep your equipment clean and organized. A cluttered kitchen can lead to a chaotic baking experience. Preach!
Getting down and dirty with bread baking might take effort, but the rewards are beyond worth it. once you've tackled these essential ingredients and equipment, you’ll be primed for the perfect miche bread .
Now that you’ve armed yourself with the tools and knowledge, it’s time to jump into the actual baking process! Get ready to create a delicious loaf that’ll rival those fancy bakeries your homemade country loaf awaits!
Professional Cooking Method: Mastering Rustic Miche Bread
Let's dive into the world of miche bread ! if you’ve ever wanted to bake the kind of bread that not only fills your kitchen with an incredible aroma but also impresses your friends and family, you’ve come to the right place.
This isn’t just any bread; it’s a rustic country loaf steeped in tradition. whether you’re an old pro or just getting your feet wet in bread making, i promise we’ll have some fun.
Essential Preparation Steps
Mise en Place: Get It Together!
First off, let’s talk mise en place you know, that fancy french term that basically means “everything in its place.
” have your ingredients measured out and tools ready to roll. for this miche recipe, we’re talking about all-purpose flour, whole wheat flour, water, sourdough starter, and sea salt.
It’ll save you from running around the kitchen like a chicken with its head cut off!
Time Management: Keep It Chill!
The fermentation process is like a marathon not a sprint. give yourself enough time. prepare for about 12 to 18 hours for the dough to ferment, so plan your bake accordingly.
I usually kick off my baking process in the evening, let it ferment overnight, then bake in the morning. so much easier!
Organize Like a Pro
You want your workspace to flow. keep your mixing bowls stacked, flour within reach, and a clean area for kneading.
It’ll not only help with efficiency but also calm your mind. trust me, there’s nothing worse than a cluttered countertop when you’re trying to focus on your amazing artisan bread .
Safety First: Avoid the Kitchen Drama
Be mindful of kitchen safety! If you’re using a Dutch oven , it gets really hot. Use those oven mitts I’ve had my share of close calls, and let’s just say, it’s not a fun experience!
step-by-step Process
Mix the dough: in a big bowl, mix 500g (4 cups) of all-purpose flour and 300g (2 1/2 cups) of whole wheat flour with 700g (2 3/4 cups) of water.
No dry bits allowed! let it rest for about 1 hour .
Incorporate Starter and Salt: Now, add your active sourdough starter (150g or 3/4 cup) and 10g (2 tsp) of sea salt. Use the pinch and-fold method to get everything combined.
Bulk fermentation: cover your dough with a damp cloth. let it rise for 4- 6 hours at room temperature.
Don’t skip the stretch and-fold every 30 minutes during the first 2 hours for that perfect chewy crumb!
Pre-shape: Lightly flour your surface and turn out your dough. Pre-shape it into a round, then let it relax for 30 minutes .
Final Shape: Now, shape it into a round or oval loaf and place it seam side up in a banneton.
Final proof: cover it and let it proof for about 1- 2 hours , or better yet, stick it in the fridge overnight.
Cold fermentation gives you a nutty flavor bread that’s hard not to love!
Preheat oven & bake: preheat your oven to 450° f ( 230° c) with the dutch oven inside. when you’re ready, plop the dough in, score the top with a sharp blade (this helps it rise beautifully), cover it, and bake for 30 minutes .
Then remove the lid and bake for another 15- 20 minutes until it’s golden.
Cool Down: Resist the urge to slice right away! Let it cool on a rack for at least 1 hour .
Expert Techniques: The Magic of Miche
Here’s where things get interesting. achieving that crusty bread exterior and chewy interior all comes down to a few critical steps .
Pay attention to your fermentation times and dough hydration. if your kitchen's on the cooler side, a longer fermentation might be your best friend it builds flavor!
A common mishap? Over proofing the dough. Keep an eye on those visual cues for doneness . Trust your gut. When it’s time to bake, a golden crust should be your north star.
Success Strategies: Avoiding the Pitfalls
We all make mistakes (trust me, i have plenty of stories!). one of the biggest no-nos is not letting the dough rest enough.
Not only does it impact flavor, but it can lead to dense bread. make sure you've got your timing precision down and that you’re respectful of each rise and rest.
So what if your bread doesn’t turn out perfect? No worries. Keep experimenting with miche recipe variations ! Toss in some herbs or even dried fruits and nuts for an extra kick.
As you step into the bread making world, remember this is a journey of discovery . The fermentation process, mastering dough hydration, and learning about bread proofing are all part of the fun.
Now that you’ve got the basics, let’s talk about the last bits of spice we can add to this journey.
Get ready for some additional information that’ll transform your baking experience even more!
Pro Tips & Secrets for Baking Miche Bread
Oh my gosh, baking a miche bread is like stepping into a world where tradition meets flavors! here are a few pro tips to ensure your new favorite rustic loaf is all that and a bag of chips.
Chef's personal insights : let’s face it; the best bread comes from the heart. trust your instincts! if the dough feels too dry, add a splash more water.
Trust me, between you and me, bread baking is more art than science.
Time saving techniques : want to cut down on that nervous waiting? try mixing your dough the night before and let it ferment in the fridge.
It’ll save you time the next day and pack even more flavor into every bite.
Flavor enhancement tips : if you're feelin' fancy, add a tablespoon of malt syrup or honey to the dough. it'll give your miche bread a deeper caramelized flavor.
Don't skip the salt - it’s not just for seasoning, it enhances the whole experience!
Presentation advice : first impressions matter, right? dust that beautiful crust with a little flour right before baking; it adds a rustic, artisan touch.
Short on kitchen tools? a simple parchment paper can elevate your presentation game by leaps and bounds.
Perfect Presentation That Wows
When you crunch into that crusty bread , the first thing people will notice is how it looks.
Plating Techniques : Keep everything simple! Slice your miche beautifully and lay it out on a wooden board. It instantly brings that country feel to your kitchen.
Garnish ideas : fresh herbs like parsley or rosemary can add a pop of color and flavor. go a little crazy with some olive oil drizzled on the side for dunking.
Yes, please!
Color Combinations : Pair that brownish loaf with some colorful sides think roasted peppers or a vibrant salad. Your plate will be jaw-dropping.
Visual Appeal Tips : Use a sharp knife for clean cuts. Nothing ruins a loaf faster than raggedy edges. Clean is chic, my friends!
Storage & make-ahead Magic
Once your homemade bread is fresh from the oven, you’ll want to savor it for as long as possible!
Storage Guidelines : Store your miche in a paper bag or a bread box to keep that crust crispy. Plastic bags? Nope, not here.
Preservation methods : if you think you won’t finish it in a few days, slice it and freeze the pieces.
Just pop them in the toaster when you’re ready. toasted miche is life changing!
Reheating Instructions : If it’s come from the freezer, give it a few minutes in the oven at 350° F to refresh that delicate crust.
Freshness Duration : Ideally, enjoy your miche within the first week for prime flavor. It can last longer, but let’s be honest, it probably won’t!
Creative Variations to Explore
Get adventurous with your bread making! The beauty of a miche recipe is it can be whatever you want it to be.
Flavor Adaptations : Add in nuts or seeds to shake things up. Think pumpkin seeds or sunflower kernels yum!
Dietary Modifications : No gluten? No problem! Try a gluten-free flour blend, just be sure it’s designed for bread baking.
Seasonal Twists : For summer, add in some finely chopped dried figs or cranberries. In fall, spice it up with cinnamon and nutmeg.
Regional Variations : Channel your inner French chef. Consider adding a bit of soft cheese baked into the loaf, making it a purely French experience.
Complete Nutrition Guide
The nutritional benefits of whole grain in your miche are totally worth it!
Detailed Breakdown : For each slice, you'll be snagging around 200 calories, helping your body and soul!
Health Benefits : Whole grain means more fiber and nutrients. Your tummy will thank you!
Dietary Considerations : If you're watching carbs, just enjoy smaller slices. Remember, moderation is key!
Portion Guidance : I’d guess one large loaf yields about 12 satisfying servings. Perfect for sharing or hoarding. No judgment here!
Encouraging Conclusion
So, why not roll up your sleeves and dive into the magical world of miche bread ? give yourself permission to experiment and, heck, even mess it up a little.
The journey of making rustic bread is just as rewarding as enjoying the loaf. whether you’re slapping butter on a warm slice or pairing it with cheese and wine, your creation will be the star of the show.
Happy baking, my friends; you've got this!
Frequently Asked Questions
What is miche bread and what makes it unique?
Miche bread is a traditional French country loaf known for its rustic appearance and hearty flavor. It is made primarily from whole grain flours, which give it a thick crust and tender crumb, along with distinctive nutty and earthy flavors. The size and free form shape of miche sets it apart from other loaves.
Can I use whole wheat flour instead of all-purpose flour for miche bread?
Yes, you can substitute some or all of the all-purpose flour with whole wheat flour in miche bread. However, this may alter the texture and hydration of the dough, so you might need to adjust the water content. Whole wheat flour typically requires a bit more water due to its higher fiber content.
How should I store my miche bread to keep it fresh?
To preserve the crustiness of your miche bread, store it in a paper bag at room temperature. This allows airflow while preventing moisture from making the crust soggy. If you need to store it for a longer period, consider wrapping it in plastic and freezing, but remember to let it cool completely first.
What are some variations I can try with my miche bread recipe?
There are many delicious variations you can make! Consider adding herbs like rosemary or thyme for a savory flavor. You can even incorporate seeds, dried fruits, or nuts for added texture and taste. For a gluten-free option, use a gluten-free bread flour blend instead of traditional flours.
What are the best serving suggestions for miche bread?
Miche bread pairs wonderfully with a variety of dishes. Serve it alongside cheeses and charcuterie for a delicious platter, or enjoy it with hearty soups and stews. You can also smear it with homemade butter or flavored spreads for an easy and satisfying snack.
Why is fermentation time important in making miche bread?
Fermentation time is crucial for developing the flavors and texture of miche bread. A longer fermentation allows the natural yeasts and bacteria to work, resulting in a better crumb structure and deeper flavors. If your kitchen is cooler, consider extending fermentation time for an optimal result.
Rustic Miche Bread The Art Of Sourdough Traditio
Ingredients:
Instructions:
Nutrition Facts:
| Calories | 200 |
|---|---|
| Fat | 1g |
| Fiber | 3g |
