Sweet & Tart Cherry Jam: a Summer Delight
- Essential Ingredients Guide: Your Go-To for Homemade Cherry Jam
- Unlocking the Art of Professional Cooking: Your Go-To for Cherry Jam
- Pro Tips & Secrets for the Best Cherry Jam Recipe
- Storage & Make-Ahead: Jam Life Hacks
- Creative Variations
- Complete Nutrition Guide
- Encouraging Conclusion
- Frequently Asked Questions
- 📝 Recipe Card
Have you ever caught a whiff of freshly made jam and felt like you’ve been transported to summer? oh my gosh, i remember the first time i tried my hand at a cherry jam recipe .
I was on a family trip, surrounded by cherry orchards, and the air was filled with the sweet smell of ripe cherries.
I thought, why not bring that summer magic home? that’s how my love affair with homemade cherry jam began. honestly, if you’ve never made jam, it might seem daunting at first, like brewing your own coffee.
But trust me, it’s easier than you think!
Recipe Overview
Let’s take a little journey back in time. canning and preserving have been around for centuries, helping folks enjoy seasonal fruits long after harvest.
The beauty of this easy jam recipe lies in its simplicity, using just fresh cherries , sugar, and a splash of lemon juice.
Fast forward to today, and cherry jam remains a summertime staple. with just 45 minutes from prep to plate, you can whip it up on a lazy sunday and have some delightful summer fruit spreads ready to enjoy.
Making cherry jam is both cost effective and rewarding. you’ll get approximately four half pint jars , which means you can keep some for yourself and share the rest.
And hey, who wouldn’t love a homemade gift from you? just think about it: friends will be convinced you're some kind of kitchen wizard!
Key Benefits
Now let’s dive into the juicy details! there’s more to this jam than just being a sweet delight. for starters, cherries are packed with antioxidants and vitamins, making this spread a healthier alternative to store-bought options.
Who knew a simple spread could elevate your breakfast game? whether you’re slathering it on warm toast or ladling it over cheese, you’re in for a treat.
What’s brilliant about this homemade cherry jam is its versatility. it’s perfect for all occasions from a cozy brunch to holiday gifting.
Trust me; this jam can steal the spotlight on a cheese platter. plus, it beats out fancy artisan jams in price and taste any day of the week.
Maybe you’re worried about the complexity of canning recipes . don’t sweat it! with easy jam-making techniques like the boiling water canning method, you’ll be preserving cherries like a pro in no time.
And don’t forget, you can experiment! mix in other fruits for unique cherry jam variations , or even try low sugar cherry jam for a lighter version.
So, ready to dive in? Let’s grab those cherries and get to making some of the best jam you’ve ever tasted!
Transition to Ingredients Section
Now that you’re hyped up about all the goodies cherry jam can deliver, it’s time to check out what you’ll need to get started.
So roll up those sleeves, and let’s see what ingredients you’ll need to create your very own batch of sweet & tart cherry jam !
Essential Ingredients Guide: Your Go-To for Homemade Cherry Jam
Alright, folks! let’s dive into the essential ingredients guide for making the best homemade cherry jam you could dream of.
If you’re anything like me, you love spreading that sweet, tart goodness on your morning toast or spooning it over some vanilla ice cream.
But you can't whip up a fantastic jar of cherry jam without knowing your key players. so, grab a comfy seat, maybe a snack, and let's chat about all the must have ingredients and tips for a successful jam-making adventure.
Premium Core Components
First things first: let’s talk ingredients . for any fresh jam, you gotta start with the star of the show best cherries for jam .
You want sweet cherries for that delightful flavor, or you can mix in some tart cherries for a zing! generally, here’s what you’ll need:
- 4 cups fresh cherries (about 2 pounds or 900 grams) , pitted and halved.
- 2 cups granulated sugar (400 grams) . Yeah, it seems like a lot but don’t skimp on the sugar. It’s essential for that jam consistency.
- 1/4 cup lemon juice (60 ml) . This adds a nice tartness that balances the sweetness.
- 1/2 teaspoon vanilla extract (optional, but oh my gosh, it adds magic!).
Now, you might be wondering, “how do i know my cherries are fresh?” look for firm, shiny skins with no blemishes.
And remember, you should be able to smell that sweet cherry aroma wafting off them!
Storage Guidelines and Shelf Life
Once your jam is made, think about storage . home canned jam can happily chill in your pantry for about 1 year if you’ve sealed it properly.
For maximum freshness, store opened jars in the fridge; they’ll last about 2-3 weeks . just make sure to use the boiling water canning method to process your jars and remove all air bubbles.
Safety first, friends!
Signature Seasoning Blend
Now, on to the fun part seasoning! while you mainly need just a few simple ingredients for your cherry jam recipe , feel free to experiment with your flavors.
Want a warm kick? toss in a pinch of cinnamon or a splash of almond extract to jazz it up.
And if you’re feeling adventurous, you can try mixing fruits for jam, like adding raspberries or blueberries . Trust me, those jams can dance on a slice of toast!
Smart Substitutions
Got dietary restrictions or missing ingredients? No worries! Here are a few smart substitutions:
- Sugar swaps: Use a sugar substitute designed for canning if you want a low sugar cherry jam .
- Frozen cherries: Out of fresh ones? Frozen cherries can do the trick! Just thaw ‘em out and drain excess liquid.
Checking your pantry or fridge for alternatives can save the day. believe me, i’ve thrown together jams on the fly just because i ran out of sugar.
It’s a learning curve, my friends.
Kitchen Equipment Essentials
Let’s not forget the kitchen gear ! Here’s a quick hit list of must have tools:
- A large heavy bottomed pot for cooking your cherries. Trust me, you don’t want a stick, or you’ll be cursing the day you decided to make jam!
- A wooden spoon for stirring things up.
- Canning jars and lids make sure they’re sterilized for ultimate freshness.
- A potato masher (optional) to help you achieve that dreamy consistency for your jam.
Tips and Tricks
As you gear up to make your cherry jam, here are a few tips to keep in mind:
- Choose ripe cherries for the best flavor.
- Check your jam's readiness using the cold plate method. Just put a spoonful of hot jam on a cold plate; if it gels, it’s good to go.
- And finally, label your jars . Nothing says "organized" like clearly labeled jars, my friends!
The Final Stretch
Alright, now you're armed with the essential knowledge! if you've been dreaming of a cherry jam with vanilla or maybe even a zingy tart blend, you're on the right path.
The beauty of making your jam is that you can tweak it to your heart's content. so, roll up your sleeves, dance around your kitchen, and get ready to create some fabulous jam-making techniques .
In just a minute, we’ll jump into those step-by-step instructions. So, stay tuned and let’s do this! Cooking with fresh fruit has never been more exciting!
Unlocking the Art of Professional Cooking: Your Go-To for Cherry Jam
Oh my gosh, if you’re anything like me, the thought of homemade cherry jam makes your taste buds do a happy little dance.
There’s something so satisfying about creating your own jam, capturing the essence of summer in a jar. so let’s dive into the professional cooking methods to whip up a batch of sweet and tart cherry jam that’ll make your friends think you’ve taken a class from a culinary school.
Essential Preparation Steps
First things first: mise en place ! this fancy french term means "everything in its place." you wanna gather all your ingredients and tools before you start cooking.
For our cherry jam, that means having your 4 cups of pitted cherries , 2 cups of sugar , and 1/4 cup lemon juice ready to go.
Trust me, you don’t want to be hunting for that sugar once the cherries are simmering.
Time management is key here. give yourself about 15 minutes to prep the cherries. while you're chopping, think of it like getting ready for a first date you gotta look good (or in this case, have everything prepped).
Next up, let’s talk organization . work clean! keep your space tidy to avoid any sticky situations literally! and, let’s not forget crucial safety considerations .
Be cautious while handling that boiling water during your canning process. trust me, i’ve learned the hard way!
step-by-step Process
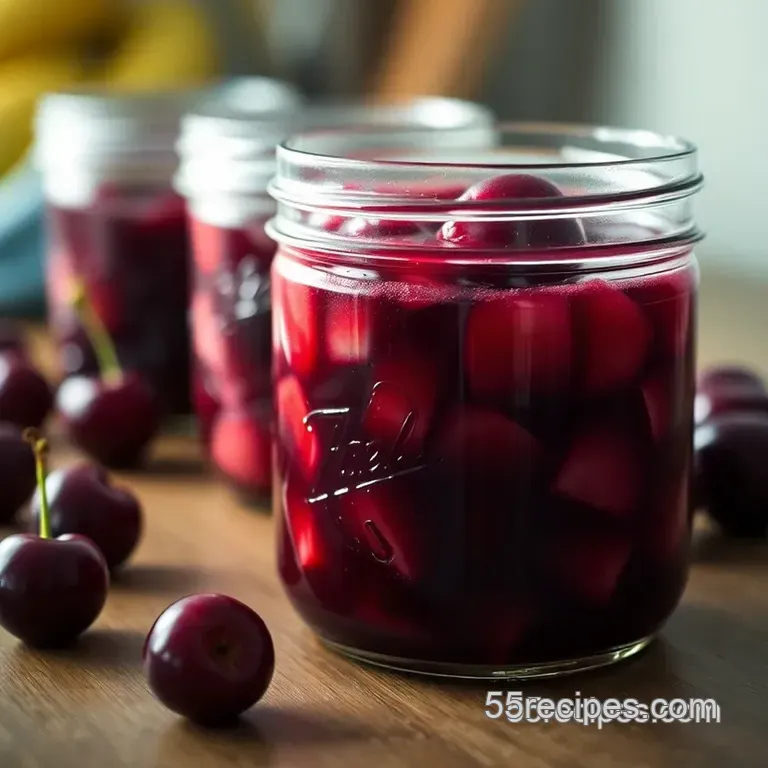
Prepare Jars : First off, sterilize your jars and lids in boiling water for 10 minutes . This ensures your jam will last and stay fresh!
Cook Cherries : Combine your lovely pitted cherries, lemon juice , and sugar in a large pot. Stir it and let it sit for 10 minutes to let the magic happen.
Simmer and Mash : Heat that mix over medium high until it starts to bubble. Stir frequently and mash the cherries if you’re feeling fancy.
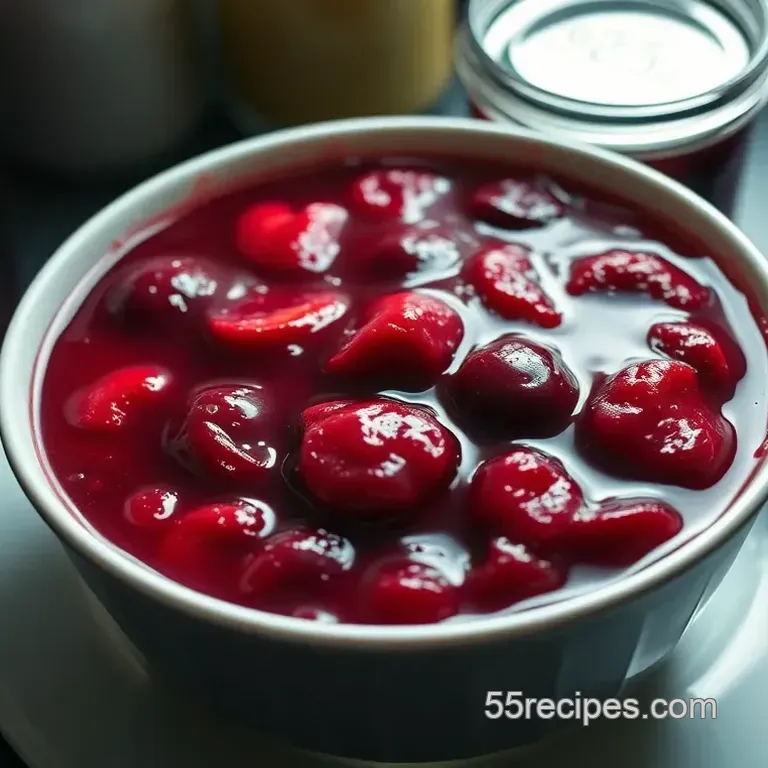
Cook to set : you want this jam to hit 220° f ( 104° c) . use an instant read thermometer if you've got one, or do the "sheeting test" by dropping some on a cold plate.
If it gels up a bit, you’re golden!
Jar the Jam : Pour your hot jam into those sterilized jars, leaving about 1/4 inch headspace . Wipe the rims clean they deserve some love too.
Seal and Process : Tighten those lids on your jars until they're fingertip tight, and then dunk them in a boiling water bath for 10 minutes .
Cool and Store : Let them cool completely on a towel. Check seals after 24 hours , and store them in a cool, dark spot.
Expert Techniques
Here’s where we step it up a notch. for a quality checkpoint , always taste your jam before jarring. if it’s missing something, a little splash of vanilla can work wonders! and, if you’re brave, mix in other fruits like raspberries for a mixed berry jam .
How about low sugar cherry jam ? you can cut down the sugar a bit, but remember sugar helps with preservation and flavor.
Now, here comes my favorite part troubleshooting tips . if your jam doesn’t set, don’t panic! just simmer it longer. if it’s too thick, add a splash more lemon juice or a touch of water.
Success Strategies
Ah, the tricks to avoid pitfalls! one common mistake? not choosing the best cherries for jam . look for ripe, plump cherries! you want that heavy sweetness or that tart bite, depending on your recipe mood.
And don’t skip quality assurance tips : Always taste as you go. This is your jam, after all! Avoid overcooking; you want to keep that vibrant color and fresh flavor.
Thinking about make-ahead options? Absolutely! You can pre-chop those cherries and store them in the fridge for up to two days. Just don’t add sugar until you’re ready to cook!
Wrapping it Up
So there you have it a DIY cherry jam recipe that’ll make you the star of every breakfast table. Homemade gifts for foodies? Check. Healthy breakfast ideas? Check.
Next up, let’s chat about additional information for the jam ensoiast in you. i’ll dive into different flavor combinations, storage tips, and more fun ways to enjoy that yummy cherry goodness.
Trust me, your weekend brunches will never be the same!
Pro Tips & Secrets for the Best Cherry Jam Recipe
Making cherry jam is a sweet adventure, trust me! i learned a ton while whipping up this easy jam recipe .
Here are some personal tips i wish i had when i started.
Chef's Personal Insights
First off, using ripe cherries is a game changer. when you’re picking cherries, go for the deep red ones. they’re the best cherries for jam ! if you’re like me and have a sweet tooth, sweet cherry jam is your jam.
But if you prefer that tart cherry jam kick, go for the darker varieties. they'll give your cherry preserves a zing that'll knock your socks off!
Time Saving Techniques
For a quick win, use pitted cherries from the freezer. Just thaw them out, and boom! No waiting on summer. Also, prep your jars while the fruit cooks. Multi tasking to the rescue!
Flavor Enhancement Tips
While cooking, consider adding a pinch of lemon zest or a splash of almond extract. Cherry jam with vanilla ? Oh my gosh, game changing . Just a smidge makes all the difference!
Presentation Advice: Perfect Presentation
After you’ve cooked down that gloriously sticky cherry jam, let’s make it pretty!
Plating Techniques
When it’s time to jar, use a fun canning funnel if you have one. it keeps your jars mess free and makes you look like a pro.
Seriously, it’s a small tool that gives you huge bragging rights.
Garnish Ideas
Garnish your jars with a simple ribbon or colored twine. It makes them look super cute and perfect for gifting! And who doesn’t love homemade gifts for foodies?
Mixing Colors for Visual Appeal
Use those colorful fruit combos I mentioned earlier! Toss in a few berries for that wow factor . People eat with their eyes first, right?
Storage & make-ahead: Jam Life Hacks
Two things to keep in mind when you whip up your homemade cherry jam : storage and freshness.
Storage Guidelines
Keep your jars sealed in a cool, dark place. if you can follow the boiling water canning method , it’ll extend that jam shelf life .
You’ll be snacking on summer flavors long into winter!
Preservation Methods
If you've got any leftovers, you can freeze the jam in airtight containers. It’s not just for canning; rev up your freezer game!
Reheating Instructions
If you want to slather it warm on your breakfast toast, just microwave it for about 15 seconds. Stir that bad boy up, and you're good to go!
Freshness Duration
Homemade cherry jam can last up to a year if sealed properly. But let’s be real who can resist digging into that deliciousness before then?
Creative Variations
Oh, the fun doesn’t stop at the basic recipe.
Flavor Adaptations
Let’s get creative! You can mix fruits for a blended fruit jam recipe . Imagine cherry and raspberry heaven!
Dietary Modifications
Considering a low sugar cherry jam ? Substitute with agave or honey to keep it healthy. Yum!
Seasonal Twists
Switch up your flavor profiles based on what’s fresh. How about a splash of cranberry for the holidays? Yes, please!
Complete Nutrition Guide
Alright, let's break it down!
Detailed Breakdown
Each tablespoon of this cherry jam gives you about 50 calories . Not too shabby, right?
Health Benefits
Cherries are loaded with antioxidants, plus they can help reduce inflammation. All the better to enjoy those cherry related desserts !
Dietary Considerations
Take note if you’re watching sugar; balance your portions for a treat that fits your lifestyle.
Portion Guidance
For a simple breakfast, one tablespoon of jam on toast is perfect. Feel free to indulge, though just keep it in check!
Encouraging Conclusion
Making this cherry jam recipe is a delightful way to cherish summer’s simple pleasures. don’t stress about perfection; have fun and make it your own! whether you’re enjoying it on toast or gifting a jar, each spoonful carries the love of summer.
So grab those cherries, get cookin', and let the sweet memories begin. you got this!
Frequently Asked Questions
What ingredients do I need for a cherry jam recipe?
To make cherry jam, you will need 4 cups of fresh pitted and halved cherries, 2 cups of granulated sugar, 1/4 cup of lemon juice, and optionally, 1/2 teaspoon of vanilla extract. These basic ingredients are essential for achieving the perfect balance of sweet and tart flavors.
How do I know when my cherry jam is done cooking?
Your cherry jam is done cooking when it reaches a temperature of 220°F (104°C) on a candy thermometer or passes the "sheeting test." To perform this test, place a spoonful of jam on a cold plate; if it holds its shape and gels after cooling, it's ready to jar.
Can I substitute ingredients in the cherry jam recipe?
Yes, you can make substitutions! For lower sugar content, use a sugar substitute that is safe for canning. If fresh cherries are not available, frozen cherries can be used just make sure to thaw and drain any excess liquid before cooking.
What is the best way to store homemade cherry jam?
Once your cherry jam is sealed in sterilized jars, store it in a cool, dark place, such as a pantry or cupboard. Sealed jars can typically last for up to a year. After opening, keep the jar in the refrigerator where it will last for about 3-4 weeks.
How can I vary the flavor of my cherry jam?
There are many ways to vary your cherry jam! You can add a splash of almond extract for a nutty depth or mix in other fruits such as raspberries or blueberries for a berry blend. Additionally, spicing it up with cinnamon or ginger can give it a warm twist that’s perfect for the fall.
Is homemade cherry jam healthy?
Homemade cherry jam can be enjoyed as part of a healthy diet. Each tablespoon contains approximately 50 calories and 13 grams of carbohydrates. While it does have sugar content, you can adjust the sugar amount to suit your dietary preferences, and it provide the antioxidant benefits of cherries.
Sweet Tart Cherry Jam A Summer Delight
Ingredients:
Instructions:
Nutrition Facts:
| Calories | 50 |
|---|---|
| Fat | 0 g |
| Fiber | 0.5 g |
