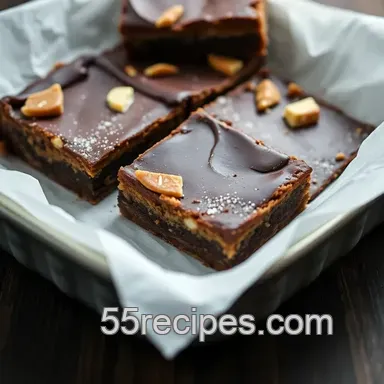
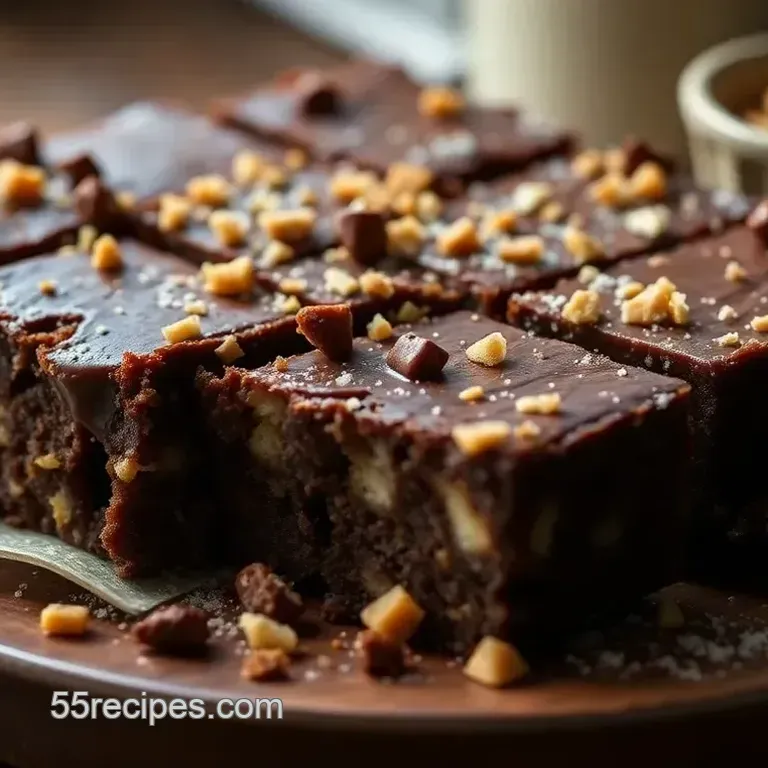
Chocolate and Toffee Delight Bars
- Indulging in Sweet Memories: Chocolate and Toffee Delight Bars
- Your Essential Ingredients Guide for Baking Bliss
- Professional Cooking Method: Crafting Your Chocolate and Toffee Delight Bars
- Pro Tips & Secrets for Delectable Bars
- Perfect Presentation of Your Sweet Treats
- Storage & Make-Ahead Magic
- Creative Variations for Everyone
- Complete Nutrition Guide
- Wrap-Up Sweet Indulgence
- Frequently Asked Questions
- 📝 Recipe Card
Indulging in Sweet Memories: Chocolate and Toffee Delight Bars
Oh my gosh, let me tell you about the first time i ever bit into a chocolate and toffee delight bar ! i was at this quaint little café in england, and it was like a fairy tale straight out of a storybook, complete with cobblestone streets and afternoon tea.
As i took that first bite, my taste buds were on a rollercoaster ride rich chocolate, buttery toffee melting in my mouth.
I was hooked! it hit me right there that these bars weren’t just a treat; they were a whole experience.
If you love chocolate desserts (who doesn’t, right?), then you’re going to want to stick around for this recipe.
The Sweet Story Behind Chocolate and Toffee
Now, let’s dive into the juicy backstory of this treat. chocolate and toffee bars trace their roots back to classic british dessert recipes .
They came about when folks began mixing buttery toffee goodness with chocolate a match made in heaven! nowadays, these bars are everywhere.
They pop up at bake sales, holiday parties, and family gatherings like that one fun uncle who always brings a lively vibe! they’re an easy crowd pleaser, and let's face it, who doesn't want an easy chocolate dessert on the table?
When it comes to whipping up these sweet delights, the time commitment is relatively low you’re looking at around an hour and five minutes from start to finish.
And honestly, it’s a medium difficulty level. it’s like riding a bike with training wheels; with a little guidance on melting techniques and candy thermometer tips, you’ll be fine.
Plus, all the ingredients won’t break the bank!
Why You’ll Love These Bars
Let’s talk benefits! not only are these bars a rich chocolate treat , but they also come packed with some sweet surprises for your health (if you consider that a stretch, but hear me out).
The toffee layer adds a delightful crunch, while the silky chocolate on top is downright decadent. and guess what? they are perfect for special occasions! whether you're hosting an afternoon tea or inviting friends over for a movie night, these bars scream indulgence.
Talk about a chocolate lovers' delight !
So, why choose these over your classic brownie or cookie? well, chocolate and toffee delight bars create the perfect sweet and salty balance.
Imagine sinking your teeth into a chewy base, followed by a crispy toffee layer topped with glossy melted chocolate. all that goodness means you’ll be the star of the dessert table! plus, if you're baking with kids, this is a fun way to get them involved.
They can help sprinkle the toppings or mix the cookie base, creating memories flavored with sugar and laughter.
What You’ll Need
Are you pumped to make these bars? great! before we can start throwing everything into the mixing bowl, you’ll want to gather your ingredients.
You’ll need flour, butter, sugar you know, the usual suspects plus some chocolate chips and butter for that tasty toffee layer. pop back in with me to check out the ingredient list when you’re ready!
With all that said, i can’t wait for you to dive into creating your own homemade candy bars . you'll soon see that these decadent chocolate treats are more than just food; they really capture the heart of sharing and enjoying dessert with loved ones.
As we get ready to jump into the ingredient section, just remember: baking is not just about the sweets it’s a way to make memories, one delicious bite at a time!
Your Essential Ingredients Guide for Baking Bliss
Hey there, fellow dessert ensoiasts! if you’re ready to whip up some magic in your kitchen, you’ve landed in the right spot.
Today, we’re diving into the nitty gritty of baking with a special focus on those chocolate and toffee treats that make your sweet tooth sing.
So grab your apron, and let’s get to it!
Premium Core Components
First up, let’s chat about the premium core components you’ll need for your baking adventure, especially when making those jaw-dropping chocolate dessert bars.
Detailed measurements : whether you’re a fan of us cups or metric grams , precision is key. in the world of baking, a little extra flour can turn a dream dessert into a dry disaster.
So, if the recipe says 1½ cups of flour (or 190g), measure it out like it’s gold!
Quality indicators : not all chocolate is created equal! look for high-quality cacao when picking out your bars or chips.
If it’s shiny and smooth, you’re on the right track. avoid anything that looks cloudy or crumbly; that’s a red flag!
Storage guidelines : chocolate can be a fickle friend. keep it in a cool, dark place to avoid it turning into a splotchy mess.
And toffee? store that buttery goodness in an airtight container. make sure to eat it within a week for the freshest taste!
Freshness Tips : For those who love the crisp crunch of toffee, only buy what you can use in a month or two. Always check for that freshness date!
Signature Seasoning Blend
Now, onto the signature seasoning blend that elevates your desserts from good to out-of-this world.
Essential Spice Combinations : Think beyond just chocolate! A pinch of sea salt or a sprinkle of cinnamon can take those glazed toffee layers over the top.
Herb Selections : Fresh mint or a dash of vanilla can pair beautifully with your chocolate layers. Trust me, it’s a game changer!
Flavor Enhancers : Don’t underestimate the power of a good espresso powder or instant coffee. Just a bit can intensify that chocolate flavor like you wouldn’t believe!
Regional Variations : Feeling adventurous? Try adding flavors typical of British dessert recipes, like a dash of Earl Grey tea for a unique twist.
Smart Substitutions
But wait, what if you’re low on butter or gluten just doesn’t suit your tummy? No worries!
Common Alternatives : Swapping standard all-purpose flour for almond flour can yield a wonderful new texture in your bars.
Dietary Modifications : If you need dairy-free options, look for coconut oil in place of butter. You’ll still get that luscious flavor without the lactose!
Emergency Replacements : Out of heavy cream for the toffee? No problem! Use coconut milk instead; it’ll lend a nice tropical vibe.
Seasonal Options : In fall, add pumpkin spice to your chocolate mixture. And come summer, fresh berries on top of those bars can be a showstopper!
Kitchen Equipment Essentials
Let’s not forget about the kitchen equipment that makes life easier.
Must Have Tools : A good mixer is a must for achieving that fluffy batter consistency. You’ll also want a good quality knife for slicing those bars cleanly.
Alternative Equipment : No stand mixer? No stress! A good old whisk and some elbow grease do the trick just fine.
Preparation Tips : Make sure your butter is softened before you start creaming it with sugar. This helps to create that perfect, airy texture.
Storage Solutions : Keep your baked goodies fresh longer by using stackable airtight containers. Trust me, it keeps the toffee crunchy and the chocolate rich !
As you gather all these essentials, you’re just a hop, skip, and a jump away from creating some fabulously rich chocolate and toffee delight bars.
Stay tuned for the upcoming section where we’ll get our hands dirty with step-by-step instructions on how to bring these treats to life! happy baking, my friends! 🍫
Professional Cooking Method: Crafting Your Chocolate and Toffee Delight Bars
Hey there, sweet treat ensoiasts! today, we're diving into the world of professional cooking methods to make those mind blowing chocolate and toffee delight bars .
I mean, what’s better than a crunchy, buttery toffee layered between rich, smooth chocolate? absolutely nothing, right? so, let’s roll up our sleeves and get to it!
Essential Preparation Steps
First things first let’s chat about mise en place . this fancy french term just means, “get your stuff together!” before you start mixing, have all your ingredients measured and prepped.
It’s a game changer. seriously, it's like putting together a puzzle. you’ll thank yourself when you're not frantically searching for that last cup of sugar halfway through!
Now, time management is key! set a timer while baking; we’re talking 15- 18 minutes at 350° f for that base, so keep an eye out.
Nobody likes burnt cookies, am i right?
Getting organized can save you from a mini kitchen disaster. have your mixing bowls, spatulas, and, oh, don’t forget that candy thermometer if you're feeling fancy with the toffee.
And of course, let’s not skip the safety bit watch out for hot sugar! pouring melted toffee can give you a nasty surprise, so be extra careful.
Step-by-step Process
Alright, let’s break it down!
- Prepare the Baking Pan : Line your 9x9-inch baking pan with parchment paper. This is where you’ll achieve that magical lift later on.
- Make the Base : Preheat that oven! We want 350° F ( 175° C) . Mix that butter and sugar until it’s light and fluffy like clouds, I tell ya. Then, add the egg yolk, vanilla, and salt. Finally, incorporate the flour, leading to a dreamy, soft dough.
-
Toffee Layer
:
- Combine butter and brown sugar in a pan over medium heat. Watch it bubble and splatter it's mesmerizing! Cook until it’s reaching that 250° F ( 120° C) sweet spot. Pour it over the base, let it chill, and get ready for deliciousness!
- Chocolate Topping : Melt those chocolate chips in 30-second increments to avoid a grainy texture. Stir in a little oil if you want that shine because who doesn’t love a shiny dessert?
- Assemble : Pour that melted chocolate over the cooled toffee layer. Chill it for about 30 minutes and then, BAM your bars are ready for cutting!
Expert Techniques
Now, let’s talk about some critical steps to nail this recipe.
- Checkpoints while mixing are essential. When the toffee is bubbling, it should be a golden hue that’s your sign it’s ready!
- Troubleshooting ? If the chocolate seizes up (yikes!), just add a teaspoon of hot water and stir. It'll save the day.
Success Strategies
Here’s where it gets real. Here are some common mistakes to avoid :
- Forgetting the parchment paper is a no-go .
- Don’t rush the chilling process. It might be tempting to dive right in, but we want clean cuts, folks!
- Always taste as you go. It’s your excuse to try a bit of that buttery toffee goodness while cooking.
Need some quality assurance tips ? Take a glance at the dessert every once in a while to ensure nothing's amiss.
Make-ahead Options
These delightful bars can definitely be made the day before. It’s perfect for parties or just for those late night cravings after a long day. They’re the ultimate easy party desserts !
So, armed with these pro tips and strategies, you’re ready to create the perfect chocolate and toffee delight bars . but hey, don’t stop here.
Check out the last section for more additional information and sweet inspirations! happy baking, my friends!
Pro Tips & Secrets for Delectable Bars
Alright, let’s dive right in! When you're whipping up those Chocolate and Toffee Delight Bars , there are a few tricks that’ll make your life a whole lot easier.
Chef’s personal insights: honestly, the secret is in the timing. when making that luscious toffee layer, stir gently but consistently.
You want it to bubble up like a sweet volcano but not scorch! i once got a tad too distracted by my favorite 90s sitcom, and boom burnt toffee.
Not fun!
Time saving techniques: if you’ve got a busy schedule and want to impress guests, prep these bars the night before. just keep ‘em sealed tight in the fridge.
Then, when everyone’s asking, “who made these epic dessert bars?” you can sit back and take all the credit.
Flavor enhancement tips: looking to kick the flavor up a notch? try adding a splash of espresso to your melted chocolate topping for a mocha twist.
Or drizzle some sea salt on top when they come out of the fridge. sweet and salty desserts for the win!
Presentation advice: remember, we eat with our eyes first! when your bars are set, cut them neatly with a hot knife (run it under warm water and wipe dry) for beautiful edges.
It’s all about that instagrammable moment!
Perfect Presentation of Your Sweet Treats

Nobody wants a messy dessert, right? Plating matters, folks!
Plating Techniques: Use a clean white plate to let that glossy chocolate shine.
Garnish Ideas: A simple dusting of powdered sugar or a few extra chocolate shavings on top will make those bars look gourmet.
Color Combinations: Pair with fresh berries or mint leaves for a pop of color that screams “dessert for chocolate lovers!”
Visual Appeal Tips: Remember to slice those bars into neat squares. You want them to look like they came straight out of a bakery!
Storage & make-ahead Magic
Let’s face it, life happens. Here’s how you keep your creation fresh!
Storage Guidelines: Once cut, keep those bars in an airtight container. They’ll be fine at room temperature but last longer in the fridge for about a week.
Preservation Methods: To keep ‘em even longer, try freezing them! Just make sure to wrap each bar individually in plastic wrap before throwing them in a freezer bag.
Reheating Instructions: If you prefer your bars a bit warm, just pop them in the microwave for about 10-15 seconds.
Freshness Duration: After a week in the fridge, they might lose some of that glorious crunch, so eat up!
Creative Variations for Everyone
Don’t settle for one version when you can mix it up!
Flavor Adaptations: Wanna spice things up? Toss in some crushed peppermint for a holiday twist or some orange zest for zesty goodness.
Dietary Modifications: You’ve got gluten allergies? No problem! Just swap the all-purpose flour with a gluten-free blend.
Seasonal Twists: In autumn, think maple and pecans; in summer, maybe some tropical coconut infused chocolate. The world is your oyster go crazy!
Regional Variations: Why not play around by adding flavors from classic British dessert recipes? Try shortbread as the base or even a sticky toffee pudding twist!
Complete Nutrition Guide
Getting all nerdy now let's talk nutrition!
Detailed Breakdown: Each bar has around 250 calories . Not exactly a diet treat, but hey, we’re living.
Health Benefits: Carbs for energy, sugar for sweet satisfaction (we all need that sometimes!), and let’s not forget the buttery toffee goodness makes life a little sweeter.
Dietary Considerations: If you need to watch your sugar, go for dark chocolate. It adds richness and cuts back on sweetness.
Portion Guidance: Access control can be a struggle. Try cutting them smaller if you want to enjoy more without the guilt.
Wrap-Up Sweet Indulgence
So there you have it! your complete guide to creating chocolate and toffee delight bars that’ll make your taste buds do a happy dance.
Remember, cooking is as much about experimentation as it is about following instructions. don’t be afraid to play around. you might just stumble upon your new favorite flavor!
Let’s be real; the joy of baking is in sharing. whip these up for your next party or just for a cozy night on the couch.
You deserve a little sweet indulgence , don’t ya? happy baking! 🍫
Frequently Asked Questions
What makes chocolate and toffee a perfect combination?
The rich, creamy texture of chocolate perfectly complements the crunchy, buttery texture of toffee. This delightful contrast results in a treat that's both indulgent and satisfying, making it a classic favorite for dessert lovers everywhere!
Can I make chocolate and toffee bars gluten-free?
Absolutely! Simply swap out the all-purpose flour for a gluten-free flour blend, and you're good to go. Just keep an eye on the texture; some gluten-free flours may absorb liquids differently, but it should still turn out delicious!
How do I store leftover chocolate and toffee bars?
To keep your bars fresh, store them in an airtight container at room temperature for up to five days. If you want to keep them longer, pop them in the fridge, where they can last for about a week just bring them back to room temp before enjoying!
What are some variations I can try with these chocolate and toffee bars?
There's plenty of room for creativity! You can add toasted nuts for crunch, stir in instant coffee for a mocha flavour, or drizzle with caramel and sprinkle sea salt for a salted caramel twist. The possibilities are as vast as the English countryside!
Do I really need a candy thermometer for the toffee layer?
While it's helpful for achieving the perfect consistency, it's not strictly necessary. If you don't have one, just watch for the toffee to bubble and thicken during cooking; it should reach a slightly firmer state before pouring it over the base. Trust your instincts!
What should I serve with chocolate and toffee bars?
These bars pair wonderfully with a dollop of cream or a scoop of rich vanilla ice cream for an indulgent dessert. A nice cup of English breakfast tea or a mocha coffee is also a classic choice to balance out the sweetness!
Chocolate And Toffee Delight Bars