The Backyard Legend Slowsmoked Gasgrilled Honeyglazed Ribs
- Mastering the Low-and-Slow Secret on a Standard Gas Grill
- The Allure of Backyard Legend: Why These Ribs Reign Supreme
- Assembling Your Flavor Arsenal: Essential Components for Perfection
- Prepping the Protein: Selecting and Preparing Your Rack
- The Step-by-Step Journey to Fall-Off-The-Bone Success
- Executing the Two-Zone Cook: Heat Management is Key
- Pro Tips for Elevating Your Next Batch of Grilled Ribs
- Handling Leftovers and Variations on the Theme
- Recipe FAQs
- 📝 Recipe Card
Mastering the Low-and-Slow Secret on a Standard Gas Grill
There’s nothing quite like the smell of slow cooked, smoky ribs wafting over the garden fence, is there? Many enthusiasts believe achieving that deeply satisfying, tender result requires a dedicated offset smoker, but I’m here to tell you that myth is busted.
This Grilled Ribs Recipe is specifically designed to leverage the consistent, manageable heat of a standard gas grill to deliver pork ribs that rival any competition setup.
We are employing fundamental barbecue physics namely, low heat over a long duration to transform a tough rack of pork into something gloriously yielding. This method is the key to unlocking true mastery over backyard grilling, proving you don't need complicated hardware to achieve legendary status.
The Allure of Backyard Legend: Why These Ribs Reign Supreme
What elevates these ribs above the ordinary? It's the combination of texture and flavour. We are aiming for ribs that are tender enough to make you whisper "wow" before you even get to the sauce. They boast a profound depth of flavour derived from a multi stage cooking process.
The initial low-and-slow phase infuses the meat with the spice blend, while the final moments under the flame create a caramelised, sticky exterior. This approach balances the richness of the pork fat with a necessary counterpoint of acidity and sweetness, resulting in the Best Grilled Ribs experience you can create at home.
Ditching the Smoker: Achieving True Tenderness with Two-Zone Heat
The primary hurdle when cooking something like ribs on a gas grill is heat control. If you blast them over direct flames, they turn dry and tough instantly. The solution lies in two-zone cooking. By lighting only half of your gas burners, you create a hot zone (direct heat) and a cool zone (indirect heat).
This technique allows us to maintain a steady Grilled Ribs Temp —ideally around 250° F ( 120° C) on the cool side.
We wrap the ribs in heavy duty foil for the initial three hours; this crucial step, often called the "Texas Crutch," traps moisture and steam, ensuring the connective tissues break down thoroughly, leading directly to those coveted Fall Off The Bone Ribs .
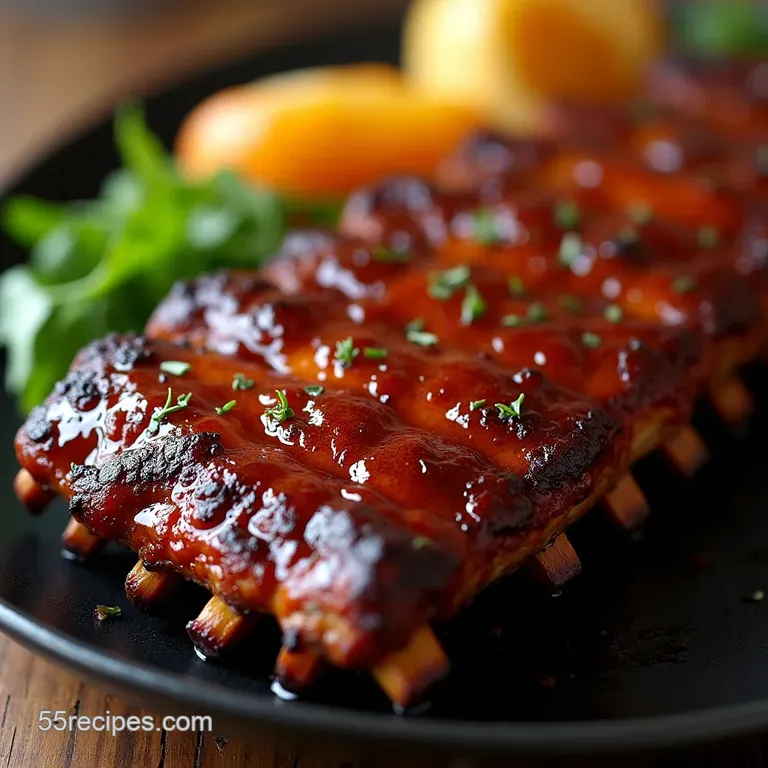
Flavor Profile Unpacked: Sweet, Tangy, and Perfectly Sticky Glaze
The flavour backbone here is a classic American barbecue profile boldly seasoned yet balanced. The dry rub, heavy on brown sugar and smoked paprika, establishes the base layer of flavour during the long cook. However, the real magic comes from the honey bourbon mop sauce applied near the end.
The honey caramelises beautifully, the apple cider vinegar provides a bright tang to cut through the pork richness, and the optional bourbon adds a mature, oaky complexity. This glaze adheres perfectly, creating that sticky exterior that defines great barbecue.
What Makes This Approach the Ultimate Grilled Ribs Solution
This recipe is the definitive Easy Grilled Ribs Recipe because it removes the guesswork often associated with maintaining smoke quality over hours. While smoke flavour is desirable, achieving superb texture is paramount.
By using indirect heat and the foil wrap, we guarantee tenderness on a Grilled Ribs Gas Grill setup. You are essentially braising the ribs in their own juices and spice blend for the majority of the Grilled Ribs Cook Time , only introducing direct heat briefly at the end to build that irresistible, mahogany crust.
This process yields deeply Smoky Grilled Ribs flavour even without a dedicated wood smoker.
Assembling Your Flavor Arsenal: Essential Components for Perfection
Before we fire up the grill, preparation is everything. Success in low-and-slow cooking hinges on the quality of your initial seasoning and the sauce you choose to finish with. You’ll need a robust set of spices for the rub that can penetrate the meat deeply, and a sticky, complex glaze that clings without burning.
Having these elements ready to go ensures that once the heat is on, your process flows seamlessly from seasoning to the final rest.
Prepping the Protein: Selecting and Preparing Your Rack
Start with a good rack of pork ribs St. Louis cut or spare ribs are ideal for this method due to their good balance of meat and fat. The absolute first step, before any seasoning, is removing the silverskin or membrane from the bone side.
Use a dull knife to gently lift a corner, then grab the edge with a paper towel for traction and peel it away cleanly. This membrane prevents flavour penetration and results in a tougher texture, so don't skip this vital prep work.
Once membrane free, pat the entire surface bone dry with paper towels; moisture prevents the rub from adhering properly.
Crafting the Signature Dry Rub Blend: Spice Ratios Defined
For the dry rub, we mix equal parts foundation spices with sweeter notes. Combine 1/2 cup of packed brown sugar, 3 tablespoons of smoked paprika (for that essential colour and hint of smoke), 2 tablespoons of kosher salt, and equal parts black pepper, garlic powder, and onion powder (1 tablespoon each).
If you like a little background heat, add 1 teaspoon of cayenne. The final trick before applying is the binder: lightly brush the entire rack with about 2 tablespoons of yellow mustard.
The mustard flavour cooks off entirely, but its sticky consistency ensures that your meticulously blended rub adheres firmly to every contour of the meat. Massage this blend in thoroughly.
The Sticky Finish: Ingredients for the Honey Bourbon Mop Sauce
The glaze is applied late, but it needs to be ready. In a small saucepan, combine 1/2 cup of honey, 1/4 cup of apple cider vinegar, 1/2 cup of ketchup, 1 tablespoon of Worcestershire sauce, and 2 tablespoons of bourbon (or water if omitting alcohol).
Simmer this mixture gently for about seven minutes, stirring occasionally, until it thickens slightly. Turn off the heat and whisk in 2 tablespoons of unsalted butter right at the end; this emulsifies the sauce, giving it a beautiful sheen and richness that will hold up well under the heat of the grill.
Essential Tools: Gear Needed to Make This Recipe Successful
While we aren't using a smoker, certain tools are non-negotiable for guaranteed success. The most critical piece of equipment for managing the Grilled Ribs Temp is a reliable instant read thermometer. You cannot guess when ribs are done; you must verify the internal temperature and tenderness.
Naturally, you need a gas grill with a lid, but for trapping moisture during the initial phase, ensure you have plenty of heavy duty aluminium foil. This foil wrap is essential for creating the perfect environment for those Grilled Ribs in Foil stage.
Related Recipes Worth Trying
- How to Cook Steak On Perfectly Grilled Every Time — Want to know how to cook steak on the grill like a pro This recipe delivers juicy flavorful results every time Learn sear techniques temp tips Get the recipe
- Crispy Fried Ribs My Chippy Tea Take on Cantonese Style — Forget boring ribs My Crispy CantoneseStyle fried ribs recipe brings chippy tea vibes to a whole new level Crispy moreish ready in under 4 hours Get the recipe
- Grilled Mahi Mahi with Mango Salsa Taste of the Islands — Bring the tropics home with my IslandSpiced grilled mahi mahi recipe Easy healthy and bursting with flavour thanks to a vibrant mango salsa Get the recipe
The step-by-step Journey to Fall Off-The-Bone Success
Once your ribs are rubbed and resting, and your glaze is prepared, it’s time to assemble the cooking apparatus. We are committing to a long haul, so efficiency in setup prevents unnecessary opening of the grill lid later.
This journey involves a significant Cook Time commitment, around four to four and-a-half hours total, broken into distinct phases to manage texture and caramelisation separately. Patience now yields the most tender results later.
Executing the Two-Zone Cook: Heat Management is Key
The goal here is setting up a reliable, low-heat environment. If you have four burners, light only the two on the left or right side. Let the grill come up to temperature, monitoring the lid thermometer until it consistently reads 250° F ( 120° C).
This process might take 15– 20 minutes. Precise heat control is what differentiates acceptable ribs from the legendary kind.
Phase One: Applying the Rub and Initial Low-Heat Infusion
Take your thoroughly seasoned and mustard bound racks. Tightly wrap each rack in two substantial layers of heavy duty aluminium foil. This creates an almost self contained steaming vessel, protecting the meat from direct heat while allowing the rub to penetrate and the fat to render slowly.
Place these foil packets bone side down directly over the unlit burners (the cool side). Close the lid and resist the urge to check them for at least two and a half hours.
How Long to Cook Ribs On the Grill for Maximum Moisture Retention
For the initial infusion, cook the ribs wrapped for a minimum of 3 hours at that consistent 250° F ( 120° C).
This long exposure to indirect, low heat is what breaks down the collagen into gelatin, giving you that characteristic melt-in-your mouth texture. After three hours, carefully open one packet (watch out for escaping steam!) and probe the meat between the bones.
If the meat is beginning to yield and pull back slightly from the bone tips, it’s ready to move to the glazing phase. If they still feel stiff, rewrap and return them to the cool side for another 30 minutes.
Glazing Strategy: Timing the Application of the Sweet Finish
Once the ribs are tender, it’s time to build that beautiful exterior. Carefully unwrap the ribs you may notice a fair amount of liquid in the foil; discard this excess moisture if you want drier ribs, or leave a small amount if you prefer them extra juicy.
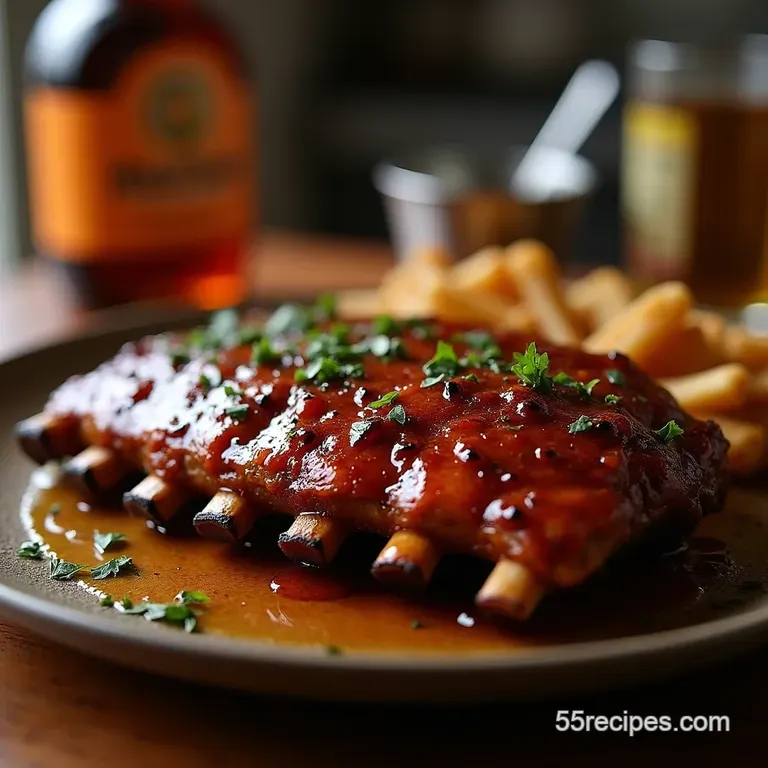
Increase your grill heat slightly to a medium low setting (around 275° F/ 135° C) over the lit burners. Brush a generous, even coat of your honey bourbon glaze onto the top surface.
Place them directly over the lit burners for 5 to 7 minutes. Watch them like a hawk! The sugar content means they can go from sticky to scorched in seconds.
Flip them, glaze the second side, and repeat for another 5 to 7 minutes until the glaze is deeply coloured and tacky.
Pro Tips for Elevating Your Next Batch of Grilled Ribs
To truly elevate your game, remember that temperature consistency is your best ally. If you notice the grill temperature creeping up past 275° F during the low-and-slow phase, briefly turn off one of the lit burners entirely for ten minutes to reset the ambient temperature.
On top of that,, after the final glaze, resting is crucial. Just as with a roast, allow the ribs to rest, tented loosely with foil, for a full 15 minutes off the heat. This allows the muscle fibres to relax and redistribute their juices, ensuring every slice is succulent.
Handling Leftovers and Variations on the Theme
These ribs are fantastic fresh, but they reheat beautifully, making them excellent for meal prepping. If you have leftovers, slicing them first will help retain moisture during reheating.
For the best results, wrap slices tightly in foil and place them back on the indirect heat side of a 225° F ( 107° C) grill for about 20 minutes, or simply microwave them wrapped in a damp paper towel for a minute.
Troubleshooting Common Pitfalls During the Grilling Process
The most common issue when aiming for Fall Off The Bone Ribs is dryness during the final glazing stage. If your ribs seem dry before you apply the glaze, it often means the initial foil stage wasn't sealed well enough, or your grill temperature spiked too high.
If this happens during the final glazing, pull them off immediately, perhaps adding a small spritz of apple juice or water before returning them briefly to the cooler side of the grill to re-moisturize before serving.
Optimal Side Dishes to Pair With Your Smoky Masterpiece
To complement the sweet, smoky richness of these Smoky Grilled Ribs , you need contrasting textures and acidity. A creamy, vinegary coleslaw is the classic choice, offering a cool, sharp crunch.
Alternatively, pairing them with a rich side like homemade smoked macaroni and cheese provides the ultimate decadent comfort meal. For something lighter, grilled corn on the cob dressed simply with lime and cotija cheese works wonderfully to balance the heavy pork fat.
Storage Secrets: Keeping Your Cooked Ribs Tender for Days
If you plan on storing leftovers, always cool the ribs down quickly after resting before packaging. Store them in airtight containers or heavy duty zip-top bags in the refrigerator for up to four days.
For longer storage, freezing works well; wrap individual portions tightly in plastic wrap, followed by a layer of foil, and freeze for up to three months. When reheating, always remember that gentle, moist heat is preferable to dry heat to preserve the texture achieved during that long initial Grilled Ribs Cook Time .

Recipe FAQs
How do I stop my grilled ribs from drying out when cooking for so long?
That's the million dollar question when cooking low and slow! For these gas-grilled ribs, the key is the foil wrap we call it the "Texas Crutch" in barbecue circles. Wrapping them tightly for the first three hours traps all the moisture in, essentially steaming the meat until it’s tender, protecting it from the dry heat.
My grill only has three burners; can I still manage the two-zone cooking for these ribs?
Absolutely, you can manage just fine! You just need to get creative with your heat zones. Light the burner on one side only, and place the ribs on the unlit side. If you only have three, light the far left and far right burners on low, and keep the middle one off; this creates a lovely hot zone on the edges and a cooler spot in the middle for your ribs.
How can I tell if my grilled ribs are done without cutting into them?
Forget just poking them with a fork; we use the 'bend test.' When the meat is perfectly tender, if you lift the rack with tongs in the centre, the whole rack should bend significantly, almost forming a ‘V’ shape, and the surface of the meat should show slight cracks.
If it breaks completely, you’ve gone too far and they might fall apart on the platter!
The recipe calls for bourbon in the glaze; what if I want to skip the alcohol?
No worries at all, that happens in every kitchen! If you skip the bourbon, you’ll lose a touch of that deep, oaky complexity, but you can easily substitute it. Try using an equal amount of strong, black coffee or even a splash more apple cider vinegar mixed with a little extra brown sugar to mimic the lost depth.
Can I prepare the dry rub and glaze ahead of time to make this easier on the day?
That’s a top-tier tip for any keen cook! Yes, you can definitely prep ahead. The dry rub will keep airtight at room temperature for months, and the glaze can be made and stored in the fridge for up to a week; just reheat it gently on the stove before you plan to baste the ribs near the end of the cook.
Gas Grill Honey Ribs
Ingredients:
Instructions:
Nutrition Facts:
| Calories | 2262 kcal |
|---|---|
| Protein | 26.2 g |
| Fat | 55.8 g |
| Carbs | 128.6 g |
| Fiber | 23.5 g |
| Sodium | 1422 mg |
