Microwave Chocolate Cake in a Cup: Molten Core

- Time: Active 2 minutes, Passive 1 minute, Total 3 minutes
- Flavor/Texture Hook: Deeply fudgy with a molten chocolate core
- Perfect for: Late night cravings, portion controlled snacking, or beginner bakers
- Perfecting Your Microwave Chocolate Cake in a Cup
- Why This Steam Bake Method Works
- Picking Pantry Staples for Deep Flavor
- Essential Specs for Your Mug Treat
- Simple Tools for This Quick Bake
- Creating a Velvety Fudgy Result
- Fixing Common Microwave Baking Mishaps
- Smart Swaps for Budget Snacking
- Storing and Keeping Your Cake Fresh
- Elegant Presentation for Mug Cakes
- Dispelling Kitchen Myths
- Recipe FAQs
- 📝 Recipe Card
Perfecting Your Microwave Chocolate Cake in a Cup
Picture this: It is 9:45 PM on a Tuesday. The house is quiet, but you have that undeniable, nagging itch for something chocolatey. You don't want to wash a dozen bowls or wait forty minutes for an oven to preheat.
I’ve been there more times than I can count, and for years, I ended up with what I can only describe as "chocolate flavored pencil erasers." You know the type spongy, tough, and frankly, a bit sad.
That all changed when I stopped treating the microwave like a mini oven and started treating it like a steamer. The moment I pulled that first successful mug out the steam rising in curls, the center still wobbling slightly, and the aroma of Dutch processed cocoa filling the kitchen I knew I’d cracked the code.
This isn't just a "good for the microwave" dessert; it’s a genuinely velvety cake that rivals anything from a box mix.
We are going to walk through how to keep that crumb tender and how that single piece of dark chocolate in the center changes everything. It’s all about the moisture balance. If you've ever felt personally victimized by a dry mug cake, this is the recipe that will finally make things right between you and your microwave.
Why This Steam Bake Method Works
- Rapid Molecular Friction: Microwave radiation excites water molecules, creating instant steam inside the batter that inflates the air bubbles trapped by the baking powder.
- Fat to Flour Ratio: The neutral oil and egg yolk provide a structural barrier around the flour proteins, preventing excess gluten from forming in the short cooking window.
- Latent Heat Carryover: Letting the cake rest allows the internal temperature to stabilize, ensuring the center sets without the edges becoming tough.
| Method | Time | Texture | Best For |
|---|---|---|---|
| Microwave Mug | 1 minute | Fudgy/Steamed | Instant cravings |
| Traditional Oven | 20 minutes | Airy/Crisp Edges | Dinner parties |
| Air Fryer Mug | 12 minutes | Dense/Cakey | Small batch baking |
There is a massive difference between a dry sponge and a molten treat. While the oven provides dry heat to create a crust, the microwave relies on the moisture within the ingredients to cook the cake from the inside out, which is why we need to be very precise with our liquids.
Picking Pantry Staples for Deep Flavor
| Ingredient | Science Role | Pro Secret |
|---|---|---|
| Dutch Cocoa | Provides color and base flavor | Sift it first to prevent bitter clumps. |
| Large Egg | Binds the fats and liquids | Room temperature eggs emulsify faster. |
| Baking Powder | Creates the "lift" or rise | Check freshness by dropping a bit in water. |
| Dark Chocolate | Creates the molten lava core | Use 70% cacao for a sophisticated bite. |
Finding the right ingredients doesn't mean spending a fortune. I usually grab the store brand all purpose flour and granulated sugar, but I don't skimp on the cocoa. If you're looking for other ways to use up that cocoa powder, you might love my German Chocolate Cupcakes recipe for your next weekend project.
Essential Specs for Your Mug Treat
- 4 tbsp all purpose flour Why this? Provides the structural foundation for the cake.
- 2 tbsp Dutch processed cocoa powder Why this? Offers a smoother, darker chocolate profile.
- 3 tbsp granulated sugar Why this? Sweetens and helps tenderize the crumb.
- 1/4 tsp baking powder Why this? The primary leavening agent for a light texture.
- 1 pinch fine sea salt Why this? Enhances the perception of chocolate intensity.
- 1 large egg Why this? Adds richness and holds the cake together.
- 3 tbsp whole milk Why this? Provides the necessary moisture for steaming.
- 2 tbsp neutral oil Why this? Keeps the cake moist longer than butter.
- 1/2 tsp vanilla extract Why this? Rounds out the flavor profile.
- 1/4 tsp instant espresso powder Why this? Amplifies the chocolate without adding coffee flavor.
- 1 large piece dark chocolate (70% cacao) Why this? Creates the signature molten lava center.
Simple Tools for This Quick Bake
You don't need a stand mixer or even a whisk for this. A standard 12 ounce ceramic mug is your best friend here. Make sure it's microwave safe usually, the bottom will tell you. If you use a mug that is too narrow and tall, the heat might not reach the center evenly.
I prefer a wider, shorter mug which allows the batter to expand comfortably without a "volcano" effect.
A simple dinner fork is actually better than a spoon for mixing. The tines act like a mini whisk, breaking up the egg and incorporating the cocoa powder without leaving pockets of dry flour at the bottom. Believe me, biting into a dry clump of flour is the quickest way to ruin your dessert vibe.
Creating a Velvety Fudgy Result
- Whisk dry base. Place the flour, cocoa powder, sugar, baking powder, salt, and espresso powder into your mug. Note: Mixing these first prevents the cocoa from clumping once wet.
- Combine wet ingredients. Crack the egg into the mug and add the milk, oil, and vanilla extract.
- Emulsify the batter. Use a fork to beat the mixture until no dry streaks remain and the batter looks glossy.
- Insert the core. Take that large piece of dark chocolate and push it right into the center of the batter. Note: Don't push it all the way to the bottom or it might stick.
- Clean the rim. Wipe any splashes off the inside rim of the mug with a paper towel. This prevents burnt bits from forming.
- Pulse the cook. Microwave on high for 60 seconds. Watch for the cake to rise and the surface to look matte.
- Check for doneness. The edges should be set, but the very center should still look slightly damp.
- Rest the cake. Let the mug sit in the microwave for 1 minute before touching it. Note: This carryover cooking finishes the center gently.
- Serve warm. Grab a spoon and dive in while the chocolate center is still liquid.
Chef's Tip
Freeze your piece of dark chocolate for 10 minutes before pushing it into the batter. This slow thaw technique ensures the cake cooks through before the chocolate fully melts into a puddle.
Fixing Common Microwave Baking Mishaps
Why Your Cake Is Rubbery
If your cake feels like a bouncy ball, you likely overcooked it or used too much egg. Microwaves vary wildly in power. A 1200 watt microwave might only need 45 seconds, while a 700 watt model needs the full minute.
Why Your Cake Is Dry
Dryness usually stems from a lack of fat or over mixing. When you stir too vigorously, you develop gluten, which toughens the cake. Stir just until the ingredients are combined nothing more.
| Problem | Root Cause | Solution |
|---|---|---|
| Cake Overflowed | Mug was too small | Use a 12oz mug or fill only halfway. |
| Gritty Texture | Sugar didn't dissolve | Whisk the egg and sugar together longer. |
| Tough Crumb | Overcooking | Reduce time by 10 seconds next time. |
Common Mistakes Checklist
- ✓ Check the wattage of your microwave; higher wattage requires shorter cook times.
- ✓ Never skip the salt; it is the "volume knob" for the chocolate flavor.
- ✓ Avoid using cold milk; room temp liquids blend more smoothly with the oil.
- ✓ Use a neutral oil like canola or vegetable; olive oil can be too savory here.
- ✓ Always let it rest; the texture improves significantly after 60 seconds of cooling.
Smart Swaps for Budget Snacking
Scaling this recipe down is easy since it’s already a single serving. If you want to make two, don't just double the time! Microwave two mugs separately to ensure even heat distribution. If you're out of specific items, check the table below for budget friendly pivots that won't ruin your snack.
| Original Ingredient | Substitute | Why It Works |
|---|---|---|
| Whole Milk | Water + 1 tsp oil | Adds moisture. Note: Result will be slightly less creamy. |
| Dutch Cocoa | Natural Cocoa Powder | Works fine. Note: Add a tiny pinch of baking soda to neutralize acidity. |
| Neutral Oil | Melted Butter | Adds a rich, dairy flavor but can make the cake firmer. |
If you're looking for a different kind of quick fix, I also have a Microwave Coffee Cup recipe that focuses on a slightly lighter texture. It’s a great comparison if you want to see how different ratios affect the final crumb.
Storing and Keeping Your Cake Fresh
Honestly, these are best eaten the second they are cool enough not to burn your tongue. However, if you can't finish it, you can cover the mug with plastic wrap and keep it on the counter for about 24 hours. To reheat, just give it a 10 second zap in the microwave to loosen the chocolate again.
For a zero waste tip: If you find yourself with a few tablespoons of leftover coffee in the pot, use that instead of the milk! It deepens the chocolate flavor beautifully and saves you from pouring that liquid gold down the drain.
You can also crumble a stale mug cake over vanilla ice cream for a quick "cake shake" the next day.
Elegant Presentation for Mug Cakes
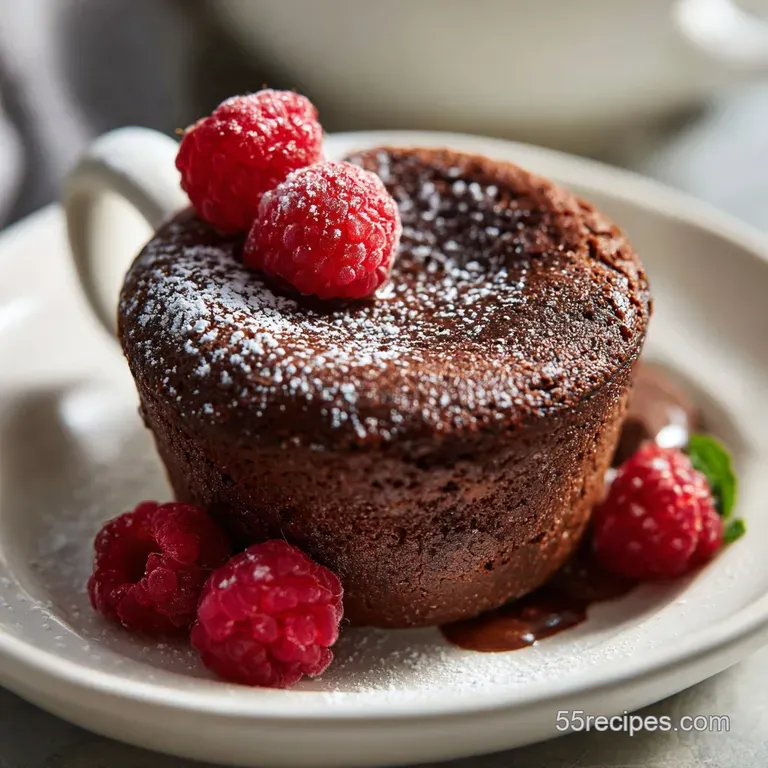
Just because it was made in a microwave doesn't mean it has to look like a science experiment. A quick dusting of powdered sugar through a fine mesh sieve makes a world of difference. It covers any unevenness on the surface and looks like a "shatter" of snow against the dark chocolate.
If you really want to impress someone (or yourself), add a dollop of whipped cream or even some of my Dreamy Homemade Frosting recipe. The contrast between the hot, steaming cake and the cold frosting is absolutely velvety on the palate. A few fresh raspberries on top add a nice acidic pop to cut through the richness of the 70% dark chocolate core.
Dispelling Kitchen Myths
One major myth is that you must use a specialized "mug cake mix" to get a good result. In reality, those mixes are just overpriced flour, sugar, and cocoa with extra preservatives. Your pantry has everything you need for a better, cheaper version.
Another common misconception is that the cake is "done" when it looks dry on top. If the top is completely dry and firm while still in the microwave, you have already overcooked it. You want a tiny bit of "glisten" or dampness in the center.
The carryover heat will finish the job while the mug sits on your counter, leaving you with a fudgy interior instead of a dry brick.
Finally, people often think you can't get a "molten" center without a complicated lava cake recipe. By simply tucking a solid piece of high-quality chocolate into the middle of the batter, you create a localized area of melted ganache like texture that is foolproof and incredibly satisfying. For more chocolate inspiration, check out this How to Bake recipe for brownie cupcakes!

Recipe FAQs
Is it necessary to use high powered microwave for this cake?
No, but wattage dictates time. Lower wattage microwaves (under 800W) require longer cooking, often needing up to 15-30 extra seconds per cake.
How to avoid a rubbery texture in the finished mug cake?
Reduce cooking time significantly. Stop microwaving when the edges look set but the very center still appears slightly wet or glossy.
What is the primary function of adding espresso powder?
It intensifies the existing chocolate flavor. Espresso powder acts as a flavor amplifier, making the cocoa taste richer without introducing a noticeable coffee taste.
How to ensure a truly molten chocolate center instead of a solid chunk?
Push a single piece of high cacao chocolate into the batter center. This piece should be slightly frozen or very cold to delay melting until the surrounding cake is nearly set.
Can I substitute vegetable oil with melted butter for this recipe?
Yes, but the texture will be slightly denser. Butter adds superior flavor, but oil keeps the cake moister longer in the microwave environment, which is crucial for quick cooking.
How to prepare a batch of two cakes simultaneously?
Microwave each cup individually on the same power setting. Placing two mugs in the microwave usually leads to uneven cooking, resulting in one undercooked and one dry cake.
Is this recipe a suitable replacement for a traditional baked dessert?
No, it is best viewed as an immediate craving solution. While delicious, the steamed texture differs from the light crumb achieved by oven baking; for a comparable oven experience, review the techniques in our How To Cook recipe.
Microwave Chocolate Cake In A Cup

Ingredients:
Instructions:
Nutrition Facts:
| Calories | 730 kcal |
|---|---|
| Protein | 14.7 g |
| Fat | 42.6 g |
| Carbs | 79.1 g |
| Fiber | 5.2 g |
| Sugar | 41.5 g |
| Sodium | 345 mg |
