No-Bake Cornflake Candy Delight
- The Sweet Childhood Classic That'll Delight Any Gathering
- Essential Ingredients Guide to Delicious No-Bake Treats
- Mastering the Art of No-Bake Cornflake Candy Delight
- Step-by-Step Process
- Expert Techniques to Elevate Your Candy Game
- Success Strategies
- Pro Tips & Secrets to Make Your No-Bake Cornflake Candy Delight Shine
- Perfect Presentation for Your Candy Treats
- Storage & Make-Ahead Tips for Sweet Delight
- Creative Variations to Spice Things Up
- Complete Nutrition Guide
- Expert FAQ Solutions
- Conclusion: Let’s Get Crunchy!
- 📝 Recipe Card
The Sweet Childhood Classic That'll Delight Any Gathering
Have you ever had one of those desserts that takes you straight back to your childhood? no-bake cornflake candy delight in 45 minutes is just that for me.
I remember standing on a stool in my grandmother’s kitchen, watching her whip up sweet treats that seemed to magically appear from nowhere.
It's funny how a simple recipe can hold so many memories. often, it becomes a tradition to serve this treat at family picnics or birthday parties, and i could always count on my aunty’s familiar voice saying, “don’t hog them all!” oh my gosh, i could never resist snagging an extra piece (or two)!
A Nostalgic Treat with a Modern Twist
The beauty of cornflake treats is that they’ve been around for ages. they first gained popularity decades ago, relying on simple ingredients to create a crunchy, sweet masterpiece that sparkles at every gathering.
Today, these no-cook desserts are all the rage, especially during hot summer months when no one wants to turn on the oven.
They’re perfect for little hands looking for something fun to make, or a quick fix when guests pop in unexpectedly.
And did i mention? this recipe is super easy, taking just 45 minutes from start to finish!
You won’t need to worry about precise baking times or advanced skills, either. this treat is rated easy and can be whipped up by just about anyone.
As for cost, you'll be pleasantly surprised that you can make this gem without breaking the bank. you likely have most of these ingredients in your pantry already, so why not give it a shot?
Why You'll Love This Recipe
Now let’s talk benefits. first off, this homemade candy is a great alternative to store-bought snacks. it blends the nostalgic flavors of chocolate desserts and the unmistakable crunch of cornflakes into a combo that’s both sweet and salty .
It’s like a party in your mouth! and with a bit of marshmallow magic, it's a treat that kids just adore.
Can you say kid-friendly recipes ?
This delight is not just a treat; it holds a special spot for holidays, birthday parties, or any festive occasion.
Think about it what better way to win at a potluck than bringing these delightful marshmallow snacks that will leave everyone satisfied and maybe a bit sticky? plus, you can customize it with nuts or dried fruits to cater to your guests' tastes who doesn’t love a little customization?
A Quick Sneak Peek at How It Works
You won't believe how easy this is! in about 15 minutes of prep time and another 30 minutes of chilling, you’ll have around 12 servings of crunchy goodness, just waiting to be devoured.
And if you ever find yourself needing a last minute dessert for a gathering, these delightful no-bake treats for kids can be a lifesaver.
Whether it's for a summer picnic or just a sweet snack at home, no-bake cornflake candy delight fits right in.
And remember, the recipe is flexible; you can swap ingredients and even dress it up with different toppings.
Ready to look into into the Good Stuff?
Now that i've piqued your interest, you’re probably wondering what goes into this incredible recipe. here comes the fun part the ingredients ! grab your mixing bowls and let’s start creating a sweet memory or two.
Essential Ingredients Guide to Delicious No-Bake Treats
When it comes to whipping up no-bake desserts like my favorite no-bake cornflake candy delight in 45 minutes , having the right ingredients in your pantry makes all the difference.
So, let’s dive into some key essentials to help you create this crunchy and sweet masterpiece!
Premium Core Components
First things first, let’s talk about measurement. you’re gonna need 3 cups of cornflakes, 1 cup of semi sweet chocolate chips, 1 cup of mini marshmallows, and ½ cup of unsalted butter.
Here’s the kicker: for those who prefer precise measurements, that’s about 75 grams of cornflakes , 150 grams of chocolate chips , and 225 grams of marshmallows .
It’s like your own little cooking cheat sheet!
When searching for quality, look for fresh and crunchy cornflakes that haven’t gone stale. for chocolate chips, a good rule of thumb is to check for a shiny coating and rich aroma.
Oh, and did i mention storing your ingredients? keep your marshmallows in an airtight container trust me, they’ll last longer that way.
Freshness counts, people!
Signature Seasoning Blend
Now, while this no-bake recipe shines with simplicity, you can jazz it up! add a pinch of salt to that buttery chocolate mixture for a sweet and salty surprise.
If you’re feeling adventurous, toss in some chopped nuts or dried fruit for extra flavor. regional variations abound, so don’t hesitate to mix in ingredients that remind you of home, like some coconut or even seasonal favorites like pumpkin spice!
Smart Substitutions
Now let’s get real sometimes we run out of an ingredient or two. no problem! if you ever find yourself missing those mini marshmallows , regular marshmallows cut down to size work perfectly! no chocolate chips? grab yourself some cocoa powder and a little coconut oil instead.
Whatever you do, don’t hesitate to improvise. that’s what home cookin’ is all about!
Kitchen Equipment Essentials
Before getting into the fun part, let’s not forget the tools. you’ll need a medium saucepan, a mixing bowl, and a rubber spatula.
Honestly, if you don’t have a rubber spatula, don’t stress; a regular wooden spoon will do just fine! for the best results, i always recommend lining your baking dish with parchment paper.
That way, you’ll have no trouble getting those little squares out later.
Road to Crunchy Candy Bars
As we gear up for our no-bake cornflake candy delight , remember this is all about fun and creativity . you’re not just making a dessert; you’re creating a little magic in your kitchen! it’s a great recipe for kids, too! got little ones underfoot?
Let them sprinkle in the chocolate chips or help pour the cornflakes.
It’ll be a bonding experience, and they’ll get a kick out of creating something sweet!
In just 45 minutes, you can whip up a batch of these easy candy recipes . perfect for parties, summer snacks, or even a random tuesday afternoon when cravings hit.
Once you master the basics, feel free to get creative and make your own variations!
So, grab your ingredients, gather those tools, and let’s dive into the step-by-step instructions for our delicious no-bake cornflake candy delight in 45 minutes .
It's all about having fun and making something people will rave about! are you ready? let's get cooking!
Mastering the Art of No-Bake Cornflake Candy Delight
So, let’s dive into one of the simplest, most scrumptious things you can whip up in your kitchen no-bake cornflake candy delight in 45 minutes .
Seriously, no oven needed! we're talking about a delightful mix of crunchy cornflakes, sweet marshmallows, and melt-in-your mouth chocolate. perfect for parties, this easy candy recipe is not just a dessert; it's the stuff of memories.
Essential Preparation Steps
Before we get elbow deep in deliciousness, let’s chat about some important prep steps. first, let’s talk mise en place . it might sound fancy, but it just means having everything ready before you start cooking.
Measure out 3 cups of cornflakes, 1 cup of chocolate chips, 1 cup of mini marshmallows, and ½ cup of butter.
Gather all your goodies upfront so you can focus on the fun part: mixing everything together!
Time management is also key. for this recipe, you’ll need about 15 minutes of prep time and then 30 minutes of chilling .
So, set a timer, and grab a snack while you wait! keeping things organized is a game changer too. use a clean workspace and bowls for stirring.
Plus, don’t forget to turn on your favorite tunes; it makes the whole experience so much better!
Oh, and safety first! when melting butter and chocolate, do it over low heat. burning that chocolate is a tragedy i wouldn't wish on anyone.
If you keep the heat down, you’ll have a smooth, melty chocolate to work with.
Step-by-step Process
Now for the fun part! Here’s a straightforward step-by-step guide to get you rocking and rolling:
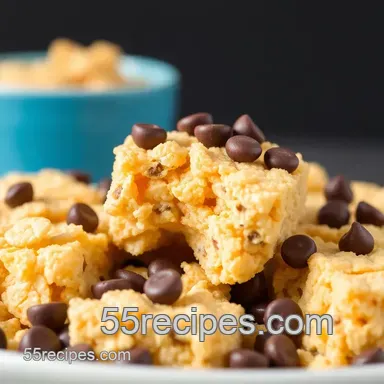
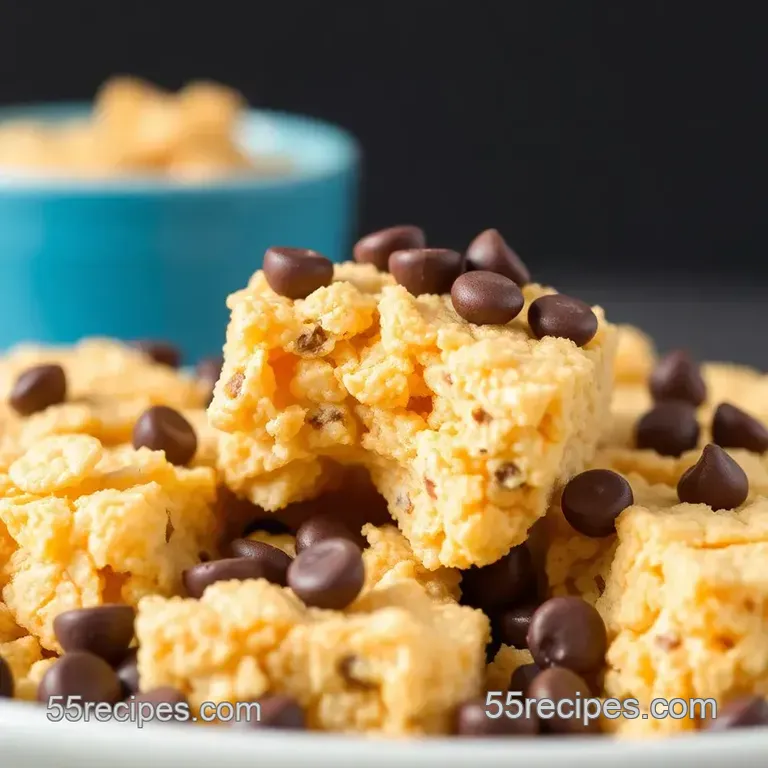
Prepare the Dish: Line a 9x9 inch baking dish with parchment paper. Trust me; it makes removal way easier later.
Melt butter and chocolate: in a medium saucepan, melt ½ cup of butter over low heat. once it’s all gooey and melty, toss in 1 cup of chocolate chips and stir until it’s smooth.
It should be silky and irresistible!
Mix in marshmallows: remove your saucepan from the heat and fold in the 1 cup of mini marshmallows. keep stirring until they’re coated and just starting to melt.
This is where the magic happens!
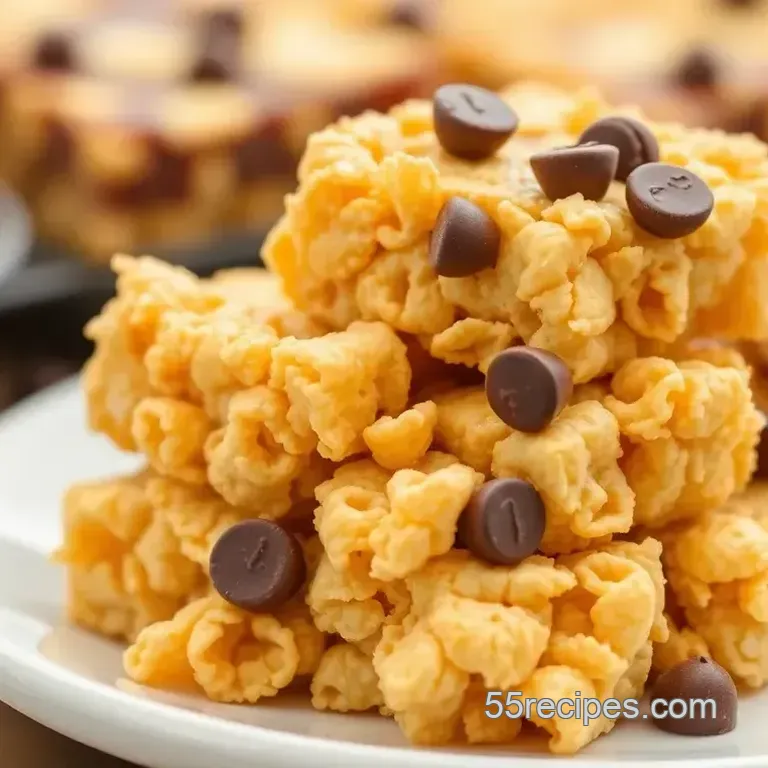
Combine with Cornflakes: Dump your cornflakes into a big mixing bowl, and pour that gooey mixture over them. Gently fold until every flake is covered in that decadent chocolate and marshmallow goodness.
Add Optional Ingredients: Want to jazz it up? Toss in some chopped nuts or dried fruit. It adds a fun twist and more texture.
Transfer to the Dish: Scoop your mixture into the prepared dish and press it down flat with a spatula. Make it nice and even for those perfect squares later.
Chill and Set: Pop that beauty in the fridge and let it chill for at least 30 minutes . This is the hardest part the waiting!
Slice and Serve: Once it’s set, remove it from the dish and cut it into squares. Serve right away, or store them in an airtight container for an impressive homemade candy treat later!
Expert Techniques to Elevate Your Candy Game
Let’s make sure your no-bake candy is just right. Here are some expert tips that I learned the hard way:
Keep the Heat Low: This is a must! Melting chocolate and butter too fast can lead to disaster. Keep it slow and steady, and your candy will turn out perfectly.
Don’t Overmix: When combining the cornflakes, fold gently. You want those crunchy flakes to remain intact, not turn into mush!
Customize Your Mix-ins: Go wild! Add peanut butter or even coconut for a twist that’ll have folks asking for your “secret” recipe.
Quality Checkpoints: Taste test! If you find your mixture too sweet, a pinch of salt can balance everything out beautifully.
Success Strategies
Now that you’re on your way to being a candy boss, here are some things to keep in mind to avoid common pitfalls:
Avoid overcooking the chocolate: If it looks grainy, you’ve gone too far.
Store in a cool place: Warm areas can turn your treats into a gooey mess. Keep them chilled until you're ready to serve.
Perfect results guide: For firmer candy, chill for an hour instead of 30 minutes .
make-ahead options: These snacks are perfect for prepping ahead of a gathering. They'll keep well in the fridge for at least a week!
So, there you have it! Your guide to creating scrumptious No-Bake Cornflake Candy Delight that’s easy, quick, and sure to impress.
If you're looking for other tasty options or want to explore more about no-bake desserts , stay tuned for our next section, Additional Information . You won’t want to miss it!
Pro Tips & Secrets to Make Your No-Bake Cornflake Candy Delight Shine
Oh my gosh, let me tell you if you’ve never tried making no-bake cornflake candy delight in 45 minutes , now is your time! this recipe is not just about mixing a few ingredients.
It's about creating something magical. yep, i’m serious!
Chef's Personal Insights
First off, one of my favorite tricks is the low and slow method. when melting the butter and chocolate, heat is your enemy.
Go low and keep stirring. it’ll save your chocolate from burning. trust me, i learned this the hard way, and nobody wants a scorched chocolate disaster, right?
Time Saving Techniques
Got a busy kitchen? i feel you! to save time, while your butter and chocolate are melting, prep your baking dish.
Line it with parchment paper for easy cleanup later. you’ll thank yourself when it’s time to turn out those crunchy bars.
Flavor Enhancement Tips
For an extra punch, think about adding peanut butter or some vanilla extract while melting the chocolate. this adds a little oomph to your no-bake cornflake candy delight and makes your taste buds dance! you can’t go wrong with a little creativity.
Presentation Advice
Let’s talk presentation because we all know we eat with our eyes first. once you’ve cut your candy bars, stack ‘em on a colorful plate.
Throw in some fresh berries around it for that pop of color. it’s not just a treat; it’s a centerpiece!
Perfect Presentation for Your Candy Treats
Once your creation is chilled and set, it’s time to wow your friends and family.
Plating Techniques
To plate, you can arrange the candy squares in a triangle or fan shape for visual impact. if you’re channeling your inner chef, layer them in a clear glass container to show off those crunchy layers.
Garnish Ideas
Adding a drizzle of melted chocolate on top or a sprinkle of sea salt can elevate your no-bake cornflake candy delight to a whole new level.
Seriously, a little salt can bring out those sweet flavors. just do it!
Color Combinations
Don’t forget about color! When you’re serving, you’ll want to keep it bright and cheerful. Fresh mint leaves or a dusting of powdered sugar can look fancy without any extra effort.
Visual Appeal Tips
If you want to go fancy, consider sprinkling some chopped nuts or dried fruit on top for a rustic look.
It gives that "wow" factor and helps everyone know what’s in those delicious bars!
Storage & make-ahead Tips for Sweet Delight
One of the best things about these no-bake treats ? They’re easy to make ahead!
Storage Guidelines
Store your cornflake bars in an airtight container at room temperature or in the fridge. They’ll last about a week, but let’s be real these are too good to last long!
Preservation Methods
Want to keep those flavors fresh? Storing them in a freezer safe bag can be your best friend. Just make sure to separate layers with wax paper to keep ‘em from sticking together.
Reheating Instructions
No reheating needed here! These bars are perfect just as they are. Seriously, they’re made to be enjoyed straight from the fridge.
Freshness Duration
If stored correctly, you can expect these crunchy candy bars to keep their yumminess for up to two weeks. But let’s face it; they’ll likely be gone before then!
Creative Variations to Spice Things Up
Let your imagination run wild with these variations!
Flavor Adaptations
Feeling adventurous? Swap out the chocolate chips for white chocolate or dark chocolate . Or take it a notch higher with caramel chips —hello, flavor explosion!
Dietary Modifications
For those watching their diet, you can substitute sugar-free chocolate chips or gluten-free cornflakes . Everyone deserves a treat, right?
Seasonal Twists
Make it festive! Add a hint of pumpkin spice in the fall or colorful sprinkles for birthday parties. Seasonal treats make every gathering special.
Regional Variations
Try adding local favorites! For instance, if you're in the south, throw in some pecans. Up north? Maybe some dried cranberries. There are no limits to how creative you can be!
Complete Nutrition Guide
Let’s get a handle on the healthy part of this delicious recipe.
Detailed Breakdown
Each piece packs in about 180 calories , with decent carbs for energy great for a quick pick-me-up!
Health Benefits
Cornflakes provide that crunch while keeping things light, and marshmallows? Well, let’s just say they deliver the sweet satisfaction we crave.
Dietary Considerations
For those with dietary needs, this recipe is easy to tweak. Just replace ingredients to fit your needs, so everyone can join the fun!
Portion Guidance
You can easily cut these into smaller or larger squares, depending on your crowd. Party treats or a simple afternoon snack? You got it!
Expert FAQ Solutions
Got a question? I’ve got answers!
Common Questions
"Can I make them nut-free?" Absolutely! Just leave out the nuts or swap for seeds.
Troubleshooting Guide
If your bars don’t set, they probably weren’t chilled long enough. Just pop ‘em back in the fridge for a spell!
Success Tips
Don't freak out if things look a little messy. They’ll taste amazing no matter what!
Variations Explained
Not sure about flavors? Go with what sounds good to you! Feel free to mix and match your kitchen, your rules!
Conclusion: Let’s Get Crunchy!
The no-bake cornflake candy delight in 45 minutes is a home run for any occasion. it’s such a hit because it’s simple, delicious, and always adaptable! challenge yourself with those creative variations, and don’t forget to share the love.
This is a recipe where everyone can find joy. give it a whirl, and get ready for a crunch that truly delights! happy snacking!
No Bake Cornflake Candy Delight In 45 Minutes