Oven Roast: the Definitive Guide to Perfect Herb-Crusted Roast Beef
- The Definitive Guide to the Perfect Herb-Crusted Oven Roast
- Unlocking Flavour: The Science Behind a Tender Roast
- Essential Ingredients for Your Magnificent Oven Roast
- Step-by-Step: Preparing and Roasting the Joint to Perfection
- Chef's Secrets and Troubleshooting Your Oven Roast
- Make-Ahead, Storage, and Reheating the Roast
- Completing the Feast: Expert Serving Suggestions
- Recipe FAQs
- 📝 Recipe Card
The Definitive Guide to the Perfect Herb Crusted Oven Roast
Forget everything else; the smell of a perfect roast filling your kitchen is pure magic. That blast of rosemary and garlic hitting the hot oven air? Instantly transports you to Sunday lunch at grandma's house.
It promises juicy tenderness encased in a savory, crunchy crust, and that's exactly what we're achieving today.
Most people think a magnificent roast means hours of fuss, often resulting in joints that are dry or grey, but I’m here to tell you that’s total rubbish. This two-stage, over high heat method takes the guesswork out, delivering impressive results without slaving away all morning.
It’s actually shockingly simple once you understand the science of searing and resting.
I made all the classic mistakes, pulling out joints that looked suspiciously grey and tasted like boot leather (true story). Now I know the secrets, and trust me, they involve a thermometer, precise timing, and some serious seasoning. Ready to crack on and make the best oven roast of your life?
Unlocking Flavour: The Science Behind a Tender Roast
The Glory of the Sunday Centrepiece: Why Top Rump Excels
We are focusing on the Top Rump today because it is a fantastic balance of flavour and value. It has enough marbling to stay moist but is lean enough that it holds its shape beautifully for carving. Other joints, like a Rib-Eye, are easier, but the Top Rump requires respect to truly shine.
Mastering the Maillard Reaction for the Ultimate Crust
The secret to a dark, caramelized crust isn't magic; it's the Maillard reaction. That intense blast of initial high heat is necessary to achieve this gorgeous browning. You must ensure the surface is bone dry before seasoning, otherwise, the energy is wasted boiling off surface moisture instead of building flavour.
Setting Expectations: Achieving Internal Temperature Precision
Timing a roast by the clock alone is like navigating by guessing the direction of the wind. It’s unreliable, often leading to overcooked meat. Your affordable digital probe thermometer is the single best investment you will ever make in the kitchen, guaranteed.
We pull the joint from the oven early because the internal temperature continues to climb dramatically while it rests.
The Power of over High heat Searing
Searing at 220°C (425°F) for just 15 minutes accomplishes two things: it kickstarts that Maillard crust and crisps up the herby fat layer. It sets the foundation.
Then we drop the temperature, allowing the heat to gently penetrate the centre without burning the beautiful crust we just created.
Why the Long Rest is Non-Negotiable
If you cut into your roast straight away, all those precious juices run out onto the board, leaving you with dry meat. Resting allows the contracted muscle fibres to relax and reabsorb those delicious liquids. This is the step that makes your roast juicy.
Twenty minutes is the absolute bare minimum, and honestly, thirty is better.
Crucial Chef’s Note: The joint can easily rest for 45 minutes covered loosely with foil and still be piping hot inside. Your sides will catch up, I promise.
Optimizing the Herb-to-Fat Ratio
We use generous amounts of fresh herbs mixed with oil and salt to create a thick paste. The oil carries the flavours deep into the meat surface and, crucially, protects the herbs from scorching during the initial over high heat sear. Don't skimp on the salt either; the thick crust needs powerful seasoning.
Essential Ingredients for Your Magnificent Oven Roast
Selecting the Ideal Top Rump Joint
Look for a joint that has good shape and a thin, uniform layer of fat on one side. If it's awkwardly shaped or floppy, use kitchen twine to tie it up tightly into a cylinder. This ensures even cooking from edge to edge.
Building the Aromatic Herb Paste (The Crust)
Fresh herbs are non-negotiable here; they lend a brightness that dried versions simply can’t match. Rosemary is robust and perfect for roasting, while thyme adds a subtle, earthy depth. The garlic must be crushed or very finely minced so it doesn't burn during that searing phase.
Oil and Seasoning: The Carriers of Flavor
We need a stable oil for the rub, preferably good quality olive oil or a neutral alternative. Coarse salt, like sea salt flakes, is far superior to fine table salt here. The flakes stick better to the surface and create pockets of concentrated salinity that boost flavour dramatically.
Ingredient Quality Notes and Sourcing
Don’t use pre-ground pepper; it loses its potency too quickly! Grind your own black pepper right before making the rub for that fiery kick. For the ultimate umami kick in your gravy base, sometimes I even throw in a teaspoon of my Tomato Paste Chefs Own SlowRoasted Umami Bomb Recipe into the pan aromatics.
| Ingredient | Viable Substitution | Quality Notes |
|---|---|---|
| Top Rump Joint | Sirloin or Rib-Eye | Choose a joint that is well marbled but not excessively fatty. |
| Fresh Rosemary/Thyme | Dried herbs (Use half the quantity) | The flavour is less vibrant, but serviceable in a pinch. |
| Olive Oil | Grapeseed or Sunflower Oil | Use a neutral oil with a high smoke point for the rub. |
| Carrots/Onions | Leeks or Parsnips | Use anything to lift the meat and flavor the pan drippings. |
step-by-step: Preparing and Roasting the Joint to Perfection
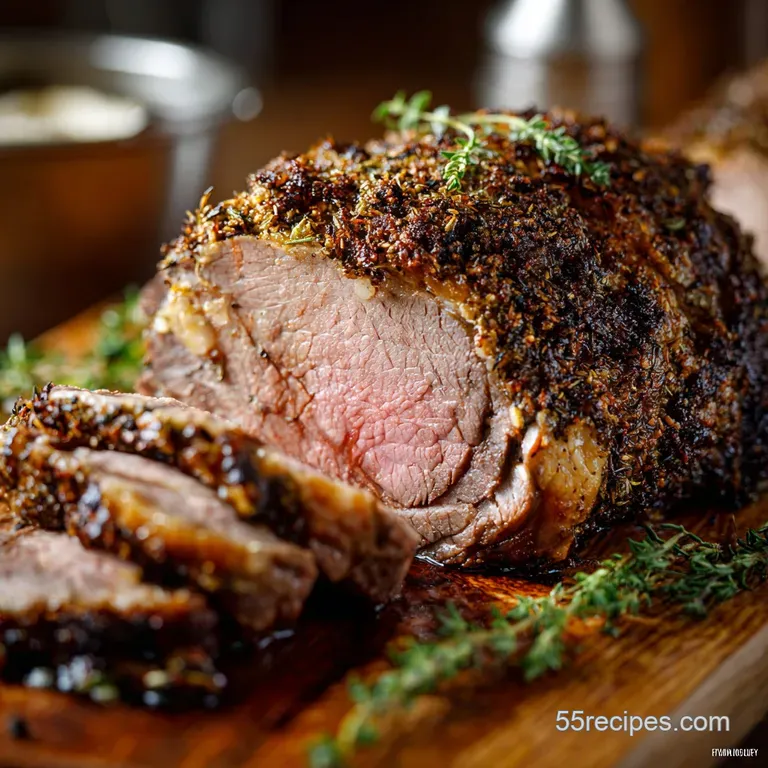
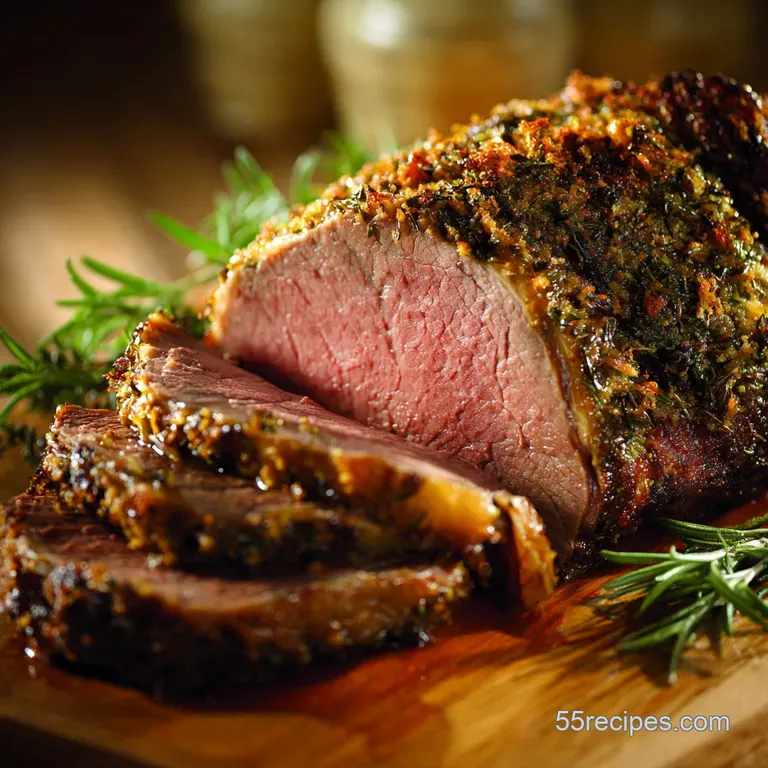
Preparation: Scoring and Applying the Herb Crust
First, pat that entire joint seriously dry with kitchen paper. Next, score the fat layer with shallow diagonal cuts, taking care not to cut into the meat itself. Now, take your thick herb and garlic paste and massage it all over the beef, pushing the mix deep into those scores.
Place the seasoned joint on a rack over your chopped oven-roasted carrots and onions. Allow it to sit at room temperature for at least 30 minutes.
The Initial over High heat Sear Phase
Preheat the oven to a blistering 220°C (425°F). Put your seasoned and tempered joint right in the centre and set a timer for exactly 15 minutes. This blast is non-negotiable and builds incredible depth of colour.
You’ll know you’re doing it right when the herbs start smelling intensely aromatic and nutty, not burnt.
Dropping the Temperature for Consistent Roasting
Once the timer shrieks, immediately reduce the oven temperature to 180°C (350°F). Don't open the door yet; just drop the setting. Continue roasting until you are about 5°C (10°F) away from your target internal temperature (remember, 57°C/135°F is perfect Medium Rare).
Check the temperature with your probe thermometer frequently during the final 20 minutes.
The Critical Step of Resting the Meat
As soon as the thermometer confirms you’ve hit the pull temperature, get that roast out! Transfer it to a warm cutting board, leaving the pan juices behind for your gravy. Cover the roast loosely with foil tinfoil tent style, not a tight wrap to prevent the glorious crust from steaming itself soft.
Let it sit undisturbed for 20 minutes minimum.
Chef's Secrets and Troubleshooting Your Oven Roast
Avoiding the Dreaded Dry Joint
The number one mistake is overcooking. If you wait until the internal temperature is 65°C before you take it out, it will climb to 70°C+ during the rest, resulting in dry, grey meat. Always pull the roast 5-7° C before the target temperature.
Calibrating Your Oven Temperature for Accuracy
Home ovens lie. They absolutely do. If you find your cooking times are wildly off, invest in an inexpensive oven thermometer and place it inside your oven. You might find that when you set it to 180°C, it's actually running at 200°C. Knowing this fact changes everything about your roasting game.
Using a Probe Thermometer Effectively
Always insert the probe into the thickest part of the meat, avoiding any bone or large pockets of visible fat. Bone retains heat and will give you a false, high reading, while fat will give you a false, low reading. Get right into the centre.
Perfecting the Gravy Drippings Collection
After you remove the roast, place the roasting pan directly onto the stove burner (if safe for your pan) over medium heat. Deglaze the pan with a splash of red wine or beef stock, scraping up all those glorious caramelised brown bits (fond). Those bits are pure flavour.
You can then use this reduction as the base for the greatest pan gravy ever.
make-ahead, Storage, and Reheating the Roast
Safe Cooling and Refrigeration Times
Cooling needs to happen fast. If you have any leftover roast, slice it immediately and transfer it to a shallow, air-tight container. Do not leave the entire joint sitting out. It should be refrigerated within two hours of cooking and keeps beautifully for 3 4 days.
Tips for Freezing Cooked Roast Beef
Does it freeze well? You bet. Slice the remaining meat thinly and place the slices flat in a freezer bag or container. Pour a spoonful of the remaining pan gravy or beef stock over the slices before sealing. This acts as a protective barrier against freezer burn. It will keep for up to 3 months.
To reheat, avoid the microwave if possible; it turns the edges tough. Instead, place the slices in an ovenproof dish with a tablespoon of stock or gravy, cover tightly with foil, and warm slowly in a low oven (150°C/300°F) until just heated through.
Completing the Feast: Expert Serving Suggestions
A magnificent oven roast deserves equally magnificent company. Naturally, you’ll want proper crispy roast potatoes, preferably cooked in the beef dripping alongside your joint.
I also strongly recommend having a side of oven-roasted brussel sprouts that are caramelized and lightly charred.
For something truly decadent and creamy, forget the standard greens and try my Ultimate Creamy Cauliflower Gratin Sunday Roast Side Dish Hero recipe it’s pure magic with this beef. A vibrant horseradish cream and that rich pan gravy we perfected are, of course, absolutely mandatory.

Recipe FAQs
Why did my roast turn out dry or tough despite following the cook time?
This usually means the meat was overcooked, or you skipped the crucial resting step. Use a meat thermometer and aim for 130°F (Medium Rare) before removing it from the oven, as the internal temperature will rise 5-10 degrees during the rest.
If the meat is tough but not dry, you may have sliced against the grain, which must always be avoided for rump cuts.
The herb crust didn't seem to brown or adhere properly. What went wrong?
The initial high heat searing phase is key for crust development. Ensure your oven is fully preheated to the high temperature before the roast goes in, and pat the meat extremely dry before applying the herb paste.
Any residual surface moisture will prevent the necessary caramelization (Maillard reaction) needed for a crispy crust.
What internal temperature should I aim for if I prefer Medium Rare roast beef?
For perfect medium rare results, remove the roast from the oven when the thermometer reads between 125°F and 130°F (52-54°C). After resting for 20 minutes, the residual heat will carry the temperature up to the desired 135°F range. If you prefer medium doneness, pull the meat at 135°F (57°C).
How crucial is the resting period, and why can't I skip it?
Resting is the most critical step for achieving a juicy roast; skipping it guarantees dry meat. When meat cooks, muscle fibers tighten and push moisture outward, and resting allows those fibers to relax and redistribute the internal juices evenly throughout the joint.
Always rest for at least 20 minutes, loosely covered with foil, before slicing.
How long are the roast beef leftovers safe to store in the refrigerator?
Properly sealed and refrigerated, leftover roast beef is safe to consume within 3 to 4 days. If you wish to freeze the roast, slice the meat first and wrap individual portions tightly in foil and then a freezer safe bag to protect against freezer burn. Consume frozen portions within 3 months for best quality.
Can I use a less expensive cut of beef, like silverside or brisket, with this searing method?
While you can certainly oven roast other cuts, cuts like silverside or brisket require different cooking times and techniques as they are tougher and benefit from slow, moist cooking over several hours.
This high heat searing method is best reserved for tender joints like top rump, rib eye, or sirloin, which benefit from speedier roasting times.
Perfect Herb Crusted Oven Roast Beef
Ingredients:
Instructions:
Nutrition Facts:
| Calories | 591 kcal |
|---|---|
| Protein | 72.0 g |
| Fat | 28.0 g |
| Carbs | 13.0 g |
