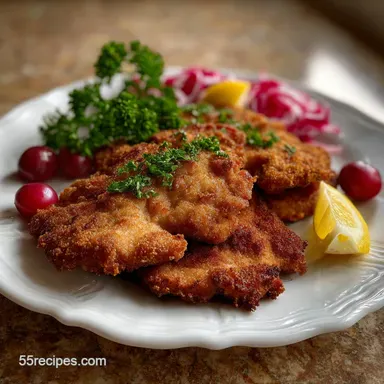
Crispy Veal Wiener Schnitzel

- Total28 Mins
- Servings2
- Calories1121 kcal
- Time: 15 min active + 10 min cooking + 3 min rest
- Flavor & Texture: Dark golden-gold and crispy
- Perfect for: A comforting family dinner
Traditional Wiener Schnitzel
Imagine the sound of a fresh lemon wedge squeezing over a hot, golden crust. The citrus cuts right through the rich butter, making the whole plate feel light even though it's a hearty meal. It's the kind of dinner that turns a random Tuesday into something a bit more special.
This recipe focuses on getting that airy, puffed coating that separates a home-fry from the real thing. You don't need fancy equipment, just a bit of patience with the pounding and a pan with enough fat.
Expect a meal that's tender on the inside and shattering on the outside. Since we're keeping it budget-smart, I'll show you how to get those results without spending a fortune on premium cuts.
What Makes the Crust Puff
- The Steam Gap: By not pressing the breadcrumbs too firmly into the meat, you leave tiny air pockets. When the meat hits the hot oil, moisture turns to steam and pushes the breading away from the veal, creating that classic puff.
- Uniform Thinness: Pounding the meat to exactly 1/4 inch means the veal cooks through at the same speed the crust browns. This prevents the meat from drying out while you wait for the golden color.
Choosing the right crumbs changes the final bite. Freshly made crumbs offer a lighter lift, while store-bought fine crumbs provide a more consistent, tight seal.
| Crust Type | Texture | Lift | Best For |
|---|---|---|---|
| Freshly Baked | Airy and light | High | Traditional feel |
| Fine store-bought | Crisp and tight | Medium | Consistent results |
Tools for the Job
You only need a few basics. A heavy skillet, like cast iron or stainless steel, works best because it holds heat steady. You'll also need a meat mallet for thinning the cutlets and three shallow bowls for your breading station.
The Ingredient List
| Component | Role | Alternative |
|---|---|---|
| Veal Cutlets | Main protein | Beef or Turkey |
| All-Purpose Flour | Base for the egg | Cornstarch or GF flour |
| Eggs | Binds the coating | Flax egg (denser result) |
| Fine Breadcrumbs | Forms the crust | Panko (crunchier) |
For the Protein
- 1 lb thinly sliced veal cutlets Why this? Lean and tender for quick frying
- 1/2 tsp salt
- 1/4 tsp black pepper
For the Breading Station
- 1/2 cup all-purpose flour
- 2 large eggs
- 2 tbsp whole milk Why this? Helps the egg coat the meat more evenly
- 1 cup fine breadcrumbs
For Frying and Finishing
- 1/2 cup vegetable oil
- 2 tbsp unsalted butter Why this? Enhances the overall flavor and richness
- 1 whole lemon, cut into wedges
Recipe Specs
- Prep time: 15 minutes
- Cook time: 10 minutes
- Total time: 28 minutes
- Yield: 2 servings
Step-by-step Instructions
Phase 1: Preparing the Meat
- Place the veal cutlets between two sheets of plastic wrap. Using a meat mallet, gently pound them until they reach a consistent 1/4 inch (6mm) thickness. Note: This ensures even cooking

- Season both sides of the pounded cutlets lightly with 1/2 tsp salt and 1/4 tsp black pepper.
Phase 2: The Breading Station
- Set up a breading station with three bowls: one containing 1/2 cup all-purpose flour, one with 2 whisked large eggs and 2 tbsp whole milk, and one with 1 cup fine breadcrumbs.
- Coat each cutlet in the flour, shaking off any excess to ensure a dusty coating rather than a paste.
- Dip the floured meat into the egg and milk mixture, ensuring every edge is completely covered.
- Lay the meat into the fine breadcrumbs and gently press the crumbs on. Avoid packing them tightly so the breading can puff during frying.

Phase 3: The Sizzling Fry
- Warm 1/2 cup vegetable oil and 2 tbsp unsalted butter in a wide pan at a medium-high setting until the butter stops foaming and the oil shimmers.
- Carefully slide the cutlets into the fat so they 'swim'. Fry for 2–3 minutes per side, gently shaking the pan to baste the top of the meat.
- Remove the cutlets once the crust is a dark golden-gold and the meat registers 145°F (63°C) internally.

- Let the meat rest for 3 minutes before serving with lemon wedges.
Chef: I prefer adding a pinch of salt to the frying oil just before the meat goes in. It doesn't significantly alter the flavor, but it helps the crust feel more seasoned.
Quick Fixes
When the breading separates from the meat, it's usually because the meat was too damp or the flour layer was too thick. For a better wiener schnitzel homemade experience, always shake off the excess flour until the meat just looks dusted.
If the crust browns too quickly but the meat isn't done, your pan is too hot. Drop the heat slightly and add another knob of butter to keep the temperature stable.
Breading Peeling Off
This happens if the egg layer is too thick or the crumbs aren't adhered. Let the breaded meat sit for 5 minutes before frying to help it set.
Crust Burning Fast
Too much butter or too high heat causes rapid browning. Use a mix of oil and butter to raise the smoke point.
Meat Feeling Tough
Over-pounding or overcooking is the culprit. Use a thermometer to pull the meat at exactly 145°F.
| Problem | Fix |
|---|---|
| Breading Peeling | Rest breaded meat 5 mins before frying |
| Burnt Crust | Lower heat and add more oil |
| Tough Meat | Check internal temp at 145°F |
Storage and Leftovers
Store any leftovers in a container in the fridge for up to 3 days.
Avoid the microwave for reheating, as it makes the crust soggy. Instead, use an air fryer at 350°F for 3–5 minutes, until the center reaches 165°F (74°C). If you don't have an air fryer, a hot oven works just as well until the edges crisp up again and the center reaches 165°F (74°C).
You can freeze the breaded, unfried cutlets for up to a month. Wrap them individually in parchment paper. Fry them directly from frozen, but add about 2 minutes to the cook time to ensure the center is hot.
Simple Swaps
If veal is too expensive or hard to find, you can easily adapt this. For a different protein, try this Chicken Schnitzel recipe or a Beef Schnitzel. Both work well with the same breading method.
If you need a gluten-free version, use cornstarch for the first dredge and gluten-free breadcrumbs. The texture will be slightly crunchier and less "puffy" than a traditional German schnitzel recipe, but it still tastes great.
For this gluten-free version, also use products labelled gluten-free for the panko or breadcrumbs.
Serving Suggestions

I love serving this with a side of warm Austrian potato salad (with vinegar, not mayo) and a heap of lingonberry jam. The sweetness of the jam against the salty, buttery crust is a classic pairing.
A simple cucumber salad with dill and white vinegar also works well to keep the meal feeling fresh. For a more filling option, a side of buttery parsley potatoes is the way to go.
Your Questions, Answered
How to make Vienna schnitzel?
Pound veal cutlets to 1/4 inch thickness and season with salt and pepper. Dredge them in flour, dip in egg and milk, and coat with breadcrumbs before frying in oil and butter.
What should I serve with this dish?
Pair the cutlets with fresh lemon wedges. The citrus brightness balances the hearty flavor of the fried veal.
Can the breaded cutlets be frozen?
Wrap unfried cutlets individually in parchment paper for storage up to a month. Increase the frying time by about two minutes when cooking directly from frozen.
Why is my breading not puffing?
Press the crumbs onto the meat gently. Packing them too tightly stops the breading from puffing during frying.
Which way is best to reheat leftovers?
Use an air fryer at 350°F for 3–5 minutes, until the center reaches 165°F (74°C). A hot oven also works well to keep the edges crisp.
Wiener Schnitzel in 28 Minutes
Ingredients:
Instructions:
You May Also Like

Classic Veal Schnitzel: Crispy, Golden Perfection!
Craving authentic veal schnitzel? This recipe delivers crispy, golden perfection every time!

Beef Schnitzel in 20 Minutes
Ready in 20 minutes, this Beef Schnitzel is a win. Explore our German dinner recipes and learn why…

Braised Chicken for 6 Servings: Tender
Mahogany skin and warm gravy define this Braised Chicken. View the Tools You'll Need section to…

Easy Chicken Schnitzel Recipe: Crispy, Golden Perfection!
This Chicken Schnitzel recipe delivers golden-brown, crispy perfection!
