Red Bean Paste Mochi
- Time: Active 20 mins, Passive 10 mins, Total 30 mins
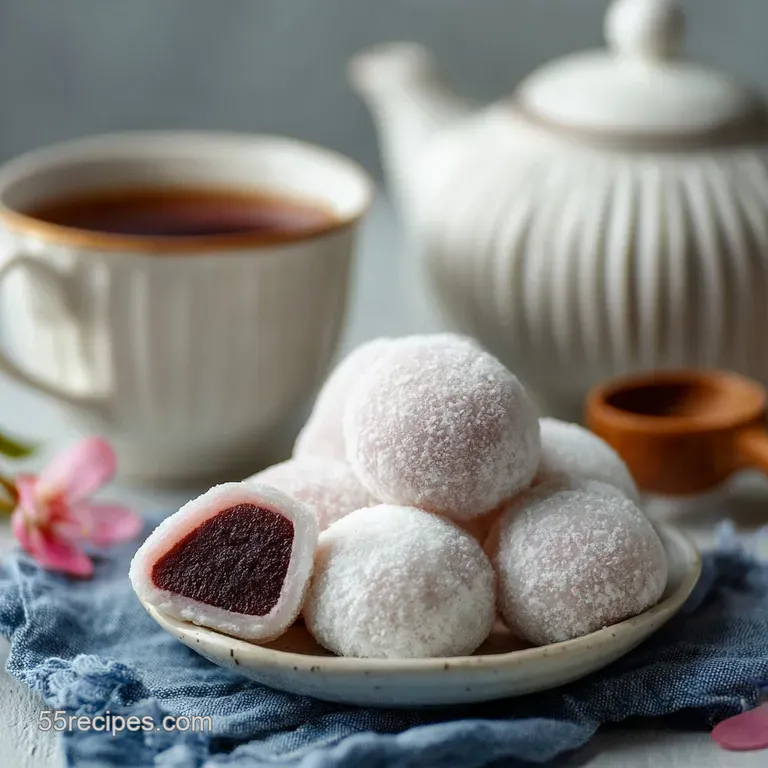
- Flavor/Texture Hook: Velvety sweet bean filling inside a chewy, pillowy dough.
- Perfect for: Afternoon tea, gluten-free gifting, or a mindful kitchen project.
- Why This Recipe Genuinely Works
- Core Ingredients for Better Texture
- Tools You Need for Success
- How to Assemble Your Mochi
- Fixes for Sticky Mochi Dough
- Creative Fillings and Ingredient Swaps
- Proper Storage for Lasting Softness
- Elegant Ways to Plate Mochi
- Myths About Making Mochi
- Recipe FAQs
- 📝 Recipe Card
Why This Recipe Genuinely Works
The secret to a great snack is all about managing moisture and starch behavior. Most people struggle with mochi because it either turns into a rock or stays like glue. We've fixed that here by using a specific ratio of filtered water to Shiratamako, ensuring the dough stays pliable without becoming a runny mess.
- Amylopectin Alignment: Glutinous rice flour is almost pure amylopectin, which creates the long, stretchy molecular chains that give mochi its signature "pull."
- Sugar as a Softener: The natural cane sugar doesn't just add sweetness; it acts as a humectant, grabbing onto water molecules so the dough stays soft even after it cools.
- Starch Gelatinization: Heating the dough to exactly the right point allows the rice granules to swell and burst, creating that translucent, bouncy texture we crave.
- Osmotic Balance: Adding the maple syrup to the beans at the very end prevents the bean skins from toughening, keeping the filling silky.
| Method | Time | Texture | Best For |
|---|---|---|---|
| Stovetop | 10 mins | Very stretchy | Maximum control and traditional feel |
| Microwave | 3 mins | Slightly firmer | Quick fixes when you're short on time |
| Steamer | 15 mins | Extra soft | Creating a delicate, airy dough |
The stovetop method is my go to because you can actually feel the dough get heavier as the starch gelatinizes. You'll see it transform from a liquid into a singular, cohesive ball that pulls away from the sides of the pan with a satisfying sizzle.
It's much easier to tell when it's done compared to the "stop and start" of a microwave.
Core Ingredients for Better Texture
Selecting the right components makes or breaks the "chew" of your Red Bean Paste Mochi. You cannot simply swap regular rice flour for glutinous rice flour, or you will end up with a gritty, crumbly dough that won't stretch.
We are looking for that specific "shiratamako" or "mochiko" label to ensure the starch content is high enough for the job.
| Ingredient | Science Role | Pro Secret |
|---|---|---|
| Shiratamako (120g) | Structural elasticity | Grind the coarse granules into a fine powder for a smoother finish. |
| Azuki Beans (200g) | Dense protein base | Soak for at least 8 hours to ensure the centers soften evenly. |
| Cane Sugar (50g) | Moisture retention | Using natural cane sugar adds a subtle caramel note compared to white sugar. |
For the Velvety Red Bean Filling (Anko)
The filling is the soul of this dish. When you simmer your 200g of dried Azuki beans, you want them to be so soft they crush between two fingers without any resistance. If you're already a fan of bean based dishes, you might notice the technique is quite similar to how I prep the base for my How to Make recipe. The sea salt is non negotiable here; it cuts through the maple syrup and makes the bean flavor pop.
For the Chewy Mochi Dough
We use 120g of Shiratamako because its larger granules actually produce a more refined, silky texture once hydrated with the 180ml of filtered water. It's less prone to lumps than standard mochiko. The potato starch is your best friend here.
Don't be shy with it; it is the only thing standing between you and a permanent coating of mochi on your palms.
Chef's Tip: Freeze your butter sized scoops of red bean paste for 15 minutes before wrapping. It makes them firm and easy to handle, preventing the filling from squishing out while you seal the dough.
Tools You Need for Success
You don't need a high tech lab, but a few specific items will make your life much easier. A heavy bottomed non stick pan is a must for the dough. If you use stainless steel without a lot of oil, you'll be scrubbing for days.
A silicone spatula is also essential because the dough won't cling to it as aggressively as it would to wood or metal.
- Non stick skillet: To heat and stir the dough until it becomes translucent.
- Fine mesh strainer: For rinsing the 200g of azuki beans and draining them after boiling.
- Large tray: To hold the 1/2 cup of potato starch for dusting and shaping.
- Small kitchen scale: Precision is key when you're dividing the dough into 8 equal servings.
How to Assemble Your Mochi
- Simmer the beans. Boil 200g dried Azuki beans in plenty of water until they are tender enough to mash easily. Note: This usually takes about 45-60 minutes depending on the age of the beans.
- Sweeten the paste. Drain the beans and stir in 1/4 cup maple syrup and 1/4 tsp sea salt over low heat until the mixture thickens into a glossy paste.
- Cool the filling. Remove the paste from the heat and let it cool completely. Note: Warm filling will melt your mochi dough.
- Mix the dough. Combine 120g Shiratamako, 50g cane sugar, and 180ml water in a non stick pan, stirring until no lumps remain.
- Cook the mixture. Heat over medium low, stirring constantly with a silicone spatula until the liquid turns into a thick, translucent dough ball.
- Dust the surface. Cover a clean work surface with 1/2 cup potato starch and turn the hot dough out onto it.
- Divide the portions. Use a floured bench scraper to cut the dough into 8 equal pieces. Note: Work while the dough is still warm as it is more pliable.
- Flatten and fill. Flatten one piece of dough into a circle, place a scoop of bean paste in the center, and pinch the edges together until the seam disappears.
- Final shaping. Roll the ball gently between your palms to smooth it out and shake off any excess starch.
| Servings | Azuki Beans | Rice Flour | Water |
|---|---|---|---|
| 4 People | 100g | 60g | 90ml |
| 8 People | 200g | 120g | 180ml |
| 16 People | 400g | 240g | 360ml |
Creating these treats is a lot like the patience required for other delicate desserts, such as the process in The Foolproof Silky recipe. You have to wait for the right temperature and texture before moving to the next step. If you rush the cooling of the beans, you'll end up with a soggy mess.
Fixes for Sticky Mochi Dough

Stickiness is the number one hurdle for every home cook making Red Bean Paste Mochi. If the dough is sticking to your hands, you likely haven't used enough starch or the dough is still too hot. It's a delicate balance; too much starch makes the mochi dry, while too little makes it impossible to handle.
For Dough That Is Too Sticky
If your dough feels like liquid glue, it might be undercooked. The starch hasn't fully gelatinized yet. Put it back on the heat for another minute. You want it to look slightly shiny and hold its shape. If it is already cooked but sticking, check your dusting starch.
It should feel like a soft velvet coating on your fingers.
For Filling That Leaks Out
This usually happens if the filling is too thin. The maple syrup needs to be cooked down until the paste can hold a peak. If it’s runny, it will seep through the dough and prevent the edges from sealing properly.
| Problem | Root Cause | Solution |
|---|---|---|
| Tough Skin | Overcooked dough | Reduce heat and stop once it's translucent. |
| Hard Mochi | Air exposure | Wrap finished pieces in plastic immediately. |
| Grainy Center | Underboiled beans | Simmer beans longer with a pinch of baking soda. |
Common Mistakes Checklist: - ✓ Always use potato starch or cornstarch; regular flour will taste raw and gritty. - ✓ Don't skip the salt in the beans; it's what makes the sweetness feel "round" rather than sharp.
- ✓ Stir the dough constantly during cooking to prevent scorched spots on the bottom. - ✓ Allow the bean paste to cool to room temperature (or colder) before wrapping. - ✓ Avoid using too much water; stick to the 180ml measurement for the 120g of flour.
Creative Fillings and Ingredient Swaps
While the traditional red bean is iconic, you can definitely play around with what's inside. If you're looking for a budget friendly swap, you can actually use canned white beans or even mashed sweet potato if azuki beans aren't available at your local shop.
The texture will be slightly different, but the mechanism of the mochi remains the same.
| Original Ingredient | Substitute | Why It Works |
|---|---|---|
| Maple Syrup | Brown Sugar | Similar depth of flavor. Note: May require 1 tbsp water to help dissolve. |
| Potato Starch | Cornstarch | Same anti stick properties. Note: Slightly more "powdery" mouthfeel. |
| Cane Sugar | Coconut Sugar | Adds a nutty, toasted flavor. Note: Will turn the mochi skin light brown. |
For those who want a bit of a salty sweet kick, a tiny bit of the sauce from this & Homemade Hoisin Sauce recipe can actually be mixed into a savory bean filling for a fusion twist. It sounds wild, but the fermented bean notes in hoisin play beautifully with the earthy azuki.
Proper Storage for Lasting Softness
Mochi is best eaten the day it's made because the starch begins to "retrograde" or crystallize almost immediately. This is what makes it go from soft and bouncy to hard and rubbery. However, you can fight physics with a few storage tricks.
- Room Temperature: Keep in an airtight container for up to 24 hours. Don't put them in the fridge! The cold air accelerates the hardening of the starch.
- Freezing: This is the best long term option. Wrap each mochi individually in plastic wrap and freeze for up to 2 months. To eat, let them thaw at room temperature for about an hour.
- Reheating: If they get a bit firm, you can microwave them for 5-10 seconds (no more!) or lightly toast them in a pan.
- Zero Waste: If you have leftover bean paste, it’s amazing swirled into morning oatmeal or spread on toast. If you have extra starch, save it for thickening sauces or frying chicken!
Elegant Ways to Plate Mochi
Presentation is half the fun with Japanese red bean mochi. Because the dough is so soft, it can look a bit "homely" if just plopped on a plate. Use a soft brush to remove the excess potato starch so the color of the dough shines through.
A clean, minimalist ceramic plate in a dark color like charcoal or forest green makes the white or pale pink mochi pop beautifully.
Try garnishing with a single salted cherry blossom or a sprinkle of toasted sesame seeds. If you want to get really fancy, you can use a wooden skewer to press a flower pattern into the top of the dough while it's still warm.
Serving these alongside a cup of hot matcha or toasted hojicha tea creates the ultimate sensory experience. The bitterness of the tea cleanses the palate between bites of the sweet, velvety paste.
Myths About Making Mochi
There is a common misconception that you need a wooden mallet and a giant mortar to make good mochi. While that's the traditional "mochitsuki" way, the stovetop method we used is chemically identical in terms of starch gelatinization. You aren't losing out on quality by using a spatula instead of a mallet.
Another myth is that "mochi" refers only to the filling. In reality, mochi is the name of the dough itself. When it's filled with bean paste, it's technically called "Daifuku," which translates to "great luck." So, whenever you're making these, you're essentially crafting little bites of good fortune for your friends and family!
Finally, don't believe the idea that you can't make mochi ahead of time. While fresh is best, the freezing method actually preserves the molecular structure of the starch quite well, meaning you can have a "great luck" snack whenever the craving hits.

Recipe FAQs
Is red bean paste mochi healthy?
It can be part of a balanced diet, but it's a treat. Mochi is primarily made from glutinous rice flour and sugar, making it high in carbohydrates and calories. The red bean paste offers some fiber and protein, but also contains added sugar.
What is the red bean in mochi?
It's azuki beans, typically sweetened and mashed into a paste. This filling, known as anko, provides a rich, slightly earthy sweetness that contrasts with the chewy mochi exterior. The preparation is similar to how beans are softened for dishes like Mexican Black Beans: Smoky & Bright, focusing on tenderizing them fully before sweetening.
What is a mochi with bean paste called?
It's most commonly called Daifuku. Daifuku literally translates to "great luck" and refers to a mochi confection stuffed with a sweet filling, such as red bean paste. This type of stuffed mochi is a delightful way to enjoy the chewy texture.
What is Japanese red bean paste made of?
It's primarily made from azuki beans and sugar. The beans are cooked until very soft, then mashed and mixed with a sweetener, often sugar or honey, until a smooth paste forms. Sometimes a pinch of salt is added to enhance the flavor.
Can I use different types of beans for the filling?
Yes, you can experiment with other beans. While azuki is traditional, ingredients like mashed sweet potato or even white beans can be used for a different flavor profile. If you enjoy the concept of bean based fillings, you might also like exploring recipes such as Mexican Black Beans: Smoky & Bright for inspiration on bean preparation.
How do I prevent my mochi dough from being too sticky?
Use enough dusting starch and ensure the dough is cooked properly. Potato starch or cornstarch is essential for handling the dough; apply it generously to your hands and work surface.
Ensure the mochi dough is heated sufficiently until it becomes translucent and cohesive, indicating the starches have gelatinized correctly.
Is it true that mochi goes hard quickly?
Yes, this is a common misconception about freshness. Mochi is best enjoyed fresh because the starch molecules in the rice begin to crystallize, or "age," rapidly at room temperature. Proper storage, like freezing, can help preserve its soft texture for longer periods.
Red Bean Paste Mochi

Ingredients:
Instructions:
Nutrition Facts:
| Calories | 201 kcal |
|---|---|
| Protein | 5.9 g |
| Fat | 0.2 g |
| Carbs | 44.1 g |
| Fiber | 3.2 g |
| Sugar | 12.8 g |
| Sodium | 73 mg |
