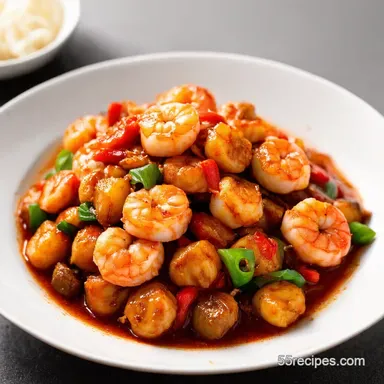
Better-Than-Takeout Kung Pao Shrimp

- Time: 10 min active + 10 min cooking
- Flavor & Texture: Spicy, savory, and crunchy
- Perfect for: Quick weeknight dinner
The aroma of dried chilies sizzling in hot oil is the first sign that this dish will be a success. The magic is in the contrast, pairing the crisp snap of bell peppers with the chew of roasted peanuts and tender shrimp.
You can serve this meal in just 20 minutes, which beats almost any delivery service. This version of kung pao shrimp bypasses lengthy marinating times but still achieves that signature, deep mahogany finish.
Expect a balance of sharp black vinegar and a touch of sweetness from brown sugar. Because this is a high-heat process, having your mise en place ready is essential to prevent overcrowding the pan.
Kung Pao Shrimp
Two-Step Sear: Cooking the shrimp first and removing them ensures they don't turn rubbery while the sauce thickens.
Cornstarch Slurry: Using a small amount of cornstarch mixed into the stock creates a glossy glaze that clings to the ingredients instead of pooling.
Toasted Chilies: Frying dried peppers in oil first releases a smoky depth that you can't get from just adding them to the sauce.
Recipe Specs
Since you're probably in a rush, you might wonder if the fast method differs from the slow, traditional way. This version focuses on speed without losing the punchy flavor.
| Method | Time | Texture | Best For |
|---|---|---|---|
| Fast-Track | 20 mins | Vibrant and snappy | Busy weeknights |
| Classic | 45 mins | Deep, infused heat | Weekend cooking |
Ingredients and Swaps
The sauce needs a specific balance of salt and acid to work. The soy sauce provides the base, while black vinegar gives it that characteristic tangy edge. If you can't find black vinegar, a mix of balsamic and a splash of rice vinegar is a decent approximation, though it's a bit sweeter.
The cornstarch is essential here. It doesn't just thicken the liquid, it gives the dish that shiny, restaurant-style look.
For the glaze:
- 1/2 cup reduced-sodium chicken stock Why this? Provides a savory base for the sauce
- 3 tbsp reduced-sodium soy sauce Why this? Essential for salt and color
- 1 tbsp black vinegar Why this? Adds a deep, tangy punch
- 1 tbsp brown sugar Why this? Balances the heat and salt
- 1 tsp cornstarch Why this? Thicks the sauce into a glaze
- 1/2 tsp ground ginger Why this? Adds a subtle warm baseline
For the stir-fry:
- 1 lb large shrimp, peeled and deveined Why this? Large size prevents overcooking
- 2 tbsp vegetable oil Why this? High smoke point for searing
- 1/2 cup roasted unsalted peanuts Why this? Adds necessary crunch
- 6 dried red chilies Why this? Provides smoky, dried heat
- 3 cloves garlic, minced Why this? Sharp aromatic base
- 1 tbsp fresh ginger, minced Why this? Bright, zingy flavor
- 3 scallions, cut into 1 inch pieces Why this? Fresh finish and color
- 1 red bell pepper, diced Why this? Adds sweetness and snap
The Cooking Process

Prep the Sauce
In a small bowl, whisk together 1/2 cup reduced-sodium chicken stock, 3 tbsp reduced-sodium soy sauce, 1 tbsp black vinegar, 1 tbsp brown sugar, 1 tsp cornstarch, and 1/2 tsp ground ginger. Set this mixture aside.
Sear the Shrimp
Warm 1 tablespoon of vegetable oil in a wok or wide non-stick pan over medium-high heat until shimmering. Add 1 lb shrimp in a single layer. Cook for 1-2 minutes per side until they are pink, opaque, and reach 145°F (63°C) internally. Immediately move the shrimp to a plate.
Sauté the Aromatics
Add the remaining 1 tablespoon of vegetable oil to the same pan. Stir in 6 dried red chilies for 30 seconds until they smell toasted. Add the diced red bell pepper, 3 cloves minced garlic, and 1 tbsp minced fresh ginger. Sauté for 2-3 minutes until the peppers are tender-crisp.
Thicken the Glaze
Give the sauce mixture another whisk to ensure the cornstarch hasn't settled, then pour it into the pan. Stir constantly for 1 minute as the liquid bubbles and thickens into a glossy glaze.
Final Toss
Return the seared shrimp and 1/2 cup roasted unsalted peanuts to the pan. Toss for 30 seconds until the shrimp are mahogany colored and fully coated. Fold in 3 cut scallions just before removing from heat.
Common Problems and Fixes
If your sauce doesn't thicken, it usually means it didn't hit the right temperature. Cornstarch needs to reach a simmer to activate and bind the liquid.
Another common issue is burnt garlic. Because garlic is minced small, it can turn bitter and black in seconds if the oil is too hot. Adding it after the peppers helps protect it from the direct heat of the pan.
Finally, rubbery shrimp happen when they stay in the pan too long. The key is the immediate removal once they hit 145°F, as carryover heat finishes the job.
| Problem | Root Cause | Solution |
|---|---|---|
| Sauce is watery | Liquid didn't simmer | Boil for 1 min before adding shrimp |
| Bitter taste | Garlic burnt | Add garlic after the peppers |
| Rubbery shrimp | Overcooked | Remove immediately at 145°F |
Flavor Variations
If you want to adjust the heat, you can swap the dried chilies for fresh Thai bird's eye chilies, though they provide a sharper, more immediate sting. For those wanting a homemade kung pao shrimp experience with less spice, simply remove the seeds from the chilies before adding them.
You can also swap the shrimp for diced chicken thighs, though you'll need to increase the searing time to about 5-7 minutes. If you want something fresh on the side, this cucumber crunch salad balances the heat perfectly.
For a gluten-free version of this kung pao shrimp recipe, use gluten-free tamari instead of soy sauce. The result is almost identical in flavor. For this gluten-free version, also use products labelled gluten-free for all soy sauces, the broth or stock.
Storage and Leftovers
Keep any remaining portions in a closed container in the fridge for a maximum of 3 days. This recipe isn't suitable for freezing, as the shrimp may become mushy and the peppers lose their crunch.
When warming things up, try to avoid the microwave to prevent overcooking the shrimp. Instead, toss the leftovers in a skillet over medium heat until steaming hot throughout and they reach 165°F (74°C) internally. Add a small splash of water or chicken stock to thin the glaze back into a pourable sauce.
What to Serve
Plain steamed jasmine rice is the standard choice here, as it soaks up the extra glaze. For something lighter, cauliflower rice or quinoa works well.
I like serving this with a side of steamed bok choy or garlic sauteed spinach to add some greens to the plate. A few extra raw scallions on top add a nice bit of freshness to the rich, savory flavors.
Your Questions, Answered
Is this dish spicy?
The heat level depends on the amount of dried red chilies used.
Tip: Remove the seeds from the chilies to reduce the spice.
Why is baking soda sometimes used on shrimp?
It is used in a technique called velveting to keep the meat tender.
Tip: This recipe omits it to achieve a cleaner, natural sear.
What is the difference between Kung Pao and Szechuan shrimp?
Kung Pao focuses on a sweet-savory-spicy balance with peanuts, while Szechuan often emphasizes numbing heat from peppercorns.
Tip: Add extra dried chilies if you prefer the Szechuan-style intensity.
How do you make Kung Pao Shrimp?
Sear the shrimp, sauté the aromatics and peppers, then thicken the sauce before tossing everything together.
Tip: Ensure the pan is shimmering hot before adding the shrimp to get a good sear.
Does this recipe follow traditional Chinese styles?
The combination of soy sauce, black vinegar, ginger, and peanuts creates a classic regional profile.
Tip: Use a wok for the most authentic heat distribution.
Where should leftovers be kept?
Place these in a closed container and keep refrigerated for no more than 3 days.
Tip: Avoid freezing this dish, as the shrimp texture can become mushy.
Can you reheat this in a microwave?
Use a skillet over medium heat instead of a microwave to prevent overcooking the shrimp. When reheating cooked leftovers, check with a food thermometer that the centre reaches 165°F (74°C); the appliance temperature and time alone do not confirm this.
Tip: Add a splash of chicken stock to loosen the glaze during reheating.
Kung Pao Shrimp in 20 Minutes