Fluffy Pan Pita: a Quick and Delicious Flatbread
- Discovering the Magic of Pan Pita
- What’s the Deal with Pan Pita?
- Health Benefits
- Why This Recipe Rocks
- Essential Ingredients Guide: Let’s look into into Deliciousness!
- Mastering the Art of Professional Cooking: Your Guide to Fluffy Pan Pita
- Pro Tips & Secrets for Fluffy Pan Pita
- Perfect Presentation: Elevating Your Pita Game
- Smart Storage & Make-Ahead Tips
- Creative Variations for Your Pita Adventures
- Complete Nutrition Guide for Your Enjoyment
- Wrapping It Up with Flavor!
- Frequently Asked Questions
- 📝 Recipe Card
Discovering the Magic of Pan Pita
Oh my gosh, have you ever had that moment when the aroma of fresh baked bread drifts through your kitchen and makes your heart race a little? i remember the first time i pulled a steaming hot pan pita from my skillet.
It was pure bliss, and my family devoured them faster than i could make them! it’s such a delightful experience that i can’t help but want to share it with you.
This fluffy pan pita isn’t just a flatbread; it’s a hug for your favorite fillings, be it grilled veggies, savory meats, or a generous scoop of hummus.
So, how about we jump right into this easy pita bread recipe? you’ll be impressing your friends in no time.
And let me tell you, there’s nothing like seeing that dough puff up while cooking! it almost feels like magic.
What’s the Deal with Pan Pita?
So, what exactly is pan pita? originating from the heart of middle eastern cuisine , pita has been around for thousands of years.
It’s a staple for many cultures, loved for its soft texture and ability to wrap around just about anything. today, everybody from foodies to everyday cooks is all about that homemade pita life!
Making your own bread might sound intimidating, but trust me this is a quick flatbread recipe that requires minimal time and effort.
With about 15 minutes of hands-on work and a little downtime for the dough to rest, you can whip up a batch of six pitas.
Plus, it’s super budget friendly. forget those store-bought options; you can make this at home without breaking the bank!
Health Benefits
Now let’s talk about some of the nutritional benefits of pita . this fluffy pan pita is not only delicious, but it’s also a healthier option compared to many other breads.
Using a mix of all-purpose flour and some hearty whole wheat flour , you’re getting fiber, along with all the joy of consuming freshly made bread.
Want an even healthier twist? go ahead, experiment with gluten-free pita or add sesame seeds on top for an additional crunch and flavor.
What i love about these pitas is their versatility. they shine as a side with a vibrant mediterranean salad or can be the center stage holding all your favorite fillings.
Honestly, they’re perfect for any occasion think summer barbecues, cozy dinners, or even a casual gathering with friends. it's a crowd pleaser all around!
Why This Recipe Rocks
So, you might be wondering what makes this pan pita better than others? firstly, the soft pita bread texture and taste are out of this world.
And because you’re cooking them in a skillet, there’s no need to mess with an oven; just the right cooking technique for the fluffiest results.
Plus, with the dough rising time being relatively short, you won’t be waiting forever.
And let me tell you, you can personalize each pita however you like! want to jazz it up with herbs like rosemary or thyme? go for it! feeling adventurous? toss in some spices to create unique pita bread variations that will tickle your taste buds.
So, are you excited to dive into the ingredients? I know you’re going to love making these. Grab your mixing bowls and let’s get this pita party started!
Essential Ingredients Guide: Let’s look into into Deliciousness!
You know, cooking is like a dance party for your taste buds. and to really get the groove going, you need to have the right essential ingredients in your dance lineup! i am talking about a premium core components that can seriously level up your kitchen game.
Premium Core Components
Alright, first things first, when you grab your ingredients, make sure you're thinking about quality . Detailed measurements are key! For a quick flatbread recipe like homemade pita, you’ll want:
- 2 cups (240g) all-purpose flour
- 1 cup (120g) whole wheat flour
- 2 teaspoons (8g) instant yeast
- 1 teaspoon (6g) salt
- 1 tablespoon (15ml) olive oil
- 1 cup (240ml) warm water (around 110° F or 43° C, don’t burn your fingers!)
A little tip here: Quality indicators for flour? Look for a silky texture and a nice smell trust me, the fresher, the better!
Now, onto storage guidelines . all-purpose flour usually stays fresh for about a year, while whole wheat flour? about six months.
Store them in a cool, dry place. and if you want to keep things fresh, toss them in the fridge!
Signature Seasoning Blend
Next up: signature seasoning blend . it's where the magic happens! for your pita bread variations , consider mixing it up with spices like cumin or paprika .
Just a pinch can take you from bland to bam! plus, don't forget your herbs! fresh or dried oregano and parsley play nice together.
Regional variations can be really fun too! A sprinkle of za’atar can make your pan pita feel like it's right in the heart of the Mediterranean. Talk about flavor enhancers !
Smart Substitutions
But hey, life isn’t always about having everything on hand, right? that’s where smart substitutions come into play. if you’re out of whole wheat flour, just double the all-purpose.
No yeast? no problem! try using baking powder instead for a little lift.
Got some dietary needs to consider? you can easily swap in a gluten-free flour blend for a gluten-free pita . honestly, when you’re cooking, the key is to be creative.
Don't stress just adapt!
Kitchen Equipment Essentials
Now let’s chat about the tools you’ll need. You don’t need a fancy culinary school kit. Just grab the must have tools :
- Mixing bowl
- Wooden spoon or dough whisk
- Rolling pin
- Cast iron skillet (or a non-stick frying pan works too)
- Kitchen towel
If you don’t have a rolling pin, a wine bottle works like a charm! Trust me; I’ve been there!
For storage solutions, those airtight containers are gold. Keep your pitas soft and warm by wrapping them in a towel after cooking nothing worse than hard pita!
Wrapping it all Up
Now that you’ve got your kitchen essentials for baking , let’s make this easy pita bread together! the crispy yet soft texture will have you chowing down on those delicious homemade pitas like they’re going outta style.
Seriously, they’re perfect for wrapping up fillings or dipping into your favorite sauces.
In a nutshell, combining the right essential ingredients , spices, substitutions, and equipment can really enhance your experience. Equals better tasting pitas and happy faces at the dinner table!
So, what’s next? Let’s dive straight into the step-by-step baking guide on how to make pita bread that’ll wow everyone. I can’t wait to share the details with you!
Mastering the Art of Professional Cooking: Your Guide to Fluffy Pan Pita
Let’s dive right into something that i absolutely treasure making pan pita ! this isn’t just any flatbread; we’re talking about a fluffy, soft bread that’s perfect for wrapping around all your favorite goodies or dipping into sauces.
It’s a classic middle eastern flatbread recipe that you'll want to keep handy, trust me!
Essential Preparation Steps
Alright, before we even dust off that mixing bowl, we gotta get our mise en place going. this term, fancy as it sounds, just means having every ingredient prepped and ready to roll.
Measure out your flours and water , because trust me, no one wants to scramble in the middle of mixing.
Time management is key here. set a timer for your dough rising about 1 hour is perfect to achieve that fluffy texture.
While you wait, clean your space! a tidy kitchen keeps your mind clear and cooking fun. and don’t forget to keep safety in check.
Use that cutting board properly, and let’s avoid any knife mishaps!
Step-by-step Process
Now, let’s break this down. Here’s how to whip up some glorious pan-cooked pita :
Mix dry ingredients : in a large bowl, combine 2 cups of all-purpose flour , 1 cup of whole wheat flour , 2 teaspoons of instant yeast , and 1 teaspoon of salt .
Give it a good whisk!
Combine Wet Ingredients : In another bowl, mix 1 cup (warm to about 110° F) of water and 1 tablespoon of olive oil .
Form the Dough : Pour that wet mix into the dry and stir until you've got a shaggy dough.
Knead the Dough : On a floured surface for about 5- 7 minutes , knead until it's as smooth as a baby’s bottom.
Rest the Dough : Put the dough back in a lightly oiled bowl and cover it with a cloth. Let it rise for 1 hour . It should double in size!
Shape the Pitas : Once it’s all puffed up, punch it down! Divide it into six equal balls, and roll them flat to about ¼ inch thick .
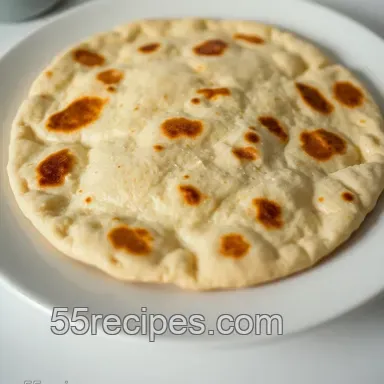
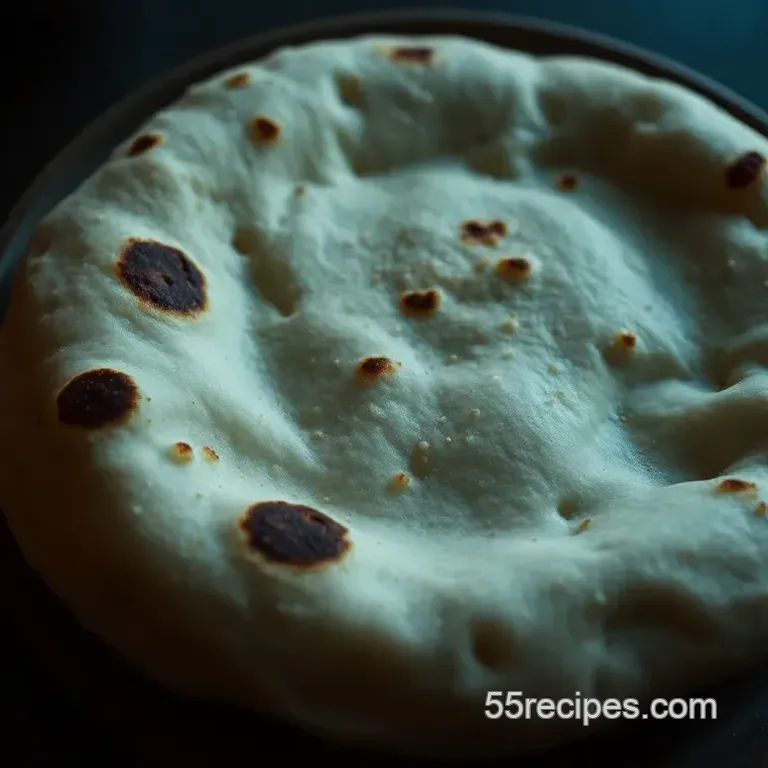
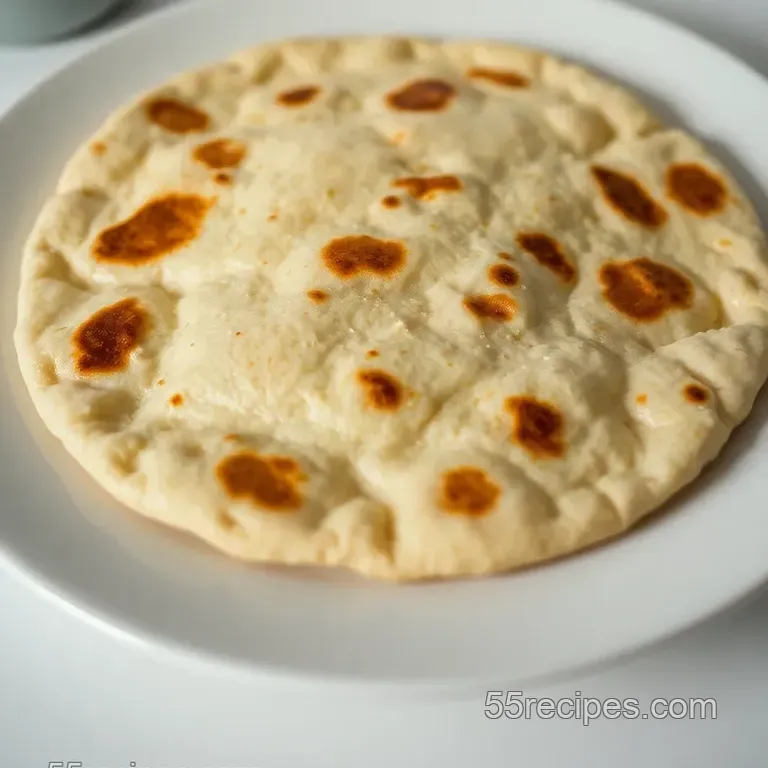
Cook the pitas : preheat your skillet on medium high heat. place one pita in and cook for 1- 2 minutes on each side until puffed and lightly golden.
Keep an eye on 'em!
Keep Warm : Take the pitas off the heat and wrap them in a towel to stay soft.
Expert Techniques
While this is an easy pita bread recipe, here are some pro tips to ensure your pitas are on point:
Watch the Heat : A too-hot skillet can burn those babies before they puff. Adjust as needed!
Dough Rising Time : This is your golden ticket to soft pitas. Patience is a virtue here.
Check for Doneness : The true sign of a perfect pita is one that puffs up beautifully.
Success Strategies
Everyone makes mistakes trust me, I’ve burned my share! But here are some common pitfalls:
- Overworking the Dough : Too much kneading can make your pitas tough. A little goes a long way.
- Skipping the Rest : Never rush rising times. The fluffiness depends on it.
For top-notch results, add some sesame seeds or herbs to the top before cooking for extra flavor!
Wrap it Up with Flavor
After mastering these techniques, let’s talk serving suggestions. pair your pitas with vibrant mediterranean salads, or load them with grilled veggies and meats for an epic meal.
You can even make a little pita pocket with hummus or tzatziki for a fun twist!
And there you have it your toolkit for making fluffy, delicious homemade pita . whether you're hosting a dinner or just whipping up a quick lunch, this quick flatbread recipe will satisfy you and anyone lucky enough to taste them.
For more fun ideas and variations on this culinary adventure, you can explore deeper into the world of homemade pita.
Happy cooking! Let's create some magic in that kitchen, folks!
Pro Tips & Secrets for Fluffy Pan Pita
Oh my gosh, let me tell you. once you get the hang of making pita, you’ll feel like a kitchen wizard! start with those time saving techniques .
If you’re in a rush, use a stand mixer. seriously! it cuts down on the kneading time. just let that baby work it for about 5 minutes.
Want to amp up the flavor ? throw in some herbs like dill or oregano right into your dough. it’s a simple trick, but trust me, it can make your homemade pita feel like a party in your mouth.
And don’t forget, the key to that perfect pita is your dough rising time at least an hour. it helps with that lovely texture!
Now when it comes to presentation , don’t just toss your pitas on a plate. try stacking them in a neat pile and wrapping them in a fresh, clean towel.
It keeps them warm and soft and feels super inviting. mix it up with some vibrant garnishes like a sprinkle of sesame seeds or even some finely chopped parsley.
Perfect Presentation: Elevating Your Pita Game
You know when you walk into a restaurant, and everything just looks mouthwatering? plating is everything they say you eat with your eyes first! try cutting your fluffy pan pita into triangles or quarters for a more gourmet feel.
Add some dips like hummus or tzatziki in small bowls alongside. the colors will pop!
For color combinations, think green, gold, and earthy brown set your pitas against a backdrop of bright veggies. Spinach salad or roasted bell peppers add that wow factor while keeping it fresh.
Smart Storage & make-ahead Tips
Okay, let’s chat about storing these beauties. if you do have leftovers though, let’s be real, that’s rare keep them in an airtight container.
They’ll last about three days . want to make ahead? roll out your pitas and freeze them between sheets of parchment paper.
When you’re ready for a quick meal, just pop them in a pan straight from the freezer, no defrost needed!
When you reheat , give them a quick minute in a skillet on low heat covered with a kitchen towel to keep ’em soft.
Trust me, this will bring back that freshly baked taste.
Creative Variations for Your Pita Adventures
Now let’s spice things up a little! got a favorite spice blend? toss in a bit of za’atar to your dough for a middle eastern twist.
If you want to go the vegan route , replacing regular flour with a gluten-free mix works wonders!
Seasonal twists can be fun, too. Imagine pumpkin spice pita in the fall or herb infused pitas for summer barbecues. You can even consider making mini pitas for a fun finger food at parties!
Complete Nutrition Guide for Your Enjoyment
Here’s the scoop on the nutritional benefits of pita . each serving has about 130 calories , and it’s packed with carbs perfect for fueling your day.
Plus, whole grain pitas can provide a dose of fiber, which is always a win.
As for portion guidance, a couple of pitas can be perfect for a meal. Just fill 'em up with veggies, lean proteins, or even a spicy chickpea salad, and you've got a healthy plate!
Wrapping It Up with Flavor!
So, there you have it! fluffy pan pita is not just a flatbread recipe; it’s a canvas for your culinary creativity.
No matter how you decide to enjoy it, remember that cooking should be fun. experiment with flavors and spice it up your way!
Every batch you make is an opportunity to learn, adapt, and make it your own. so gather your ingredients, roll up those sleeves, and get ready to impress your family and friends! when they ask “how do you make pita bread like this?” you’ll have the secret all figured out.
Happy cooking, my friend!
Frequently Asked Questions
What is pan pita and how is it different from regular pita?
Pan pita is a type of flatbread that is cooked in a skillet rather than in an oven, resulting in a different texture and flavor profile. While traditional pita may be baked to create pockets, pan pita boasts a soft and chewy consistency that’s perfect for wrapping or dipping.
Can I make pan pita ahead of time and reheat it later?
Yes, you can make pan pita ahead of time! To reheat, simply place the pita in a dry skillet over medium heat for about 30 seconds on each side until warmed through. Just be careful not to overheat, as this can make the bread tough.
What are some variations I can try with pan pita?
You can customize your pan pita by adding herbs or spices to the dough, such as garlic powder or dried oregano for extra flavor. Additionally, consider using different types of flour, such as spelt or chickpea flour, for unique textures and nutritional benefits.
How do I store leftover pan pita?
To keep your leftover pan pita soft, store it in an airtight container at room temperature for up to 2 days. If you want to keep it longer, consider freezing the pitas individually wrapped in plastic wrap and then placed in a freezer bag for up to 2 months.
Is pan pita a healthy option for my diet?
Pan pita can be a healthy addition to your diet, especially when made with whole wheat flour, which adds fiber and nutrients. Keep in mind the portion size, and pair it with healthy fillings like veggies, lean proteins, or legumes to create a balanced meal.
What are some good serving suggestions for pan pita?
Pan pita is incredibly versatile! It pairs well with dips like hummus or tzatziki, and can be served alongside grilled meats, roasted vegetables, or salads. Try using it to make wraps or sandwiches for a quick and delicious meal.
Fluffy Pan Pita A Quick And Delicious Flatbread