The Proper Job Brisket Perfectly Tender Slowcooked Classic
- Taming the Beast: Why This Brisket Recipe Wins Every Time
- The Magic of Low and Slow: Achieving Legendary Tenderness
- Assembling Your Flavor Arsenal: What You'll Need
- The Prep Stage: Trimming and Seasoning Like a Pro
- Cooking Mastery: Smoker vs. Oven Braise Explained
- The Crucial Rest: Unlocking Maximum Juiciness
- Beyond the Main Event: Pairing Ideas for Your Feast
- Storing Leftovers and Reheating for Day-Two Glory
- Recipe FAQs
- 📝 Recipe Card
Taming the Beast: Why This Brisket Recipe Wins Every Time
Cooking brisket can sometimes feel like trying to tame a lion a massive, intimidating cut of meat that demands respect and patience. However, with the right approach, you can transform this tough piece of beef into a showstopper that will make your gathering legendary.
This recipe guides you through achieving that incredibly sought after, melt in your mouth brisket ; the kind that requires no knife, simply yielding to the lightest pressure.
Whether you prefer the deep, smoky embrace of a backyard smoker or the reliability of an oven braise, this method locks in flavour, ensuring a deep, savoury bark and a succulent interior every single time. This is the centerpiece of any serious feast, the culinary equivalent of winning the village fête bake off.
The Magic of Low and Slow: Achieving Legendary Tenderness
The secret weapon in preparing beef brisket isn't high heat or fancy marinades; it's time and temperature management. Brisket, a hard working muscle from the chest of the cow, is riddled with connective tissue, primarily collagen. Applying high heat too quickly will result in tough, dry meat.
By cooking low and slow around 250° F ( 120° C) we give that collagen ample time to break down, rendering into luscious gelatin, which is what delivers that extraordinary tenderness we crave.
This dedication to the "low and slow" mantra is what separates mediocre cuts from truly spectacular barbecue.
Your Journey to Melt-In-The-Mouth Perfection
This process is a commitment, clocking in with a total time commitment that can stretch from 9 to 15 hours, including prep and rest, for a 5 7 lb cut.
Active preparation time is minimal about 30 minutes for trimming and seasoning but the cook phase demands vigilance. We are targeting an internal temperature range of 200° F to 205° F ( 93° C– 96° C), but more crucial than the thermometer reading is the textural feedback: the meat must feel like it's yielding easily when probed.
Rushing this stage, particularly during the dreaded temperature stall, is the fastest route to disappointment. Patience here is your greatest ingredient.
Understanding the Brisket Cut: Point vs. Flat
When sourcing your beef brisket , you will usually find a full packer cut, which consists of two distinct muscles: the flat (leaner, uniform shape) and the point (fattier, thicker, and ideal for shredding).
If you purchase a full packer, keeping them bound together during the cook is recommended to help insulate the leaner flat muscle. If you separate them, remember that the flat will cook slightly faster due to its lower fat content.
For a classic sliced presentation, the flat is the star, but the point is often reserved for mixing into a rich brisket chili recipe later in the week.
The Secret to That Irresistible Bark Formation
The "bark" is the dark, flavourful crust that forms on the exterior during the early stages of cooking. This is where flavour compounds, smoke particles, and the spices from your rub combine to create magic. Achieving a thick, mahogany coloured bark requires dry surface conditions during the initial cooking phase.
For the first 5 to 7 hours, the brisket must remain uncovered to allow moisture to evaporate and the Maillard reaction to occur, building the complex, deeply savoury exterior that contrasts beautifully with the moist interior.
Assembling Your Flavor Arsenal: What You'll Need
To craft this ultimate brisket recipe , you need quality raw materials and the right tools. We are aiming for deep flavour penetration that marries well with the beef's inherent richness.
While the required active time is low, about 30 minutes for preparation, choosing the right cut and ensuring you have appropriate equipment will streamline the 8 14 hour cooking journey ahead.
This particular blueprint is designed to yield a fantastic result whether you’re using a dedicated smoker or the reliable confines of your kitchen oven.
Sourcing the Best Beef: Choosing Your Brisket Weight
For a substantial weekend project yielding 10 12 generous servings, aim for a 5 7 lb full packer cut of beef brisket . When selecting, look for good marbling within the flat muscle, though don't stress over perfection if you are relying on the fat cap for moisture protection.
If you find a pre-trimmed flat or point, ensure the fat cap remaining is around 1/4 inch thick; any thicker and the seasoning won't penetrate properly, any thinner and you risk drying out the meat during the long cook.
Tools of the Trade: Equipment for Success
While you can achieve excellent results with basic gear, investing in a reliable thermometer is non-negotiable for this challenging cut. You will absolutely need an instant read thermometer for quick checks and, ideally, a leave-in probe thermometer to monitor the brisket internal temp constantly without opening the cooker or oven repeatedly.
Beyond that, a sturdy roasting pan with a tight fitting lid (if oven braising) or a smoker setup, along with heavy duty aluminum foil or butcher paper for wrapping, will complete your essential kit.
Crafting the Signature Spice Blend for Deep Flavor Penetration
The foundation of great barbecue is the rub. For this classic approach, we rely on simplicity and boldness, utilizing ingredients that enhance the beef flavour without overpowering it.
This best brisket rub is made from a mixture of 2 tablespoons of Kosher Salt, 2 tablespoons of Coarse Black Pepper, 1 tablespoon of Smoked Paprika, 1 tablespoon of Granulated Garlic Powder, 1 teaspoon of Onion Powder, and an optional teaspoon of Cayenne Pepper for a slight building heat.
Mixing these components thoroughly ensures even coverage.
The Prep Stage: Trimming and Seasoning Like a Pro
Preparation is the first real hands-on step for your easy brisket recipe . Begin by trimming the hard edges of external fat, aiming to leave that protective 1/4 inch fat cap primarily on the point side. This layer acts as a shield against harsh heat.
Next, if you are cooking a full packer, you may wish to use butcher’s twine to gently secure the shape, ensuring a more uniform thickness for even cooking. Once trimmed, it’s time for the seasoning application.
Step-by-step: Applying the Dry Rub Liberally
With your spice blend ready, apply it liberally and evenly across the entire surface of the brisket top, bottom, and sides. Don't be shy; you want a thick coating that adheres well. After rubbing, wrap the seasoned meat tightly in plastic wrap.
Now comes the crucial flavour infusion step: place the wrapped brisket into the refrigerator for a minimum of 6 hours, though preferably overnight. This seasoning soak allows the salt to begin its work, gently curing the exterior and preparing it for the long cook ahead.
Related Recipes Worth Trying
- OvenSmoked brisket flat Texas BBQ Easy Recipe — Get authentic Texas BBQ brisket flat at home This easy oven recipe uses liquid smoke for a rich juicy smoked brisket recipe Check it out
- Brisket to Ballymaloe How to Turn Brisket Into Corned Beef — Ditch the storebought stuff Learn how to turn brisket into amazing corned beef A truly authentic St Patricks Day feast Includes pickling spice recipe
- Smoky Spiced Fatty Brisket: A Flavorful Barbecue Delight — Discover my Smoky Spiced Fatty Brisket recipe! Juicy, tender, and bursting with flavor, it's perfect for gatherings and BBQ parties. Get the tips inside!
Cooking Mastery: Smoker vs. Oven Braise Explained
When deciding how to cook, you have two primary paths to achieving that melt in your mouth brisket . Path one is traditional smoking, using Hickory or Oak wood chunks at 250° F ( 120° C) for that authentic smoky profile.
Path two, the oven braise, is incredibly reliable for beginners or when outdoor cooking isn't an option. If you choose the oven, you'll utilize a roasting pan with a tight lid and add braising liquid 4 cups of beef broth, quartered onion, smashed garlic, Worcestershire sauce, and bay leaves to keep the environment humid while the meat cooks.
Phase One Cooking: Hitting the Stall Point
Regardless of your cooker, the initial cook is Phase One: building the bark. Set your heat to 250° F ( 120° C) and cook the brisket unwrapped (fat-side up) until the internal temperature registers between 150° F and 160° F ( 65° C– 71° C).
This can take 5 to 7 hours. You will notice the temperature plateauing or even dropping slightly around 160° F; this is the "stall," caused by evaporative cooling as moisture migrates to the surface.
The Wrapping Technique: Foil vs. Butcher Paper Decision
Once the bark is set and you hit the stall, it’s time to wrap often called the Texas Crutch. For a pure smoky flavour, wrap tightly in heavy duty butcher paper; this allows some smoke flavour to pass through while trapping necessary moisture.
If you are prioritizing tenderness and speed (or using the oven method), use heavy duty aluminum foil, which traps significantly more steam. If wrapping in foil, you can add a small splash of beef broth or apple cider vinegar to the wrap before sealing it completely.
Temperature Checks: Knowing When Your Brisket Is Truly Done
After wrapping, return the brisket to the heat. Continue cooking at 250° F ( 120° C) until the meat reaches its final temperature target.
While 200° F to 205° F ( 93° C– 96° C) is a good guide, the true indicator is probe tenderness.
Insert your thermometer probe into several spots; when it slides in with almost zero resistance, like poking room temperature butter, it is ready. This textural readiness signifies that the collagen has fully converted.
The Crucial Rest: Unlocking Maximum Juiciness
This step cannot be overstated: the rest is as important as the cook itself. After achieving perfect tenderness, immediately remove the brisket from the heat source. Keep it tightly wrapped in its foil or paper.
Place it in an insulated cooler (without ice) or the lowest setting of a warming oven (below 170° F/ 77° C). Allow it to rest for a minimum of one hour, though ideally two to three hours.
This crucial resting period allows the tense muscle fibres to relax and reabsorb the rendered fats and juices, leading to maximum moisture retention.
Beyond the Main Event: Pairing Ideas for Your Feast
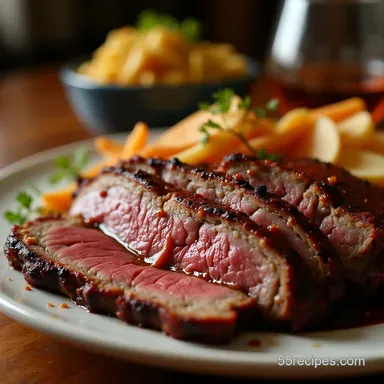
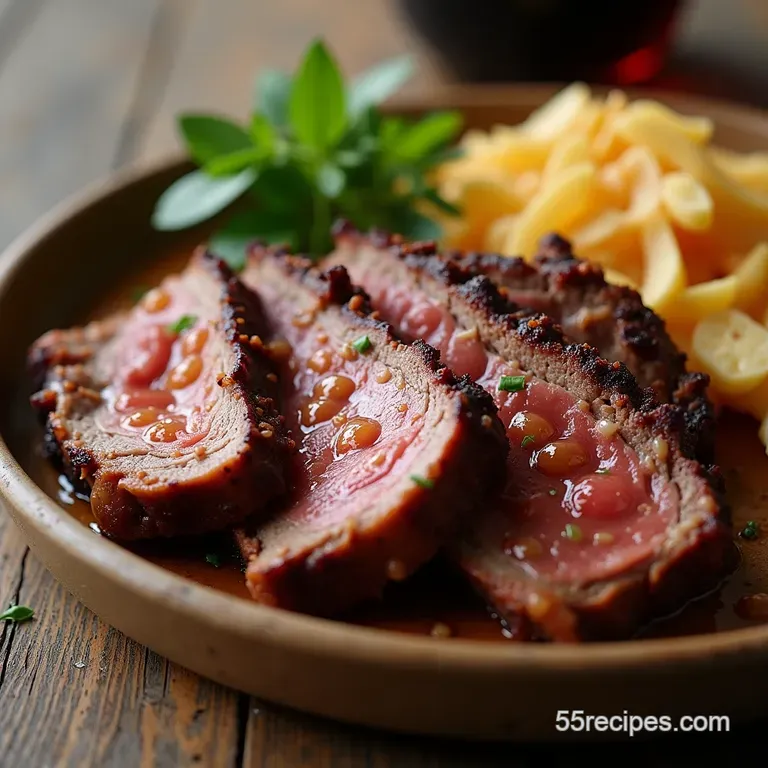
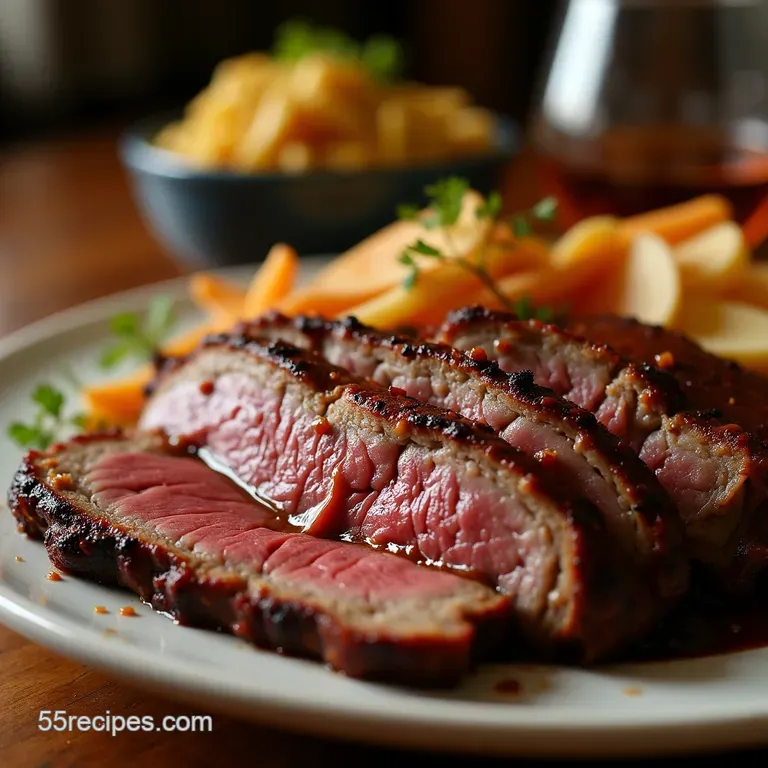
A masterpiece like this brisket deserves exceptional company. Classic pairings cut through the richness beautifully. Consider serving alongside a sharp, creamy homemade coleslaw to provide crunch and acidity, balancing the deep, fatty flavour of the meat.
Equally essential is a side of rich, sharp Cheddar Macaroni & Cheese. For sauce options, keep it simple; serve a sweet and smoky Kansas City style sauce on the side, or opt for a vinegary Texas mop sauce for those who prefer a brighter flavour profile.
Troubleshooting Common Brisket Pitfalls
If your brisket internal temp stalls for an excessive amount of time (more than 10 hours total cook time for a 6lb cut), it likely means you need to wrap it to push past that evaporative cooling phase.
If, after resting, the meat seems slightly dry, it means you cut it too early, or it overshot the desired tenderness temperature. In this case, it needs to be sliced immediately and perhaps tossed with some of the rendered pan drippings.
Nutritional Snapshot of Your Slow Cooked Masterpiece
While brisket is certainly an indulgent meal, when prepared leanly and without heavy sauces, it offers significant nutritional value, primarily high-quality protein. For an estimated serving of the slow cooked meat (pre-sauce), you can expect between 350 to 450 calories, boasting 35 40g of protein.
The fat content varies greatly depending on how diligently you trimmed the initial cap.
Creative Variations: Adding a Smoky Twist to Classic Dishes
Once you’ve mastered the main event, the leftovers are incredible. Shred any remaining meat and transform it into a fantastic brisket sandwich recipe piled high on a toasted brioche bun with pickled onions.
For a heartier second day meal, slow cooked shredded brisket is phenomenal when incorporated into a smoky, robust brisket chili recipe , where its deep flavour only intensifies overnight.
Storing Leftovers and Reheating for Day-Two Glory
Leftovers should be sliced against the grain and stored tightly wrapped in the refrigerator for up to four days. For reheating, avoid the microwave if possible, as it dries the meat quickly.
The best method is to gently reheat slices in a small amount of beef broth (or the reserved pan drippings) on the stovetop over very low heat, or wrapped tightly in foil in a 275° F ( 135° C) oven until warmed through.
Recipe FAQs
My Brisket seems stuck at 160°F should I turn up the heat?
Not a chance! That temperature is known as 'the stall,' and it’s totally normal; it's the moisture evaporating off the surface cooling the meat down, just like sweating. If you crank the heat, you risk drying out that gorgeous bark you’ve worked so hard to build.
Stick to the plan and wrap it tightly in foil or butcher paper (the 'Texas Crutch') to push through that stage.
How long do I absolutely have to rest this Brisket for, and how do I keep it hot?
The rest is non-negotiable think of it as the final, crucial cooking step! You need at least one hour, but two to three hours is the absolute sweet spot for maximum juiciness.
Wrap it securely in its original foil/paper, place it in an empty, clean cooler, and wrap a couple of old towels around it; the insulation will keep it spot on until serving time.
What exactly does "slice against the grain" mean, and why is it so important?
Brisket is made of two muscles, the flat and the point, which often run in different directions, so you must check both! Slicing "against the grain" means you cut perpendicular to the direction the muscle fibres run.
If you slice parallel to the grain, you end up with long, chewy strands nobody wants a tough mouthful when they’re expecting melt-in-the-mouth bliss!
Can I cook this brisket ahead of time, and how should I reheat it later?
Absolutely, this beef is often better the next day once the flavours have settled in. Once fully cooked and rested, slice the brisket, then place the slices into a sturdy container, pouring a little beef broth or au jus over the top (don't drown it).
Reheat gently, either tightly wrapped in foil in a 275°F (135°C) oven or in a slow cooker on low, until heated through without boiling it.
My rub turned out too salty; can I still salvage the meat?
If you’ve already applied the rub and it tastes far too salty, try patting off some of the excess before it goes into the heat. If you’re using the oven braising method, adding extra, unsalted liquid like plain water or extra broth to the pan will help dilute the saltiness as it cooks.
For future attempts, always go easy on the salt; you can always add more sauce later!
Ultimate Oven Brisket