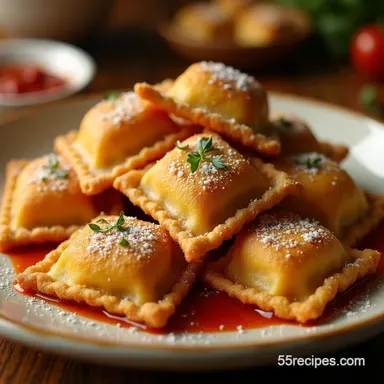
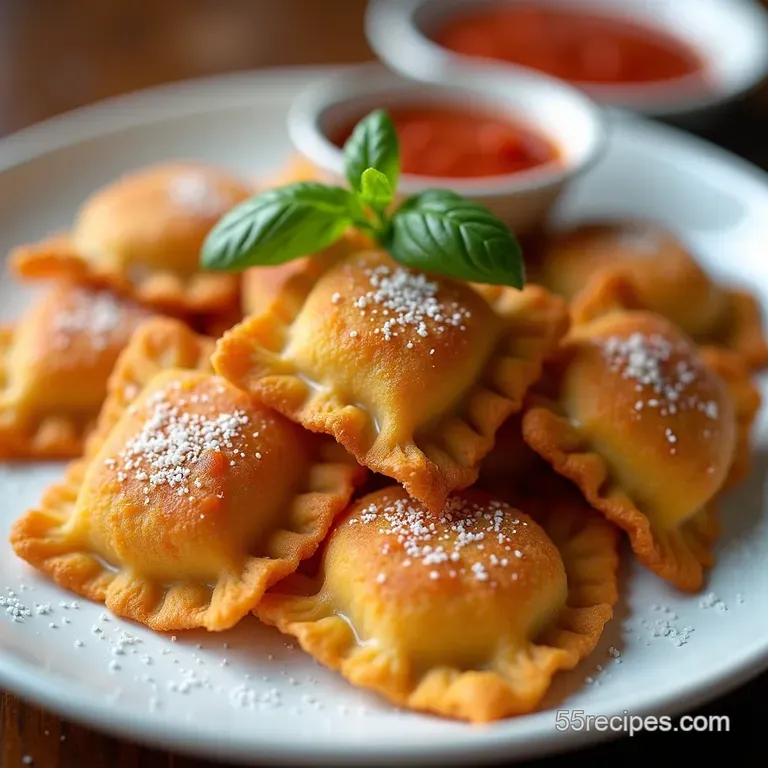
The Golden Pockets Crispy Cheesy Deepfried Ravioli with Marinara Dipping Sauce
- Beyond the Mozzarella Stick: Elevating Comfort Food with Deep Fried Ravioli
- Why These Golden Pillows Are Your New Go-To Appetizer
- Assembling the Components for Stellar Deep Fried Ravioli
- The Step-by-Step Guide to Frying Success
- Mastering the Heat: Techniques for Perfect Golden-Brown Deep Fried Ravioli
- Customizing Your Crunch: Variations and Flavor Boosts
- Recipe FAQs
- 📝 Recipe Card
Beyond the Mozzarella Stick: Elevating Comfort Food with Deep Fried Ravioli
Right then! Deep fried ravioli. Now we're talking proper comfort food, aren't we? It’s like a little hug in a golden, crispy package. Forget those tired old mozzarella sticks; this is where it’s at.
We’re crafting beautiful, plump little pillows of joy that achieve the perfect marriage of shatteringly crisp exterior and molten, savory interior. This Best Deep Fried Ravioli Recipe transforms humble pasta pockets into an irresistible centerpiece for any gathering.
Why These Golden Pillows Are Your New Go-To Appetizer
There's a magic inherent in transforming something soft and delicate like fresh pasta into something aggressively crunchy. This Deep Fried Ravioli appetizer hits all the right notes: it’s familiar, deeply satisfying, and surprisingly elegant when executed properly.
The Irresistible Allure of Crispy Italian Delights
What separates fantastic fried pasta from the merely adequate is texture and temperature contrast. When you bite into perfectly executed Deep Fried Ravioli , you get the audible crunch of the breadcrumb shell, followed immediately by the soft, yielding pasta, and finally, the burst of warm, flavorful filling.
It’s a multi sensory experience that few other appetizers can match. This technique works whether you’re starting with Homemade Deep Fried Ravioli or using high-quality store-bought discs.
Setting the Stage: What Makes This Recipe Superior?
Our approach focuses heavily on minimizing sogginess and maximizing structural integrity. The secret lies in the chilling process and the quality of the dredging mixture. We utilize a three stage coating system designed to seal in moisture while offering maximum surface area for crunch.
On top of that,, by ensuring our filling (we'll focus on a classic ricotta and spinach blend) is drier than standard, we drastically reduce the risk of blowouts during the frying process.
This detailed methodology is what elevates this from a quick snack to the Best Deep Fried Ravioli Recipe you’ll ever follow.
A Taste Transformation: From Freezer Aisle to Golden Perfection
While it’s tempting to grab a bag of frozen ravioli and toss them into the fryer, the results are often uneven, resulting in greasy shells and underheated centers. By controlling the process whether you choose to make your Deep Fried Ravioli stuffed pockets from scratch or carefully prepare pre-made ones you control the outcome.
If you are looking for a lighter approach, exploring an Air Fryer Deep Fried Ravioli method is a worthwhile adventure, though it requires precise timing to achieve the same level of crispness we get from proper immersion frying.
Assembling the Components for Stellar Deep Fried Ravioli

Creating the perfect fried ravioli is less about the frying itself and more about the preparation leading up to it. We need three perfectly calibrated elements: the core filling, the armor (breading), and the heat source.
Selecting the Perfect Ravioli Filling (Cheese vs. Meat)
For this foundational recipe, we focus on a classic Whole Milk Ricotta and Spinach filling. The key here is drainage. Ricotta holds a significant amount of moisture, which becomes steam and steam is the enemy of a crisp shell. You must press your ricotta thoroughly to remove excess whey.
If opting for a meat filling, ensure your cooked sausage or ground beef is drained completely of all rendered fat before mixing with binders and seasonings. A well seasoned, firm filling is essential for Crispy Deep Fried Ravioli .
Crafting the Ideal Crispy Dredge: Flour, Egg, and Breadcrumb Ratios
Our breading station is built for maximum adhesion and crunch. We start with a light dusting of seasoned flour this provides a dry surface for the egg wash to cling to. Next, the egg wash (three eggs lightly beaten with a splash of water) acts as the glue.
Finally, we use Panko breadcrumbs over standard fine breadcrumbs. Panko’s larger, irregular flakes absorb less oil and crisp up into a superior texture. Seasoning these layers adequately ensures that the exterior isn't bland; a little salt and pepper mixed directly into the flour and Panko makes all the difference.
Necessary Apparatus: Tools for Achieving Maximum Crunch
While you can make Deep Fried Ravioli without breadcrumbs using a simple flour and water batter, the results are often thicker and less appealing. For the classic look, you absolutely need a heavy bottomed pot or dedicated deep fryer.
Most critically, you need a reliable deep fry thermometer. Guessing the temperature guarantees a mediocre result, either resulting in undercooked centers or overly dark, greasy exteriors.
Related Recipes Worth Trying
- Crispy Oven Fried Potatoes Proper PubStyle at Home — Forget the chippy Get proper crispy oven fried potatoes like your favorite pub Easy healthier oven baked fries are a cinch with this simple trick
- Crispy Fried Ribs My Chippy Tea Take on Cantonese Style — Forget boring ribs My Crispy CantoneseStyle fried ribs recipe brings chippy tea vibes to a whole new level Crispy moreish ready in under 4 hours Get the recipe
- Stuffed Pizza Supreme The Ultimate Deep Dish Delight — Forget takeaway This stuffed pizza recipe is a showstopper Think Chicago deepdish but BETTER Easy homemade pizza guaranteed to wow Get the recipe now
The step-by-step Guide to Frying Success
The assembly of the ravioli itself, ensuring those seals are perfect, is perhaps the most labor intensive part if you are making them from scratch. Once assembled and chilled for at least 30 minutes, the transformation process begins.
We move through the breading process methodically, ensuring each piece is fully coated before it meets the hot oil. Remember to work in small batches through the entire frying stage to maintain oil temperature consistency.
Mastering the Heat: Techniques for Perfect Golden Brown Deep Fried Ravioli
This is where technique separates the novice from the expert. Success hinges on temperature control and speed.
Preparing the Ravioli for Their Hot Oil Baptism
Handle the breaded ravioli gently. If they have been sitting too long, the moisture from the filling can start to seep into the breading, creating soft spots. If you are making a large batch, keep the un-fried pieces resting on a tray in the refrigerator until you are ready to drop them in.
This chilling phase prevents the exterior from over browning before the inside has heated through, which is key for an Easy Deep Fried Ravioli experience that doesn't leave you waiting forever for them to cook.
Achieving the Ideal Oil Temperature for Non-Greasy Results
The target temperature for achieving Crispy Deep Fried Ravioli is consistently 350° F ( 175° C) . If the oil is too cool, the breading absorbs the fat before it sets, resulting in a heavy, greasy product.
If the oil is too hot, the exterior burns instantly, leaving the cheese filling barely warm. Using a reliable thermometer is non-negotiable for this stage of the Deep Fried Ravioli recipe .
The Quick Fry Cycle: Ensuring the Filling Stays Warm and the Exterior Stays Crisp
Once the oil is stabilized, introduce the breaded ravioli in small batches no more than five or six at a time in a standard 3-quart pot. Overcrowding causes the oil temperature to plummet, leading to that aforementioned sogginess. They will cook rapidly, usually in about 90 seconds to two-and-a-half minutes.
You are looking for a deep, even golden brown color. Turn them once gently halfway through the process to ensure even coloring on both sides.
Post Fry Rituals: Draining and Immediate Seasoning
As soon as they hit that perfect golden hue, use a spider or slotted spoon to lift them directly from the oil. Do not shake them over the pot, as this sends oil splatter everywhere. Immediately transfer them to a wire rack placed over a baking sheet lined with paper towels.
Place them on the rack, not directly on the paper towels, to allow air circulation underneath this prevents the bottom from steaming and losing its crispness. While they are still piping hot, hit them immediately with a light dusting of fine sea salt. This small step enhances the flavor profile significantly.
Customizing Your Crunch: Variations and Flavor Boosts
Once you master the classic cheese version, the culinary world of fried pasta opens up completely. Think of the breaded ravioli as a blank canvas for bold flavors.
Finding Flavor Pairings: The Ultimate Dipping Sauce Portfolio
While the classic pairing is a bright Marinara, the richness of the fried pasta benefits from acidity or creaminess. A robust, slightly chunky dipping sauce is preferred to thin, watery sauces.
The bright, quick blender sauce detailed in the recipe outline provides the perfect counterpoint, cutting through the richness of the fried coating.
Troubleshooting Common Frying Issues (Soggy or Burnt)
Soggy results almost always trace back to insufficient oil temperature or overcrowding the pot. If your ravioli are burning on the outside but remaining cold inside, your oil is definitely too hot, or your ravioli were too warm going in.
The solution is patience: let the oil recover its temperature between batches, and ensure your initial components are thoroughly chilled.
Making Ahead: Storage Tips for Leftover Fried Delights
Frankly, Deep Fried Ravioli are best enjoyed the moment they leave the fryer; their texture degrades quickly as steam redistributes within the breading. If you must make them ahead, the best strategy is to undercook them by about 30 seconds, drain them completely, and store them in a single layer on a tray in the refrigerator.
To reheat, a quick blast in a 400° F oven or air fryer (about 5- 7 minutes) will crisp them up beautifully without re-greasing them. Never store them at room temperature if you want that satisfying crunch.
Creative Filling Swaps for Next Level Appetizers
To take your Deep Fried Ravioli repertoire further, explore Italian inspired flavor combinations within the filling. Consider finely minced sun-dried tomatoes mixed with mozzarella and basil, or perhaps a blend of sharp Gorgonzola and caramelized onions.
If you enjoy spice, blending spicy ’nduja sausage into a creamy cheese base offers an incredible savory depth that pairs wonderfully with the crunch.
The Essential Tang: Recipes for Robust Marinara Companions
To truly complement these golden bites, ensure your dipping sauce has enough acid. A standard Marinara works well, but consider adding a small splash of good quality red wine vinegar to your sauce just before serving.
This hint of tang cleanses the palate between bites, making you reach for another perfect, Crispy Deep Fried Ravioli pocket almost immediately.
Recipe FAQs
What's the secret to getting perfect, crispy Deep Fried Ravioli that doesn't get soggy?
The secret lies in temperature control and ensuring your ravioli are bone dry before breading! Make absolutely sure your oil stays steady at 350°F (175°C); if it’s too cool, they’ll absorb oil and turn soggy.
Also, use Panko breadcrumbs, as their larger structure gives you that superior, light crunch we’re after.
My ravioli keep bursting open in the fryer! What am I doing wrong?
Nine times out of ten, this is caused by air pockets trapped inside the pasta when you sealed them, or by frying them when they are too warm. When pressing the dough together, be meticulous about squeezing out every bubble of air.
Chilling the sealed and breaded ravioli for at least 30 minutes beforehand also helps the exterior set, locking the filling safely inside.
Can I bake these instead of deep frying them? I’m trying to be a bit healthier.
You certainly can give them a go in the oven, though they won't have that authentic, shatteringly crisp texture. If you bake them, you must spray the breaded ravioli liberally with oil, bake them on a wire rack over a baking sheet at 400°F (200°C), and flip them halfway through until they are golden.
They make a decent, lighter alternative!
Can I make these ahead of time, and if so, how should I store leftovers?
You can prepare and bread the ravioli entirely ahead of time and keep them on a tray in the fridge for up to 24 hours just don't fry them until you are ready to serve. If you have leftovers, they are best eaten fresh, but you can reheat them in an air fryer or a hot oven (around 375°F) for about 5 7 minutes to re-crisp the coating.
What’s the best type of cheese filling to use for this recipe?
The recipe uses a classic ricotta and spinach mix, which is heavenly when it melts. Whichever cheese you use, make sure the ricotta is well drained excess moisture is the enemy of crispness!
If you prefer a bolder flavour, try swapping half the ricotta for well drained, firm goat cheese or some finely grated Provolone.
Crispy Deep Fried Ravioli