The Perfect Pilaf Foolproof Fluffy White Rice Every Single Time
- Decoding the Myth: Why Your Previous Attempts Failed
- The Essential Foundation: Mastering Basic White Rice Texture
- The Minimalist Toolkit: What You Absolutely Need
- The Absorption Technique: Step-by-Step Cooking Mastery
- Achieving Peak Fluffiness Through Post-Cook Conditioning
- Troubleshooting Common Kitchen Catastrophes
- Recipe FAQs
- 📝 Recipe Card
Decoding the Myth: Why Your Previous Attempts Failed
It’s an almost universal kitchen truth: mastering something as seemingly simple as White Rice can feel like chasing a ghost. One day, you achieve ethereal fluffiness; the next, you’re scraping a solidified starch brick from the bottom of your pan.
The core reason most home cooks struggle with this staple is overcomplication and interference. People tend to rely on guesswork about the white rice to water ratio , they stir the pot too frequently, or they succumb to the temptation to check on the simmering process.
This interference releases steam the very mechanism required to perfectly cook the grain leading to unevenly cooked, sticky results. We are going to bypass those pitfalls entirely by focusing on a precise, hands off absorption method that guarantees success, delivering the perfect foundation for any cuisine you desire.
The Essential Foundation: Mastering Basic White Rice Texture
The ultimate goal when preparing this staple is to ensure each individual grain is tender, fully cooked, and separate from its neighbours. This distinct texture elevates any dish it accompanies, transforming a simple plate into something far more satisfying.
Achieving this isn't about high heat or fancy gadgets; it's about controlling moisture exchange.
Setting the Stage for Starch Separation
The first, non-negotiable step in any successful white rice recipe involves addressing the exterior of the grain. Raw white rice grains are coated in loose surface starch. If this starch remains in the cooking water, it dissolves, binding the grains together in a gluey mass.
By implementing a thorough rinsing ritual, we wash away this superficial layer, allowing the water inside the pot to focus solely on gelatinizing the starch within the grain, leading directly to fluffy separation.
Why This 'No Fuss' Method Outshines Pressure Cooking
While appliances like the white rice instant pot offer speed and consistency, they operate under immense pressure. This forces water into the grain rapidly, sometimes resulting in grains that are mushy on the outside but still slightly firm in the centre if the timing is off by even a minute.
The traditional stovetop absorption technique, when executed correctly, uses gentle, consistent low heat and steam a much more forgiving environment for achieving perfectly plump, distinct grains of White Rice .
It is the time tested, quintessential white rice on stove approach.
Defining the 'Perfect Fluff' Benchmark
What does success look like? A perfect batch means that when you gently prod the surface, you can see individual, elongated grains. They should be soft enough to chew easily but retain a slight structural integrity they should not mash under light pressure.
This ideal texture is the benchmark for what is the correct way to cook rice , ensuring it complements rich sauces rather than dissolving into them.
The Minimalist Toolkit: What You Absolutely Need

You do not require specialized equipment to produce fantastic rice. The beauty of this method lies in its accessibility. What you do need is a medium sized, heavy bottomed saucepan equipped with a lid that fits snugly a tight seal is paramount for trapping steam during the cooking phase.
On top of that,, a fine mesh sieve is mandatory for the cleansing process, and a simple fork will be your tool for the final, delicate aeration.
Precise Measurements: The Water-to-Rice Ratio Revealed
This is where many home cooks falter, relying on vague approximations. For standard long grain White Rice (such as Basmati or Jasmine), the key is precision.
The authoritative white rice to water ratio for this absorption technique is 1 part rice to 1.5 parts water by volume. To answer the common query, how much water to put in 1 cup of white rice ?
You need precisely 1 ½ cups of cold water for every 1 cup of rinsed rice. Deviating significantly from this ratio is the fastest path to either undercooked, hard kernels or an over saturated, sticky mess.
Rinsing Rituals: Eliminating Excess Surface Starch
Take your measured amount of rice let’s aim for 1 ½ cups for a side serving four people and place it into that fine mesh sieve. Run cold water over the rice until the water flowing out from beneath runs almost completely clear. This may require two or three changes of water.
Once drained, let it sit in the sieve for a moment to shed excess liquid before proceeding to the cooking phase.
Essential Cookware Checklist (Beyond the Standard Pot)
While a stainless steel pot is excellent, a heavy bottomed pan is slightly better as it distributes the low heat more evenly, preventing hot spots that can scorch the bottom layer of rice during the simmer.
If your lid is loose, don't panic; you can place a layer of aluminum foil over the pot before settling the lid on top to create a better vapour seal during the critical cooking stage.
Related Recipes Worth Trying
- The Secret to Perfectly Fluffy Mexican Rice Authentic Arroz Rojo — Tired of claggy rice This authentic Mexican Rice recipe uses a simple toasting trick to guarantee fluffy vibrant Arroz Rojo every time Perfect for tacos
- Easy Slow Cooker Stuffed Peppers with Smoky Italian Rice — Meet the Best Slow Cooker Stuffed Peppers recipe Ground beef and rice simmer perfectly for a tender flavourful weeknight meal So easy
- Stop Soggy Rice How Do You Cook White Rice The Fluffy Restaurant Method — Tired of sticky rice porridge Ill show you how do you cook white rice using the simple absorption method Get the perfect fluffy white rice recipe every...
The Absorption Technique: step-by-step Cooking Mastery
With your rice rinsed and your tools ready, we move into the active cooking phase. The process is a sequence of high heat initiation followed by a long, gentle steam. Combine 1 ½ cups of the rinsed rice, 2 ¼ cups of cold water (adhering to the 1:1.5 ratio), ½ teaspoon of fine sea salt, and, if desired for flavour and richness, 1 tablespoon of cold unsalted butter.
Place this mixture over high heat, uncovered. Stir the contents once as the liquid begins to heat up this initial stir ensures even distribution before the starch sets. Wait patiently until the mixture reaches a vigorous, rolling boil across the entire surface.
The moment this happens, your high heat work is done. Immediately reduce the heat to the lowest possible setting a barely perceptible simmer and cover the saucepan tightly. Set a timer for precisely 15 minutes.
Achieving Peak Fluffiness Through Post Cook Conditioning
The next phase is arguably more vital than the cooking itself, determining the final texture and preventing that dreaded clumping often seen in inferior preparations.
The Crucial Initial Boil and Simmer Transition
The transition from a rapid boil to a low simmer must be immediate and total. If your burner retains residual high heat, even on the lowest setting, the rice at the bottom will scorch while the top grains remain uncooked.
If you suspect your low setting is too aggressive, place a heat diffuser underneath the pot for the 15-minute simmering period to moderate the temperature further.
Seal Integrity: The Importance of a Locked Lid
Throughout the 15 minutes of simmering, no steam must escape. The water inside the pot is converting entirely into steam, which circulates around the grains, forcing moisture into the centre to finish the cooking process.
A loose lid allows this steam your cooking engine to escape prematurely, leaving you with a dry bottom and raw top.
The Rest Period: Why You Must Not Peek at Your White Rice
When the 15 minutes elapse, turn off the heat entirely. Do not lift the lid to check the texture. Instead, remove the entire pot from the hot burner and place it on a cool surface, ensuring the lid remains firmly in place for a mandatory 10 minutes.
This post cook rest allows the residual heat to redistribute evenly across the grains and permits the internal structure to stabilize, preventing breakage upon agitation.
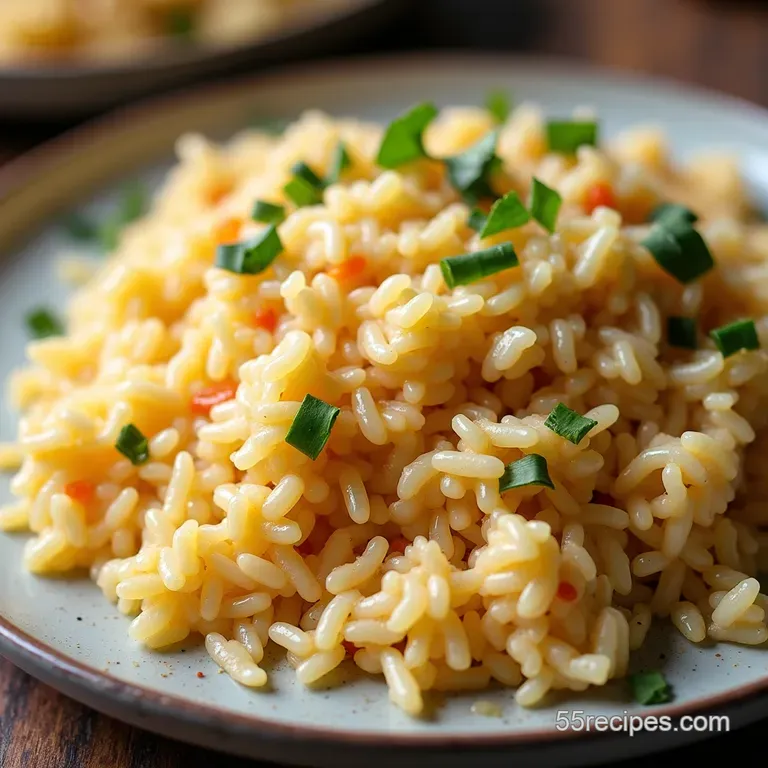
Fluffing Strategy: Forking vs. Spooning
After the 10-minute rest, finally lift the lid. The steam will rush out, revealing perfectly cooked grains. Take a clean, dry dinner fork. Using gentle, upward motions, rake the fork through the rice, working from the outer edge inwards.
This aerates the grains, separating any that might have lightly clung together without crushing them, which a spoon often does. Your staple White Rice is now ready to serve.
Troubleshooting Common Kitchen Catastrophes
Even with the best instructions, mistakes happen. The most frequent issue is that the bottom layer of rice is scorched while the top remains hard. This indicates the heat was too high or the lid seal inadequate during the simmer phase. The fix? Next time, reduce the heat more aggressively or use a diffuser.
If the rice is universally gummy and sticky, you used too much water, or you failed to rinse the starch off adequately before cooking.
Storing Leftovers: Maintaining Quality Overnight
Leftover White Rice is a fantastic resource, but it must be handled correctly. Once cooled slightly (but still warm), transfer it to an airtight container. For best results, refrigerate within two hours.
When reheating, sprinkle a teaspoon of water over the portion you intend to eat and cover it tightly before microwaving briefly; this reintroduces the necessary steam to revive the texture.
Exploring Flavor Profiles: Beyond Plain Rice
While this method delivers perfect plain rice, experimentation is encouraged. To infuse flavour without altering the texture dynamics, consider adding whole spices like one star anise or a bay leaf alongside the rice and water.
Alternatively, to elevate the dish further, lightly toast the dry rice in a tablespoon of butter or oil for two minutes before adding the cold water; this adds a subtle, nutty depth to the final product.
When to Consider Alternatives: A Note on Wild Grains
Understanding the nuances of white rice vs brown rice is also key to kitchen versatility. Brown rice retains its bran layer, meaning it absorbs water slower and requires a longer cooking time and slightly higher water ratio (often 1:2.5 or 1:3).
If you are looking for a substantial boost in fibre and a nuttier profile, exploring white rice nutrition alternatives like brown rice is worthwhile, but remember to adjust the technique accordingly, as the absorption dynamics change completely.
Recipe FAQs
Why is my white rice always coming out sticky and claggy instead of fluffy?
Nine times out of ten, stickiness is down to two things: not rinsing the starch off, or stirring the rice during cooking. Make sure you rinse the grains under cold water until the water runs clear, as outlined in the recipe.
Also, resist the urge to poke it with a spoon once it's simmering; those 15 minutes must be undisturbed!
What's the best way to store leftover cooked white rice, and how long is it good for?
Cool your leftovers down quickly don't leave them sitting on the counter like a cooling cuppa! Store the rice in an airtight container in the fridge, and it should be perfectly fine for about 3 to 4 days.
If you’re feeling organised, you can freeze it in portions for up to a month, ready for a speedy reheat later in the week.
I don't have Basmati; can I use any other type of long grain white rice in this recipe?
Absolutely, Jasmine rice works brilliantly and has a slightly sweeter fragrance, making it a fantastic swap. Just stick to the 1:1.5 water ratio unless the package instructions for your specific brand advise otherwise.
If you switch to short grain, remember you'll need slightly less water, or you’ll end up with something closer to porridge!
My hob runs very hot, even on the lowest setting. How do I stop the rice from burning on the bottom during the simmer?
That's a common kitchen niggle, especially with powerful modern hobs! The trick is heat diffusion. You need to break up that direct heat try placing a metal trivet or an old metal biscuit cutter (the heat diffuser mentioned in the tips) between the burner and the bottom of your saucepan.
This lowers the overall temperature hitting the base significantly.
Does the resting time after cooking really make that much difference to the final texture of the white rice?
It’s non-negotiable, mate! Those final 10 minutes off the heat, while the lid stays firmly on, are crucial for allowing the residual steam to redistribute evenly throughout the grains.
It firms them up and ensures they are separate rather than damp think of it as letting the roast potatoes settle before you serve them!
Fluffy White Rice Recipe

